Latest Version
Version 1.28
Release Date: 21 May 2025
Installation
First, download StarUML application from starum.io.
Steps to install the odoo addon generator extension on StarUML:
Get an extension as a .zip file, you may obtain it here or at the Odoo marketplace website.
Extract the file on the extensions path:
- /Users/<user>/Library/Application Support/StarUML/extensions/user for Mac OS.
- C:\Users\<user>\AppData\Roaming\StarUML\extensions\user for Windows.
- ~/.config/StarUML/extensions/user for Linux.
Check a folder in the extensions path and main.js file in the folder.
Restart StarUML.
Steps to uninstall an extension:
Go to the extensions path.
- /Users/<user>/Library/Application Support/StarUML/extensions/user for Mac OS.
- C:\Users\<user>\AppData\Roaming\StarUML\extensions\user for Windows.
- ~/.config/StarUML/extensions/user for Linux.
Remove the extension folder to uninstall.
Restart StarUML.
Configuration
In StarUML, Click Tools > Odoo > Configure to set your addon setting
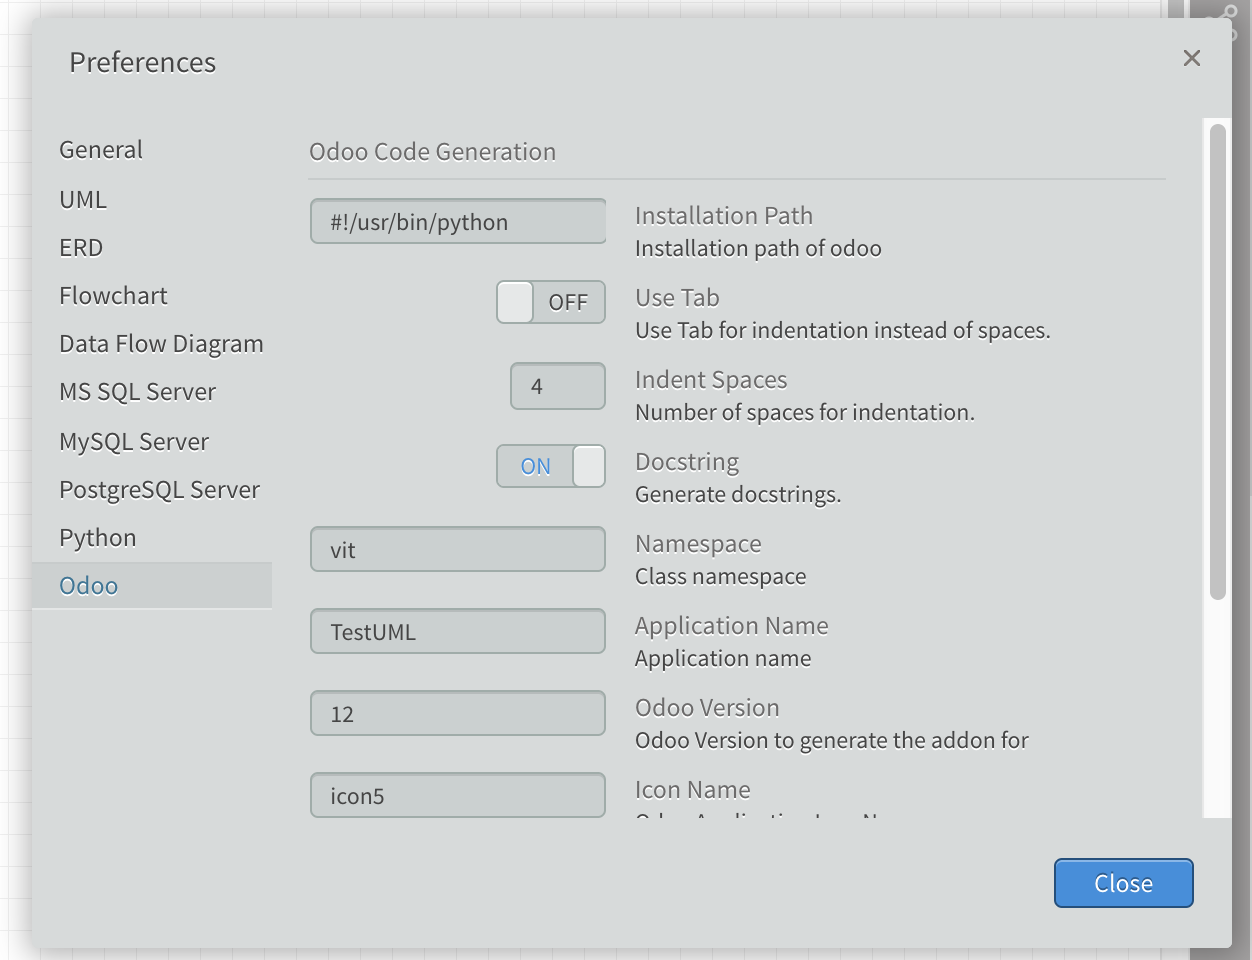
- Namespace: is your class namespace
- Odoo Version: what version of Odoo you want to generate the addon for, example 10, 11, 12, 13, 14, 15, 16, or 17
- English Language: check for English grammar for One2many and Many2many fields by adding "s" after the field label name
- Docstring: Yes or No to wether generate to documentation string on your class or not
- Installation Path: your python installation path (optional)
- Use Tab: whether you want to use Tab character instead of spaces on your python indentation
- Indent Spaces: number of indent spaces on your python code.
Addon Name
Diagram name will be treated as the addon folder name. You may have more than one diagram on a single StarUML file, and choose which diagram to convert at the generation process.
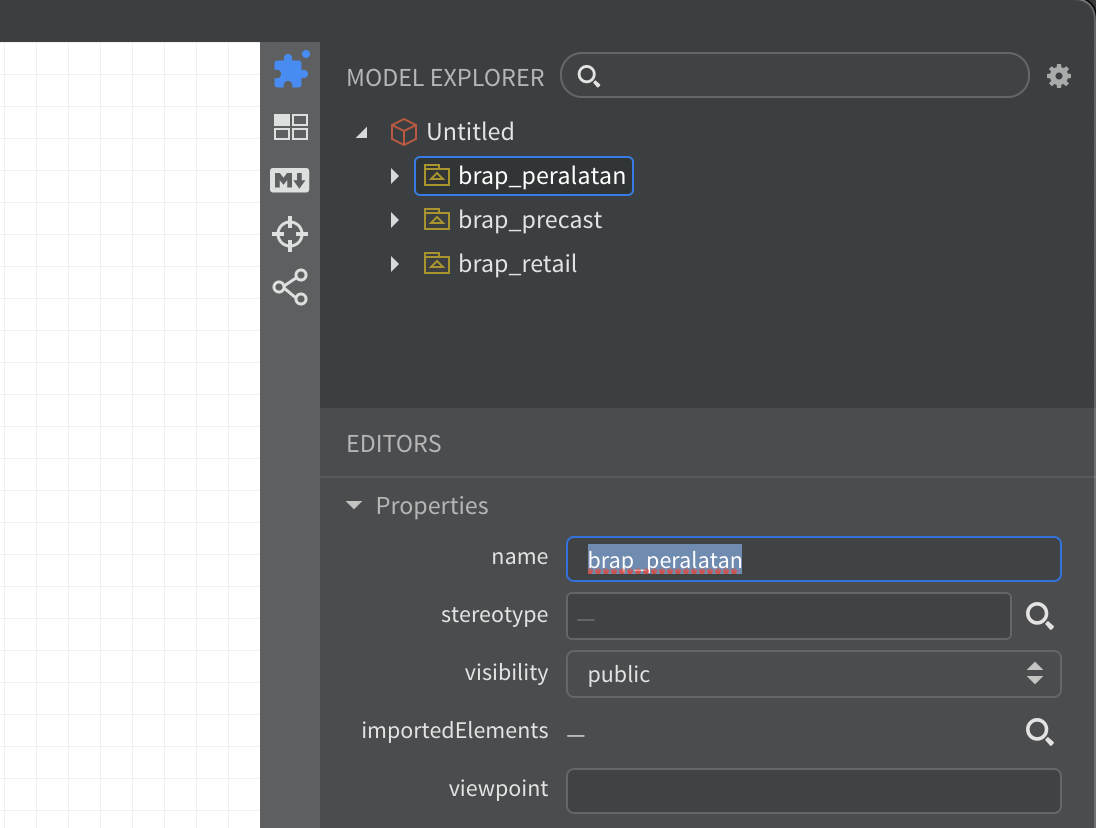
Specify the diagram name on the Properties - name box on your class diagram.
You may add more class diagram from the menu: Model - Add Diagram - Class Diagram.

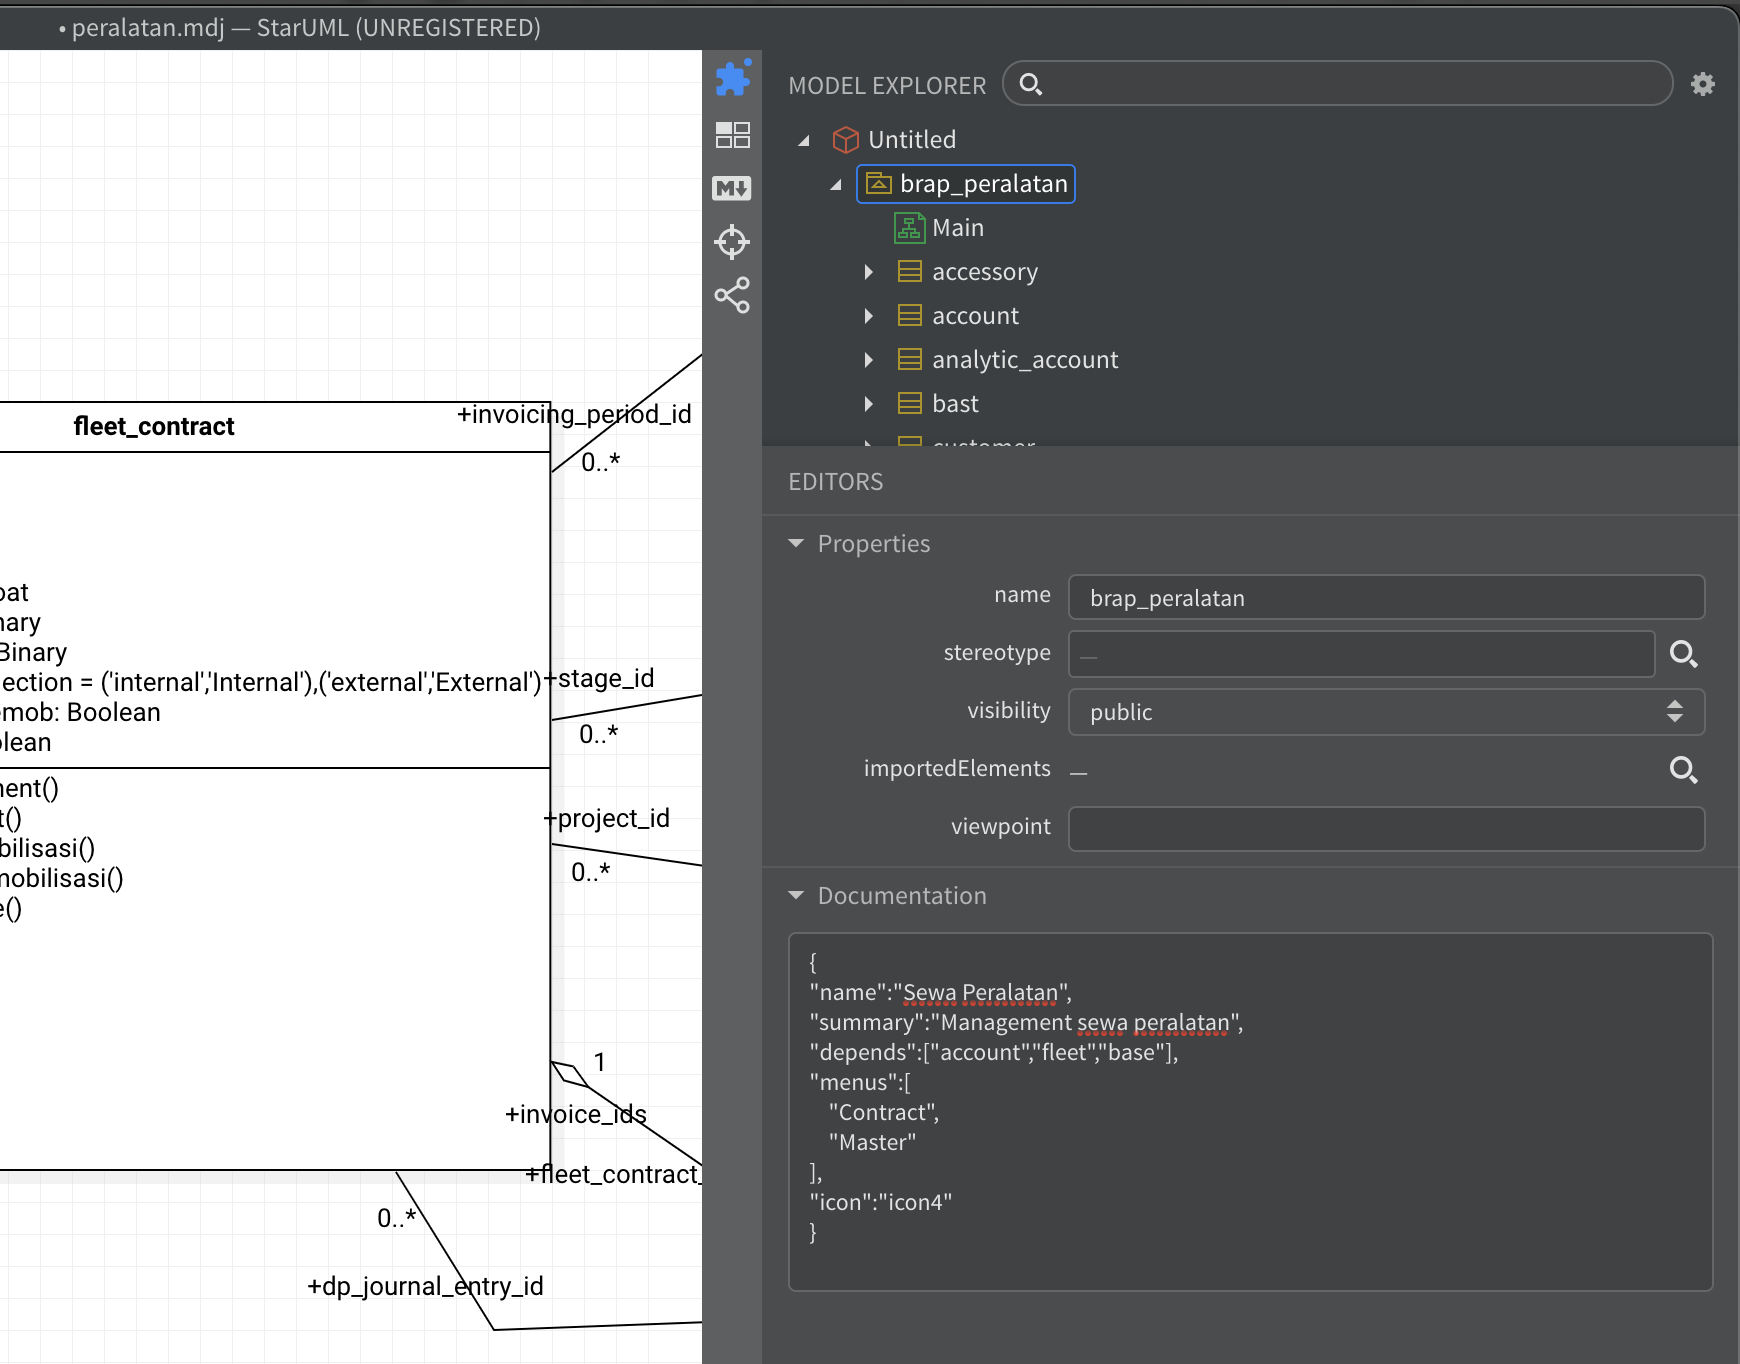
Addon Manifest
The Class Diagram Documentation box can contain JSON format information for specifying Manifest file.

The JSON format example:
{
    "depends":["base", "hr" , "xedu_common"],
    "name":"xEduPSB Application",
    "summary":"xEdu PSB module",
    "description":"xEdu PSB module module generated by StarUML Generator",
    "version":"2.0",
    "icon":"icon2"
}
All keys defined here will replace the default Manifest data for the addon.
JSON key "icon" is a special key to define the application icon. Available icon code is 1 to 10.
JSON key "menus" is also special key to define the application menu. See below.
Application Menu
By default, the generator will create Operation menu and Configuration menu under the application menu.
For example if you define the application name as "MyApp" then it will create this menu structure:
MyApp
Operation
Configuration
All classes with "state" or "stage_id" field will be placed under the Operation menu, and other classes will be under Configuration menu.
We can configure the application menus. On diagram Documentation box, define the menus in JSON list format for your application, eg:
It will generate menu items with XML id: <your_applicaiton>_menu_<sequence>, where sequence is starting from 1,2,3... etc.
Then, on the class Documentation box, define the menu id, in which this class will be placed under, eg:
It will place the class under menu with seq 1.
Put the 0 value to hide this class from any menus.
Once again, classes with no menu defined will be placed under Operations menu if it has state field, or under Configuration menu it it has not.
Valid keys on the diagram documentation box are:
parent_menu:menu_id to set application parent menu to an existing Odoo app menu, or leave blank to set it on top menu.
name:
summary:
depends:
icon:
Example:
{
"name":"Loan Management",
"summary":"Management loan",
"depends":["account","base","hr","account_accountant"],
"icon":"icon8",
"parent_menu":"account_accountant.menu_accounting"
}
Odoo Model Name

- Odoo object name is automatically generated from "namespace" and "className", eg "my_addon.my_object"
- On class inheritance, you may force you Odoo object name to be different from your UML class name by adding an attributed called _name on the class and set the name on _defaultValue field, eg "res.partner".
- This _name attribute is mandatory if you inherit your Odoo object from another Object
- If the object is inherted from other Odoo object, create an attribute called _inherit and _name
- The parent object name is set on defaultValue field, e.g "res.partner"
Model Attributes
We can set the appearance of a class on our application by specifying the class attributes. Some of the valid keys on the class documentation box are:
- label:string set the class label on menu, or using sentenceCase of the class name
- menu:menu_id class menu
- sequence:integer to set the ordering sequence, put 'sequence' key on the class docs
- context: context dictionary string, to add the context on class action window
- domain: domain syntax string, to add the domain on class action window
- prefix: sequence number prefix if defined, or first three letters capitalized of model name
- first_view_mode: "kanban", to specify the default view mode to "kanban", or else it will be "tree,form,kanban,..."
For example:
{
    "label": "SCF Data",
    "menu":"account.menu_admin",
    "sequence":1,
    "context":"{'group_by':'stage_id'}",
    "domain":"[('stage_is_draft','=',True)]"
}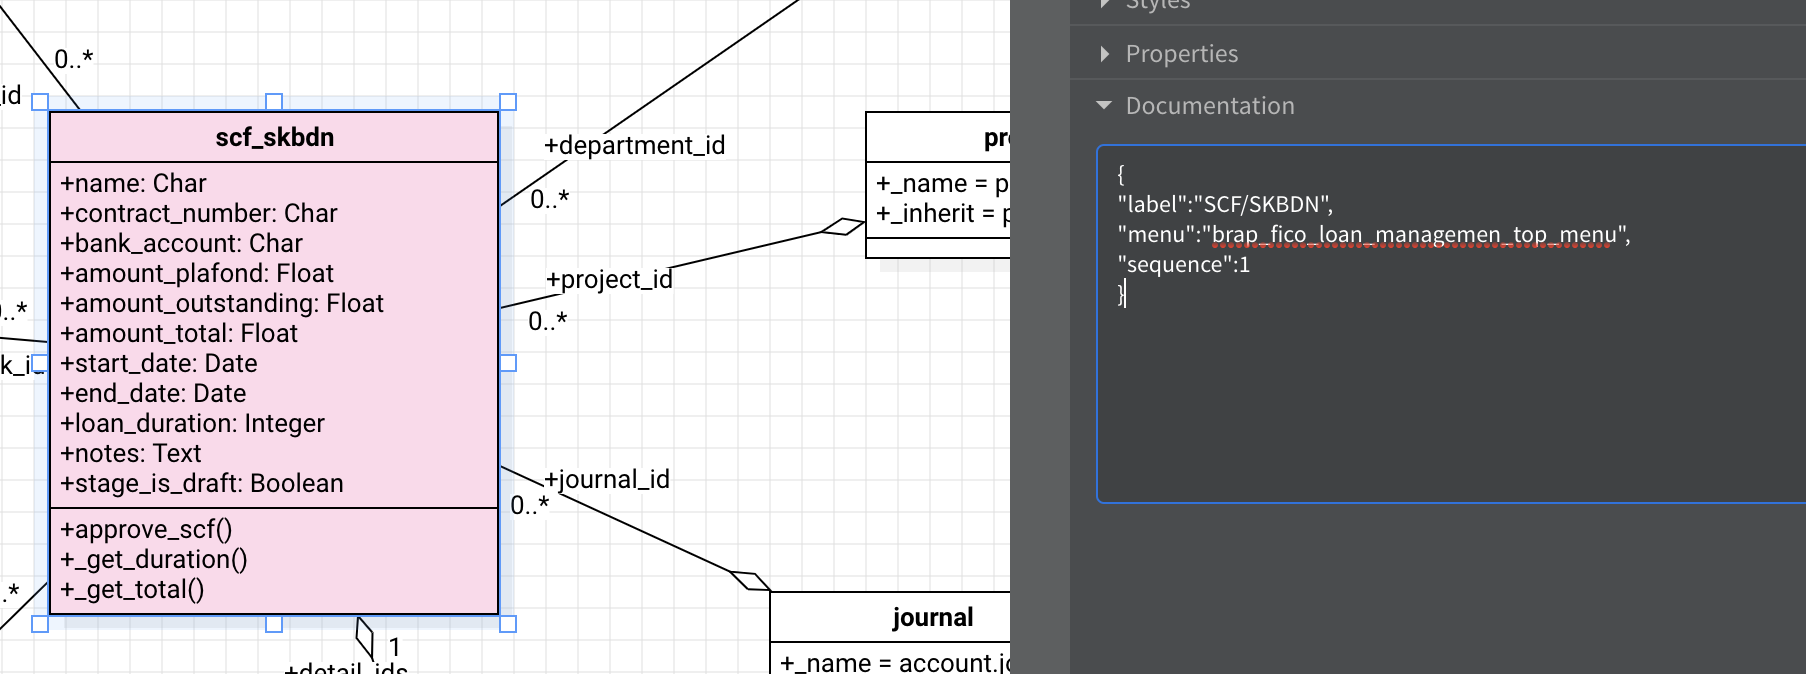
Odoo Model Attributes
Addional class Documentation key "odoo_attributes" containing any valid attributes for Odoo class, eg: _order, _rec_name, etc.
If a field with sequence name exists, then _order key is appended with "sequence asc".
For example:
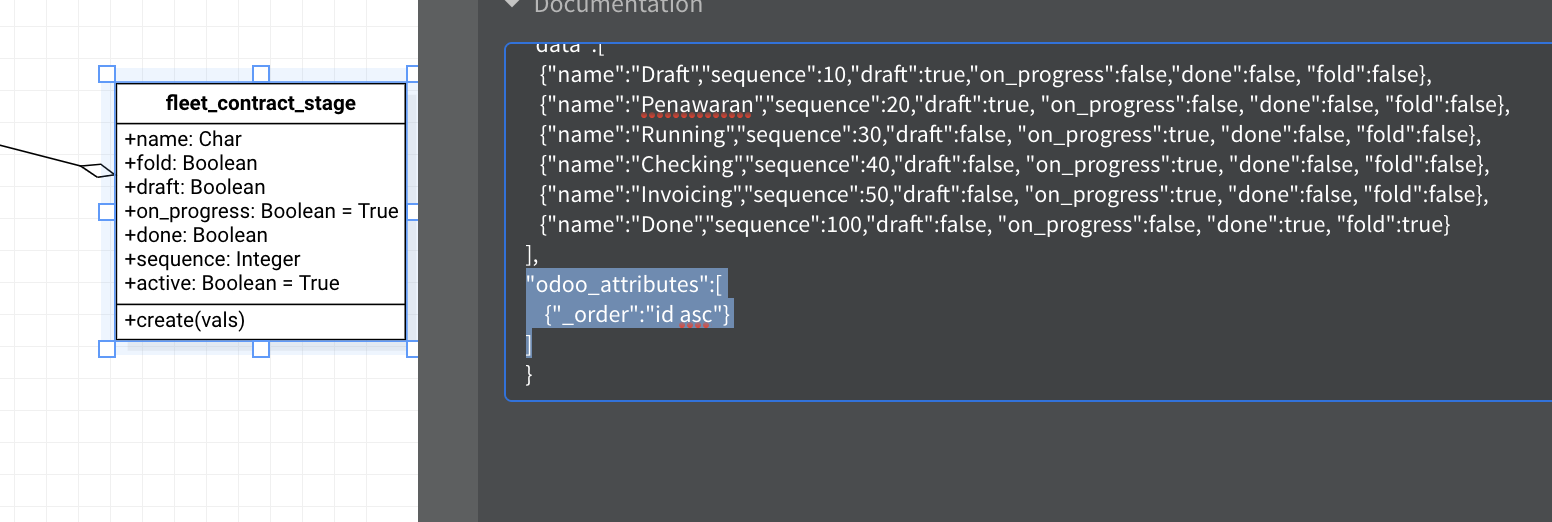
This will generate Python code:
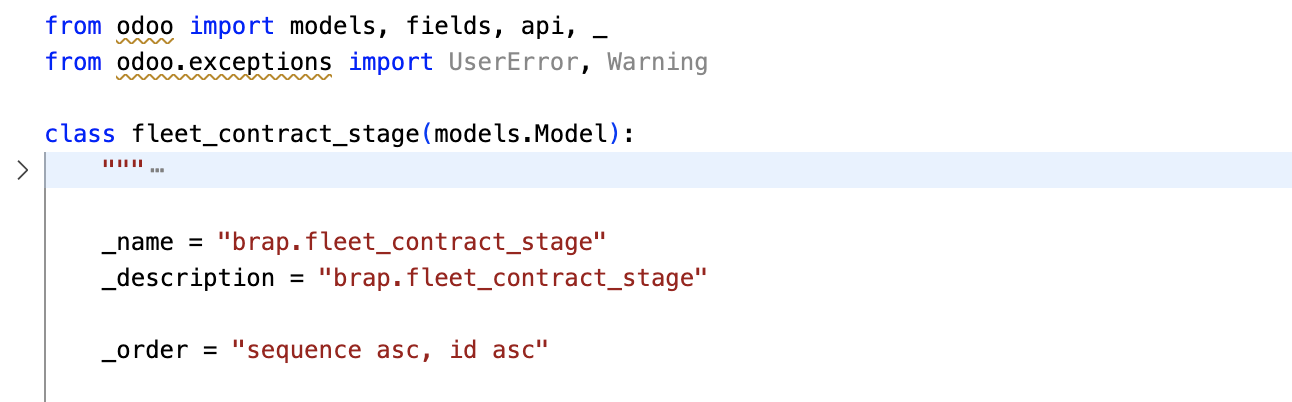
Here, we got:
_order = "sequence asc, id asc"
because we define the _order key on odoo_attributes key and we have the sequence field on that class.
Valid model attributes:
- all odoo model attributes, eg _order, _rec_name, _etc
- inhert_mail: true|false, to define whether the model will be inherited from mail.mail and mail.mixin to utilize the messaging features
- data: list, to define the initial records on this model to be inserted upon addon installation
- imports: list, to define additional Python libraries to be imported at the class definition
Model Inherited from mail.thread
To be able to utilize the messaging, tracking value changes of an object, then inherit your class from mail.thread by simply adding "inherit_mail" key option to the Class Documentation.
For example:
{
"inherit_mail":true
}
This will make the generator add inherit line from mail.thread and mail.mail.activity.mixin for us to be able to get additional fields required to do messaging and notification stuffs for the object, and also add the chatter box on the XML form.
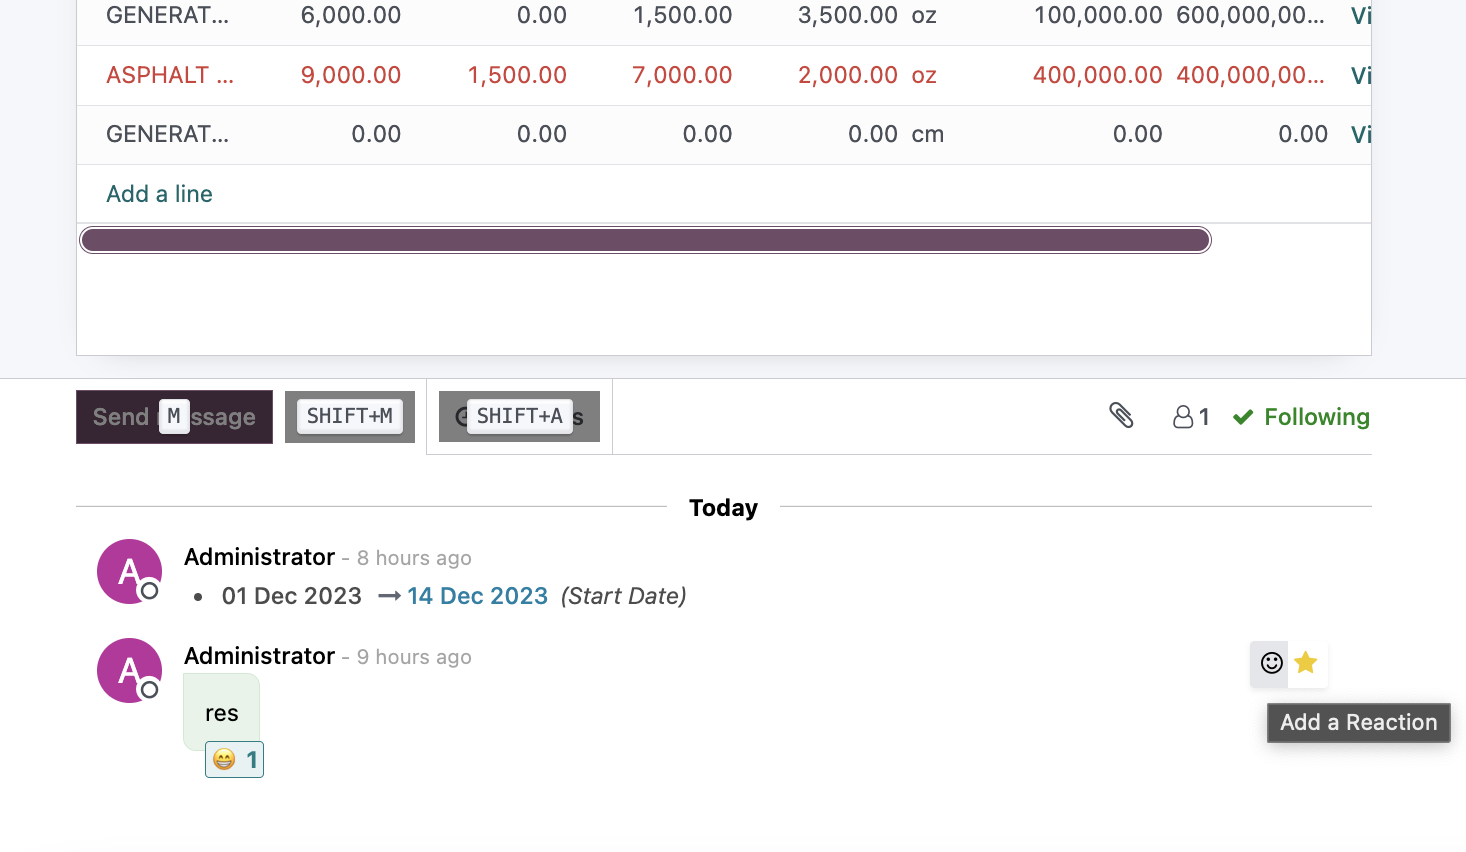
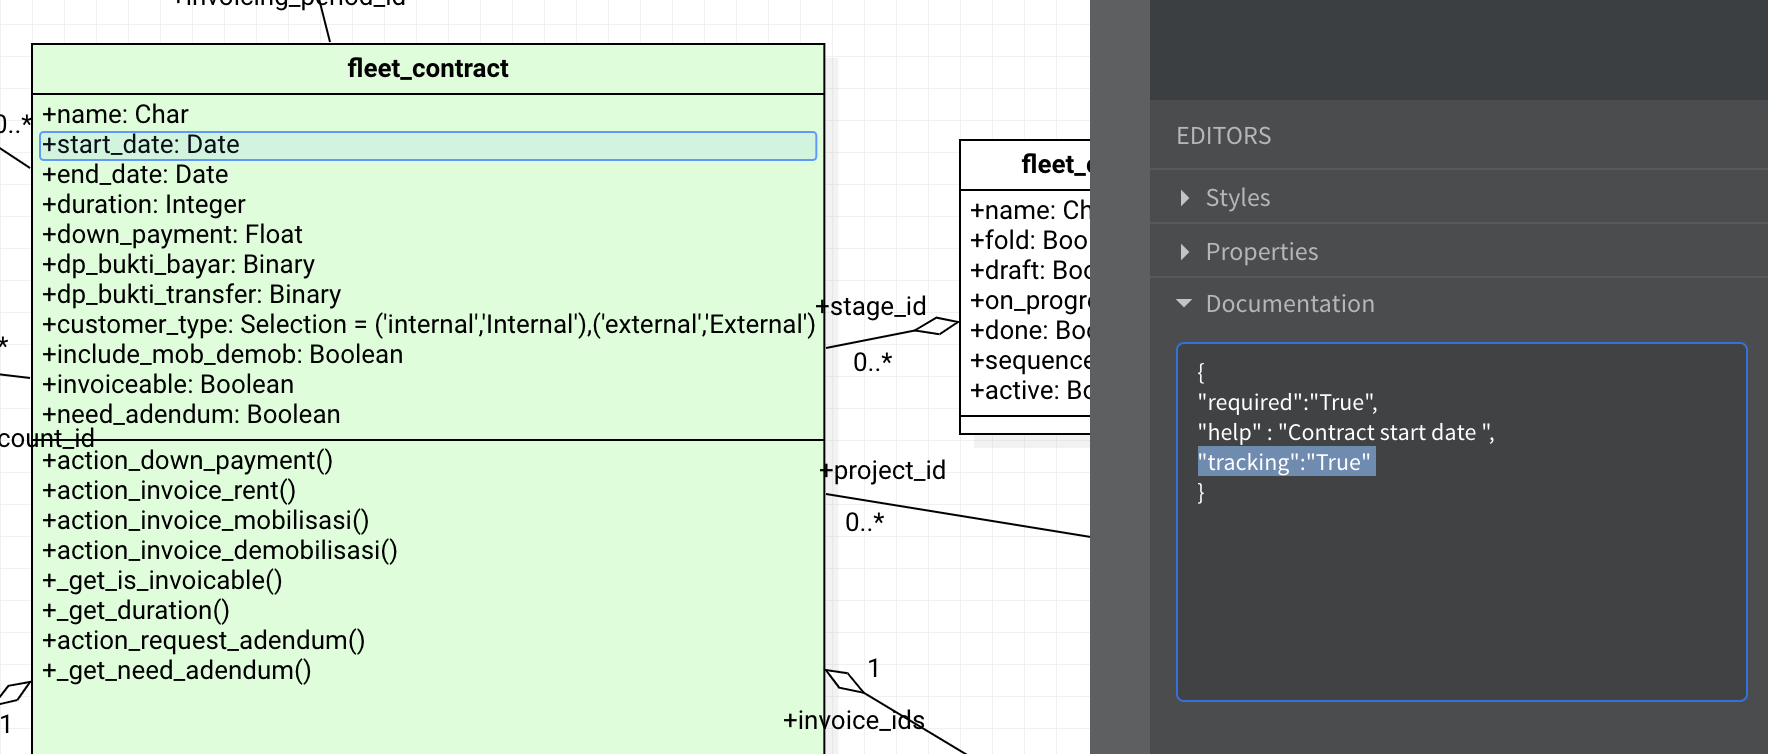
To select which fields will generate the notification on the chatter box, simply add "tracking" to True or "track_visibility" option at the field Documentation box JSON data.
For example, the above form is tracking the Start Date field, so we must add the tracking = True to the start_date field like below:
Model Initial Data
To insert records as initial data on an object, put the definition on the class Documentation box is JSON format, for example:
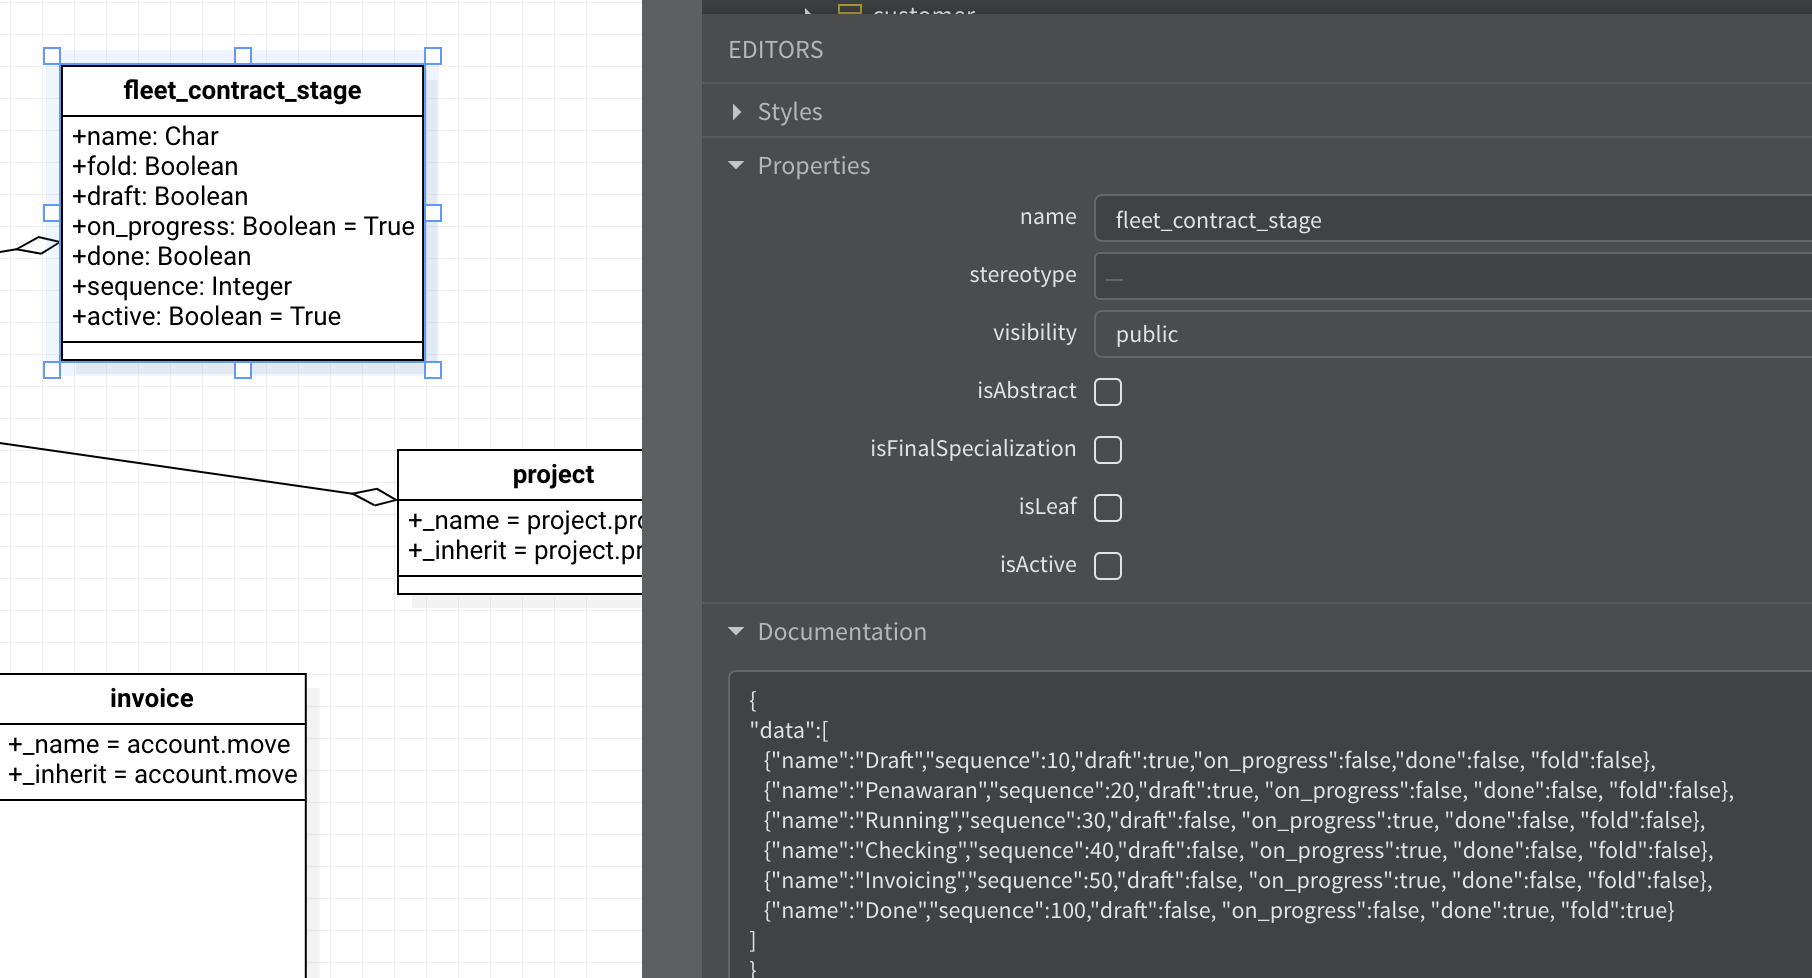
Data will be generated as CSV file with header: "id", "name", and other fields defined on the JSON data.
There are two ways to define the format:
JSON list of values:
eg ["Abby", "Jane", "John"].
It will generate the CSV file with only "id" and "name" field.
JSON list of object:
eg [{"name":"Abby", "age":10} , {"name":"Jane", "age":20}, , {"name":"John", "age":30}, ]
It will generate the CSV file with "id", "name", and "age" fields, and all other fields defined on the JSON object.
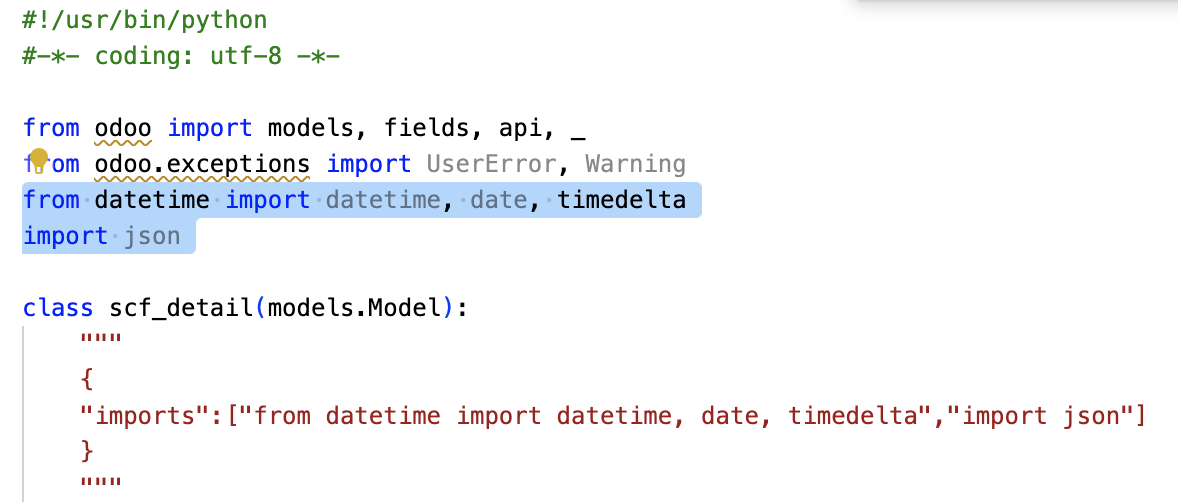
Import Python Libraries
To import additional Python libraries into the class, set the imports key as a list of string, for example:
{
"imports":["from datetime import datetime, date, timedelta","import json"]
}
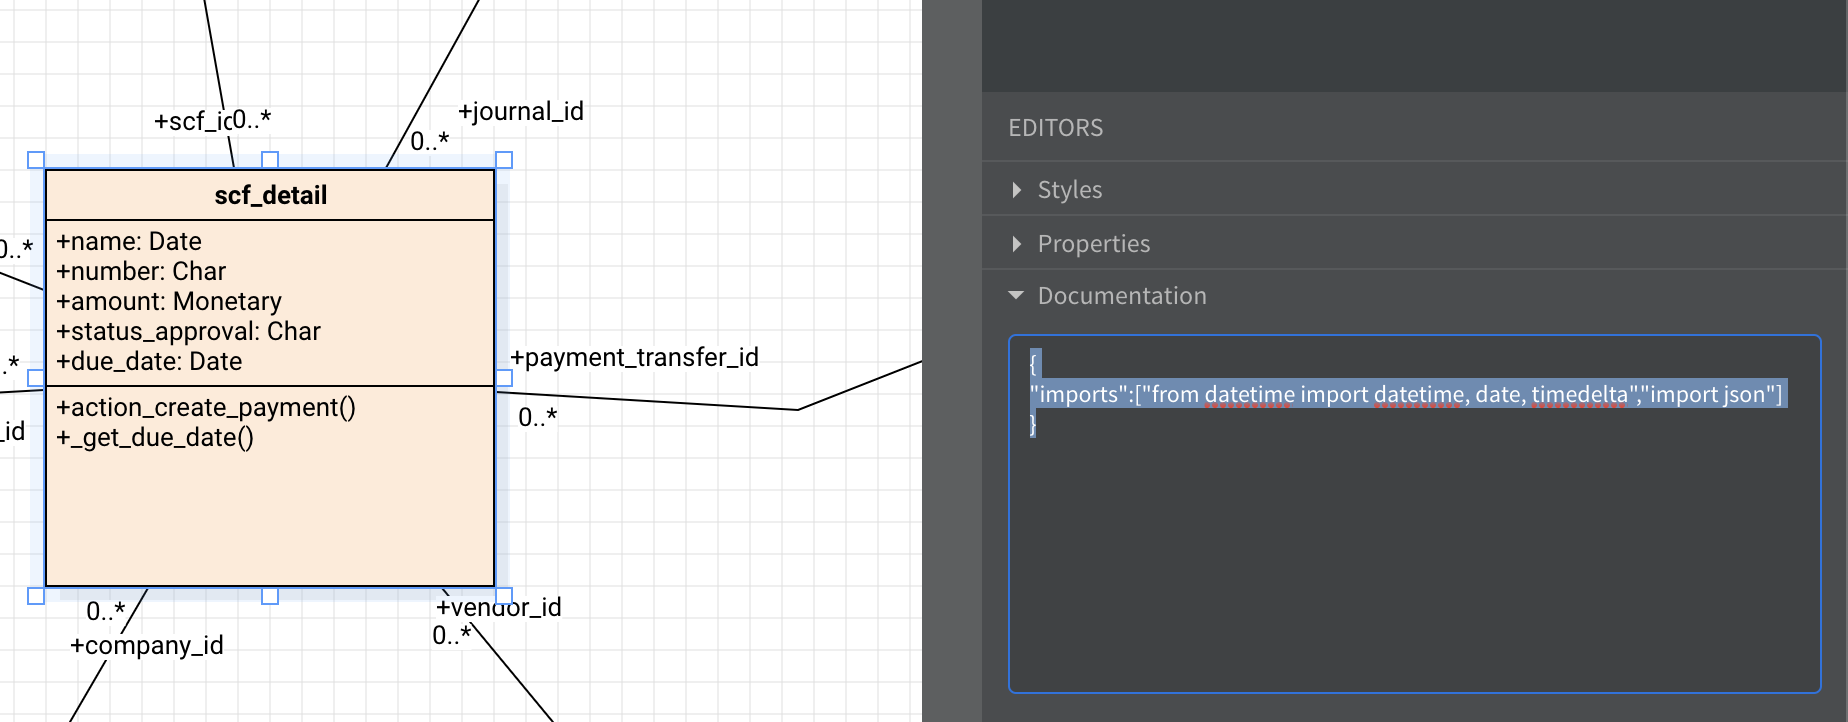
This will generate the import lines required for the class to access the methods or object at the libraries.
Auto Create Inherited Forms
The generator will auto create inherit form XML for inherited object: partner, employee, account, fleet, SO, PO, BOM, etc.
If the original form has Notebook tag, then a new page will be inserted inside it, with the "application name" as the page string, or taken based on the inherited object name if is_<object_type> field exists, containing all additional fields on that inherited object.
It it has no Notebook, then the additional group of fields labelled "application name" will be placed inside the <sheet> tag.
Also, if the model is inherited with additional is_<object_type> field, then a special menu item will also be created for that type of inherited object, labeled according to the object name, placed under the "Configuration" menu.
For example, when inheriting from res.partner, naming the class as "publisher" and adding is_publisher Boolean field, the generator will add:
- a new Page with label "Publisher" on partner form Notebook, containing a boolean field "is Publisher"
- a new menu item named "Publisher" under applications "Configuration",
- an action window, containing the domain and context for that partner type
domain = [('is_publisher','=',True)]
context = {'default_is_publisher':1} - so that the menu will only display this kind of partner type, and when we create a new record, the partner type field is_publisher is automatically filled with True
This scenario is also applied with other object:
- hr.employee
- account.account
- account.journal
- fleet.vehicle
- fleet.vehicle.log.services
- res.company
- res.currency
- res.users
- sale.order
- purchase.order
- product.template
- mrp.bom
- and so on on the next versions
For example:

The school_origin is inherited from res.partner, and has is_school Boolean field.
The generator will generate this XML:
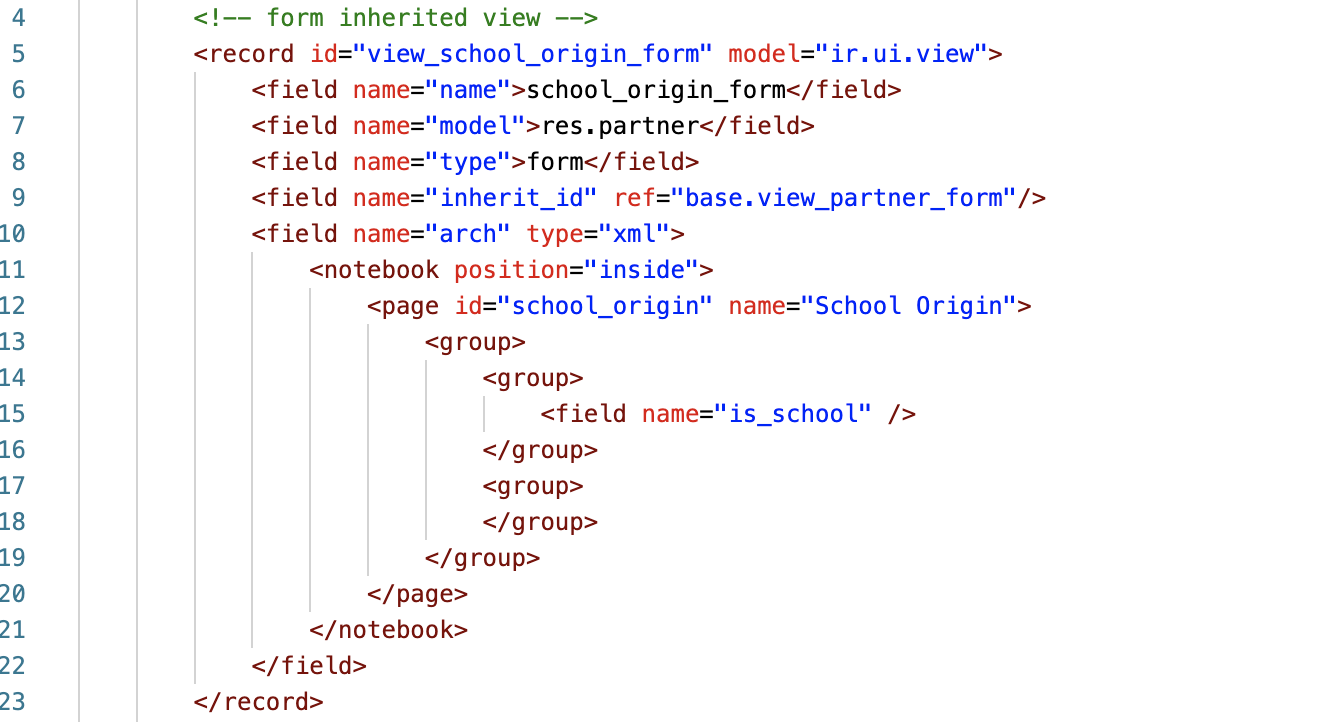
and this action window:
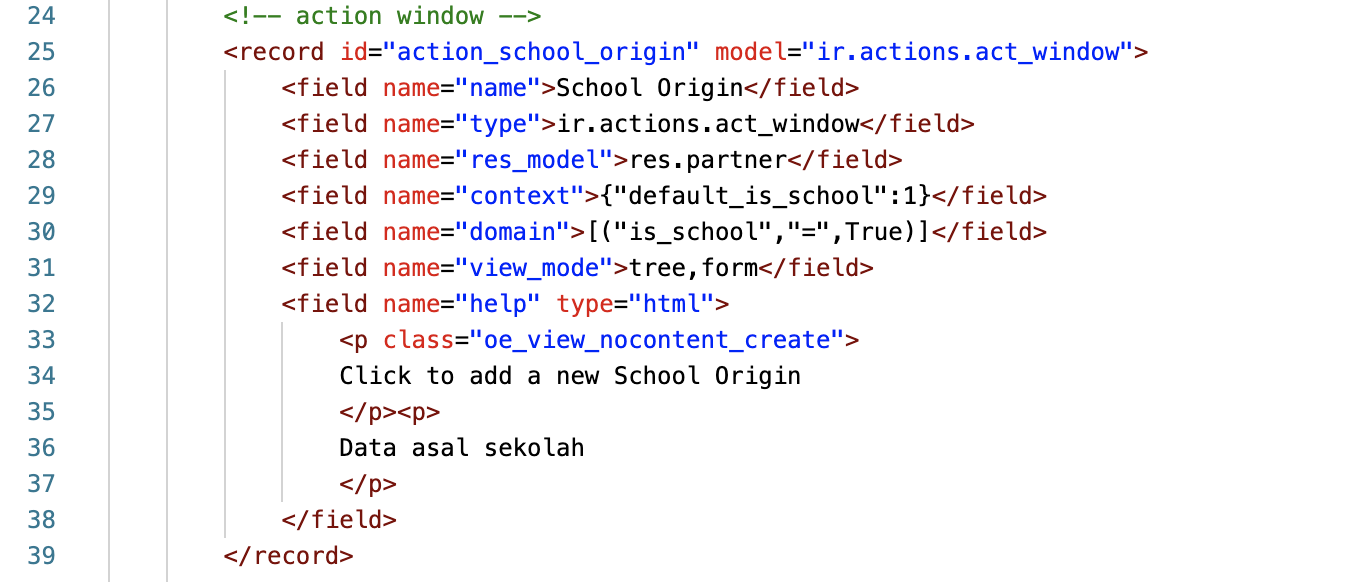
and also, this menu item

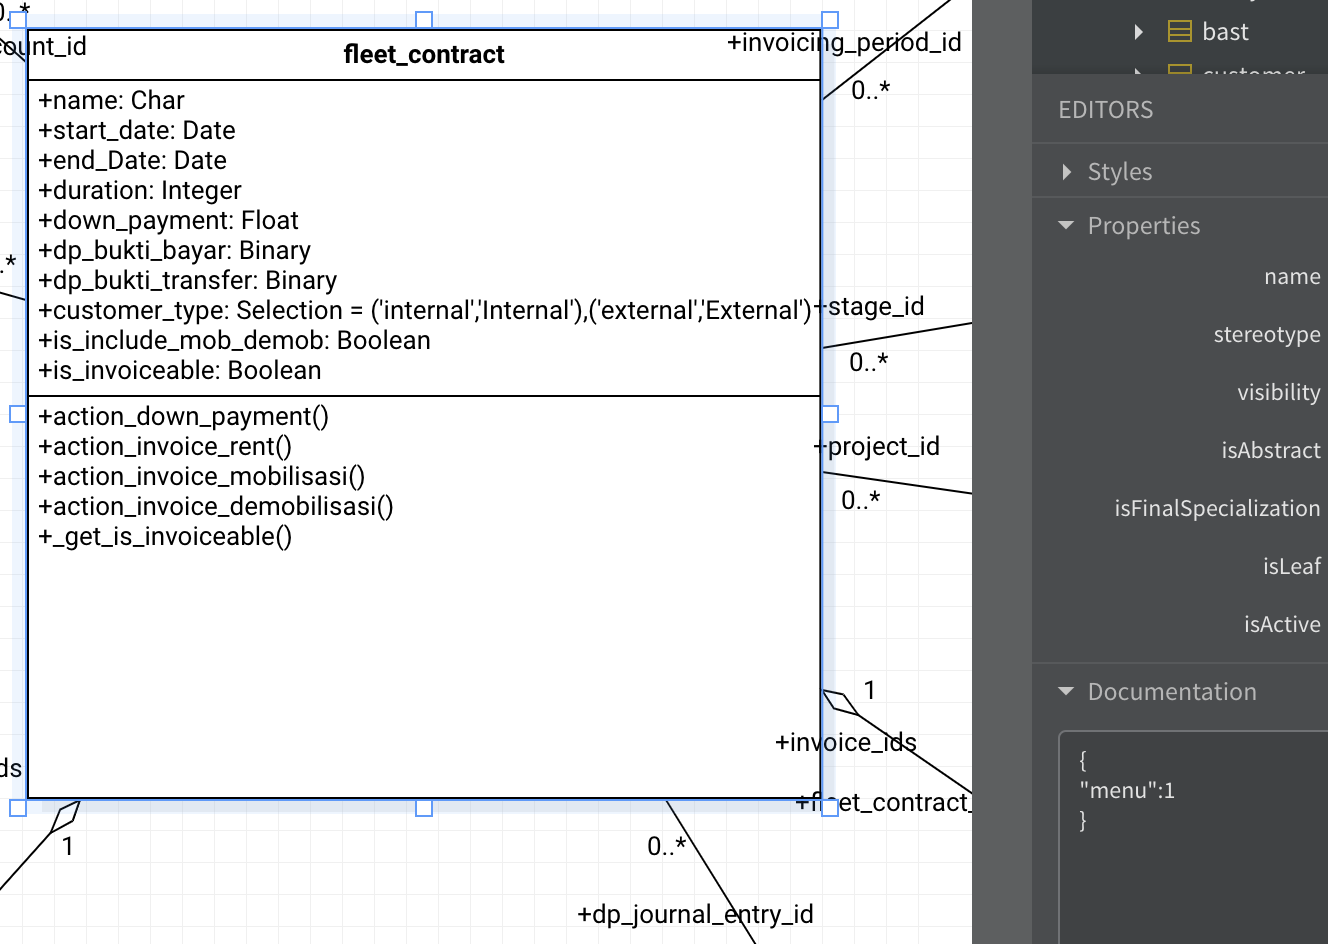
Odoo Normal Fields
Every attributes on UML class is converted into Odoo object field.
Set the valid Odoo field type on type field.
Example: Char will be converted to fields.Char(), Integer to fields.Integer(), and so on.
Odoo Field Attributes
The Field Documentation box can contain JSON data format for specifying the Python field attributes as well as the XML field attributes.
Valid field attributes:
- all Odoo field attributes for python and XML form definition, prefix xml:attributes to set the XML field attributes, otherwise it will be considered as Python field attributes
- for python tuple fields attributes pattern, eg digits=(2,3), simply fill the field documentation with: "digits":"(2,3)"
- string: label, to define the label for the field, instead of sentence case of the field name.
- tree:attribute, to define the <tree> tag attributes for One2many field on the XML form of the object if it has One2many field
- tree:invisible: true/false to show or hide the field on the tree view from the menu or under the One2many tree on a form
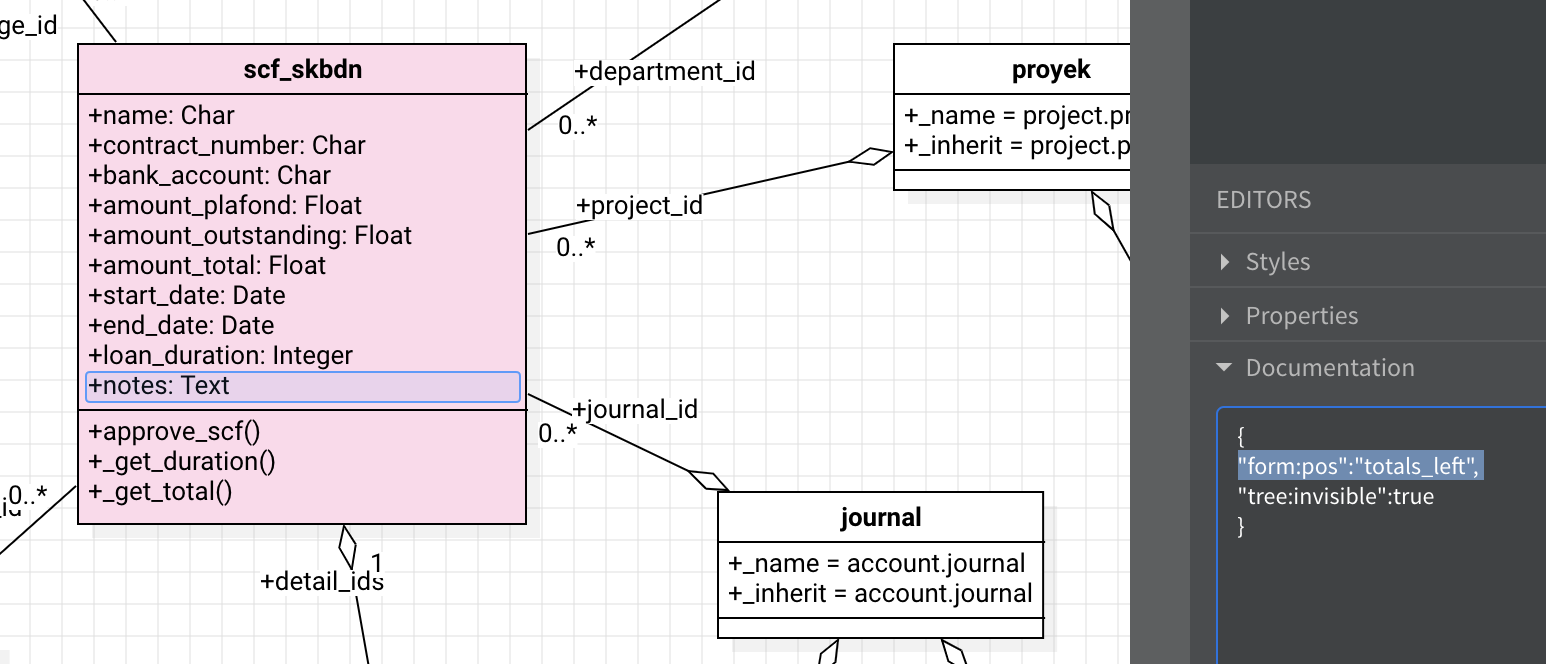
- form:pos:left|right|totals_left|totals_right|tab, to define the field location on the form, whether on the left side or right side of the form, at the totals section below the notebook section, or a new tab page in the notebook. If not defined, then regular fields will be displayed on the left side, and relational fields will be on the right side of the form.
- form:seq:integer, to define the appearance sequence of the field on the form and tree, smaller value will be displayed first, of not specified then sequence will start from 100, 101, and so on.
- page:invisible: true/false to show or hide page/tab for One2many field
- kanban:show: true/false, to show or hide the field on the kanban view. Default setting, only name and date are show in kanban view.
The JSON format example:
{
    "xml:domain": "[('company_id', '=', company_id )]",
    "help": "Select level",
    "compute":"_compute_method",
    "string" : "Optional String for field Label",
    "form:pos" : "right",
    "form:seq" : 10,
}
JSON key prefixed with "xml:" will be placed on XML files, and other will be placed on Python files.
JSON key prefixed with "tree:" is used to define the properties of the tree widget on the One2many field on the form, eg, tree:editable=bottom.
Other example: tree:invisible=true/false, to show or hide the field on the tree view.
JSON key string is used to override the default string parameter for field label, if defined this value will used, otherwise the field name converted as sentence case will be used.
Any other valid keys will be treated as field parameter on the Python code.
Field Sequence and Position
We can arrange the position and appearance order of the fields on the form and tree view by specifying form:pos and form:seq special key on the Field Documentation.
- form:pos:left|right|totals_left|totals_right, to define the field location on the form, whether on the left side or right side of the form, or at the totals section under the <notebook> section.
- If not defined, then regular fields will be displayed on the left side,
- and relational fields will be on the right side of the form.
- if form:pos=totals_left or totals_right is specified, then field will be placed on the left side or right side of the totals section below the notebook section
- form:seq:integer, to define the appearance sequence of the field on the form and tree, smaller value will be displayed first, of not specified then sequence will start from 100, 101, and so on. This sequence will also apply on the appearance order on the tree view.
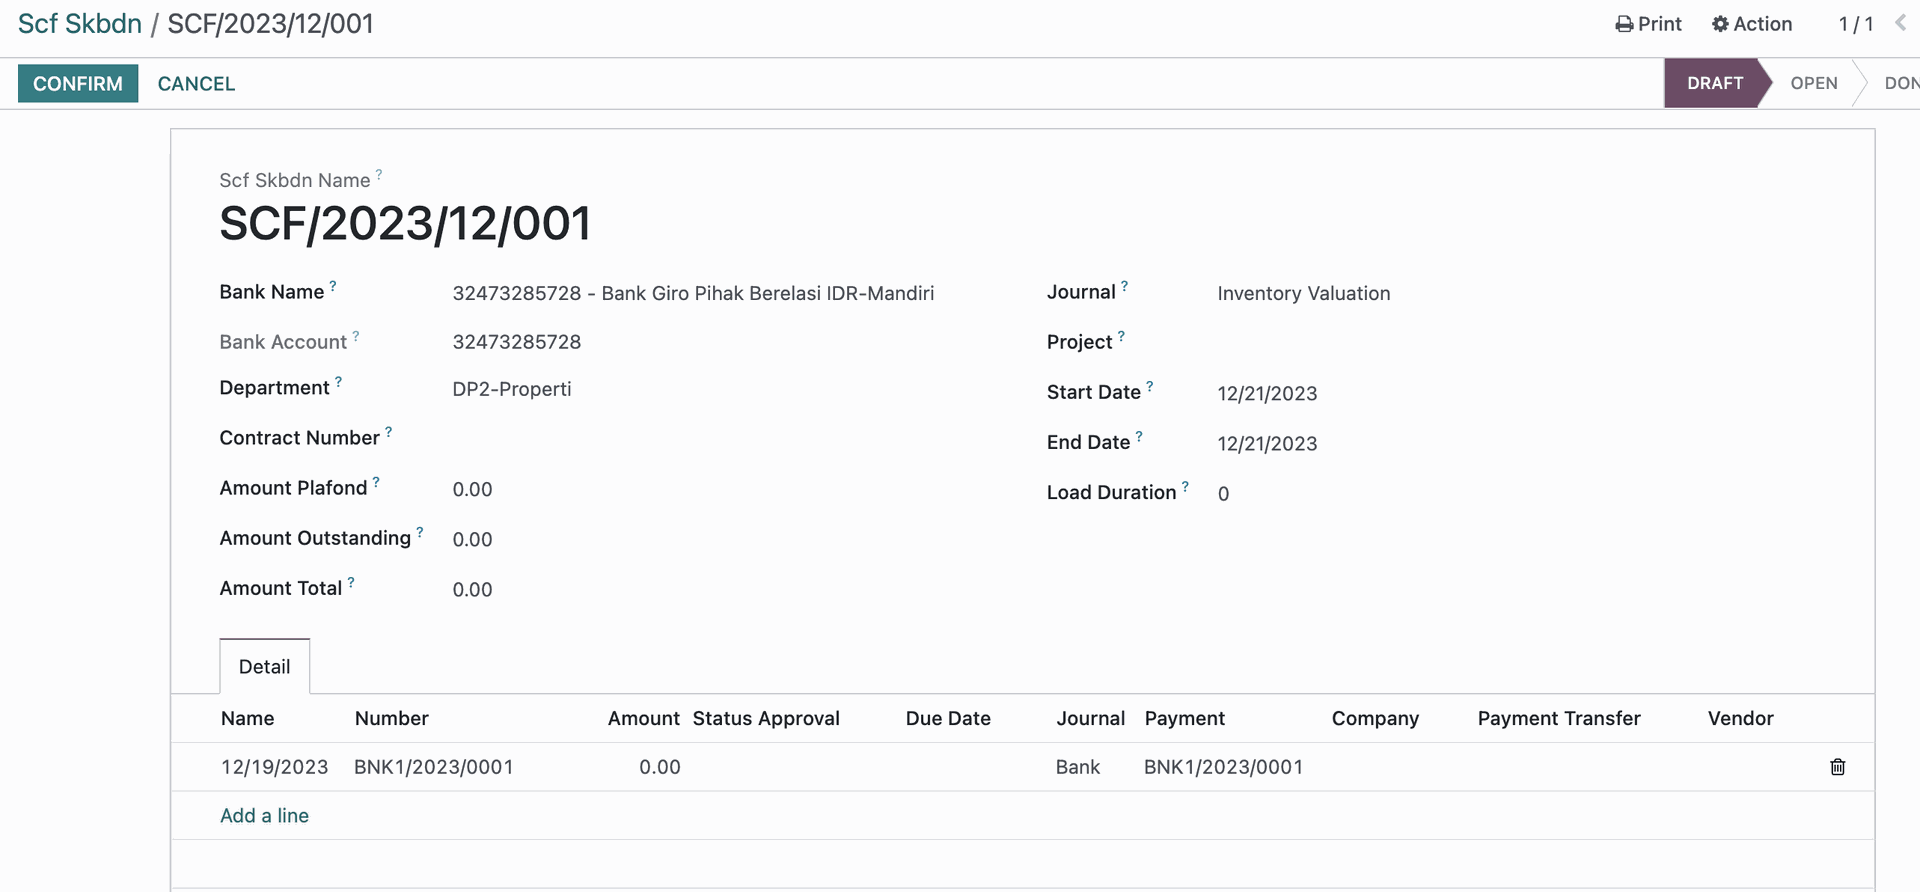
For example:
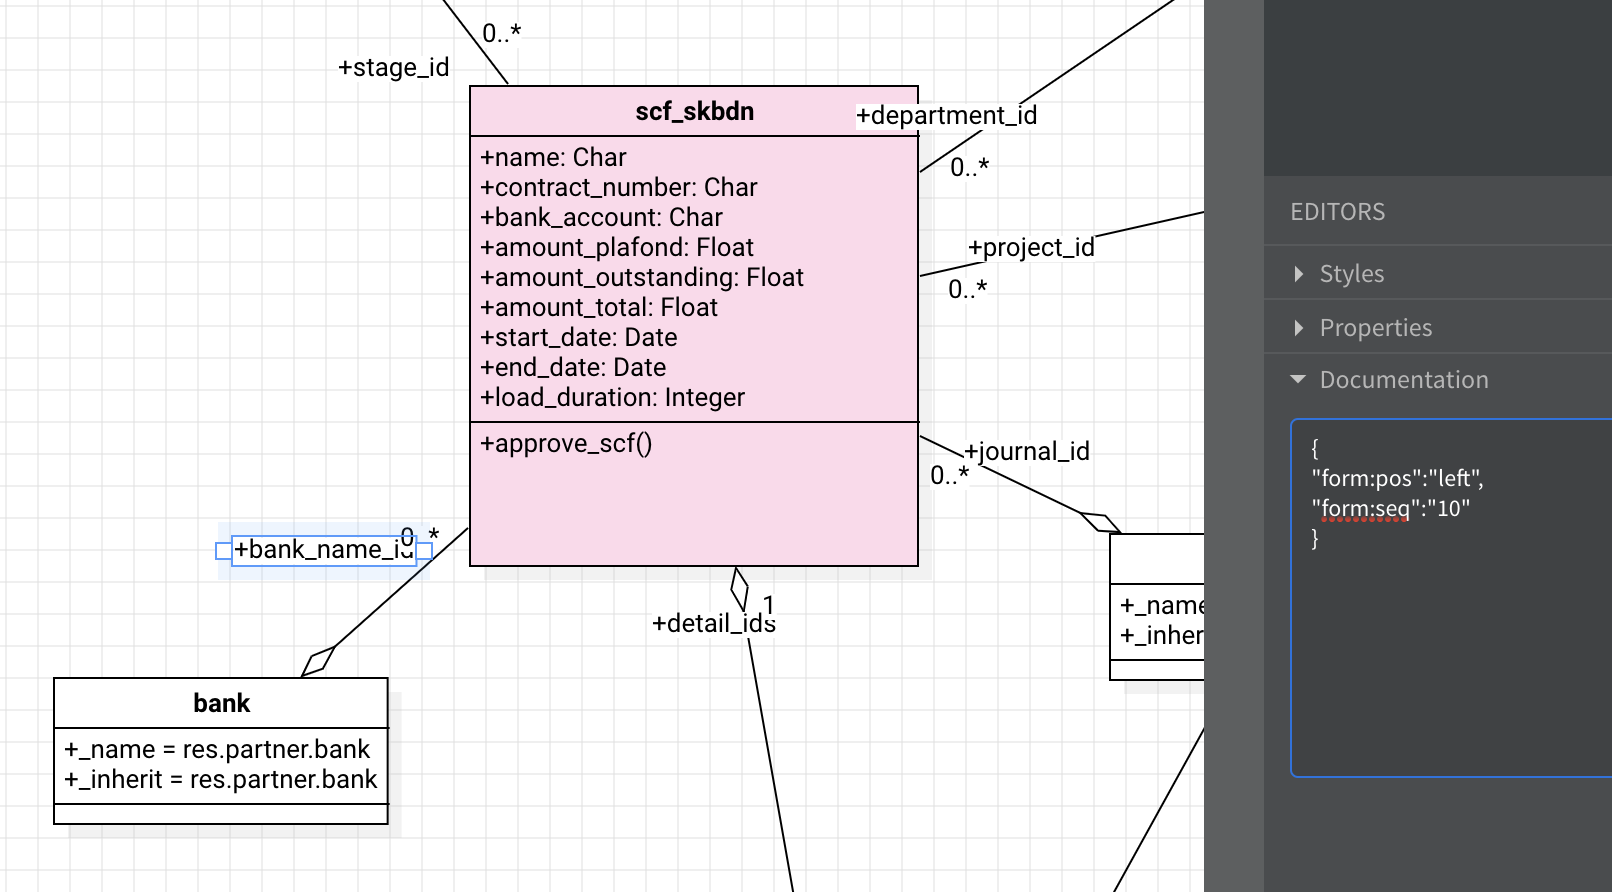
The bank_name_id (Many2one) field has this attributes:
{"form:pos":"left",
"form:seq":"10"
}
and the bank_account has this attributes:
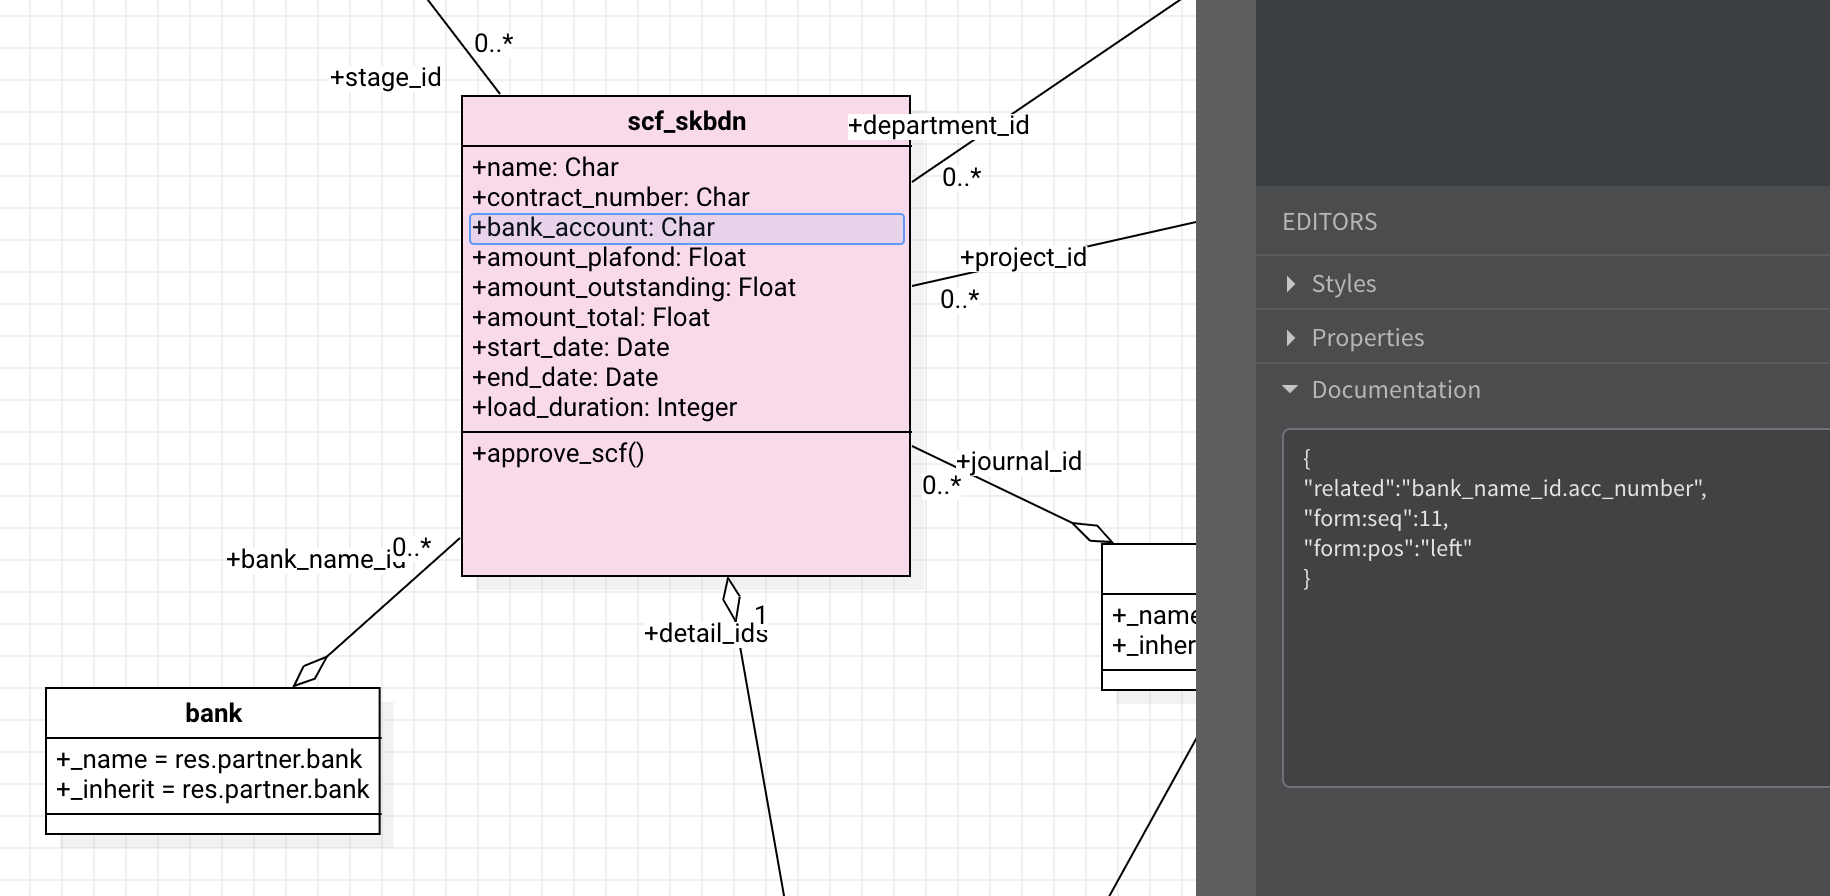
{"related":"bank_name_id.acc_number",
"form:seq":11,
"form:pos":"left"
}
By default if not specified, the normal field will be placed on the left side of the form, while the Many2one field will be on the right side.
Also, the sequence of field appearance will be according the the creation sequence on the UML file.
When specified, the arrangement will follow the specification we define on the form:pos and form:seq key so it will be arranged as follows:
Totals Field Section
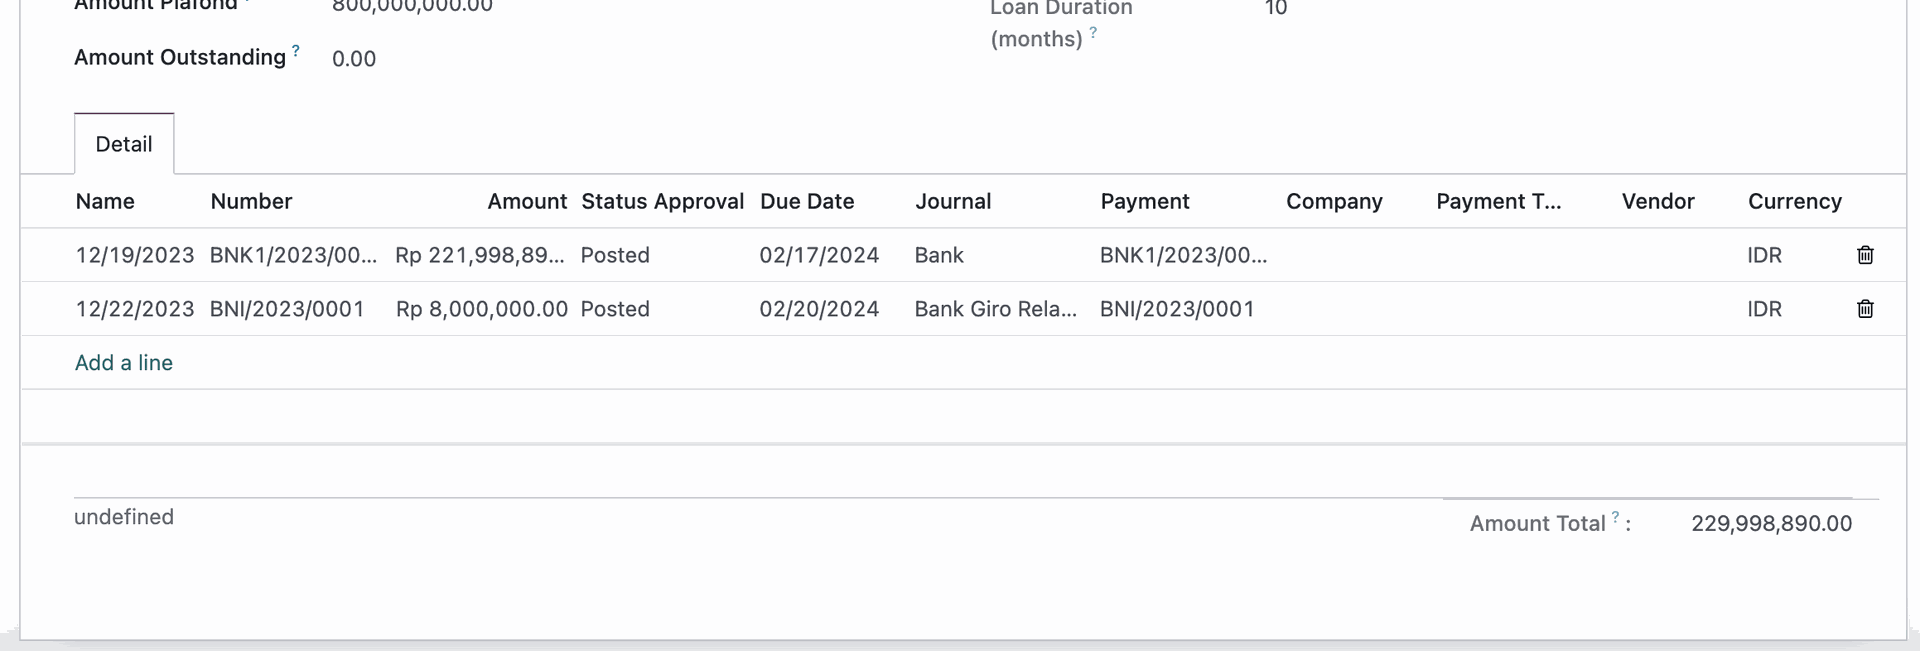
If form:pos=totals_left or totals_right key is specified on the field documentation, then it will be placed on the left side or the right of the totals section.
For example:
we have amount_total field with form:pos=total_right
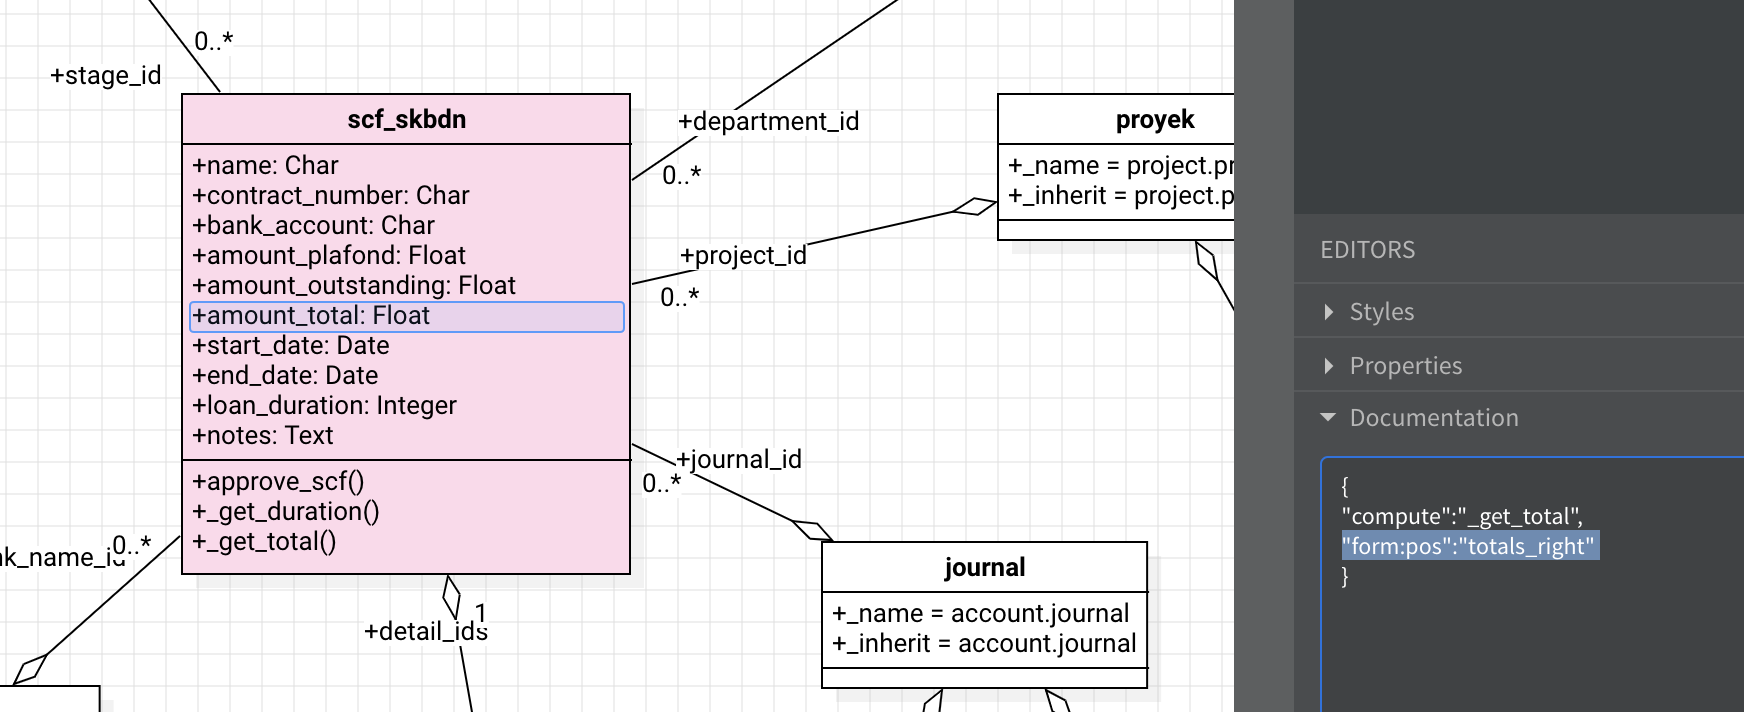
and notes field with form:pos=totals_left
This will generate additional group on the XML form view below the notebook section:
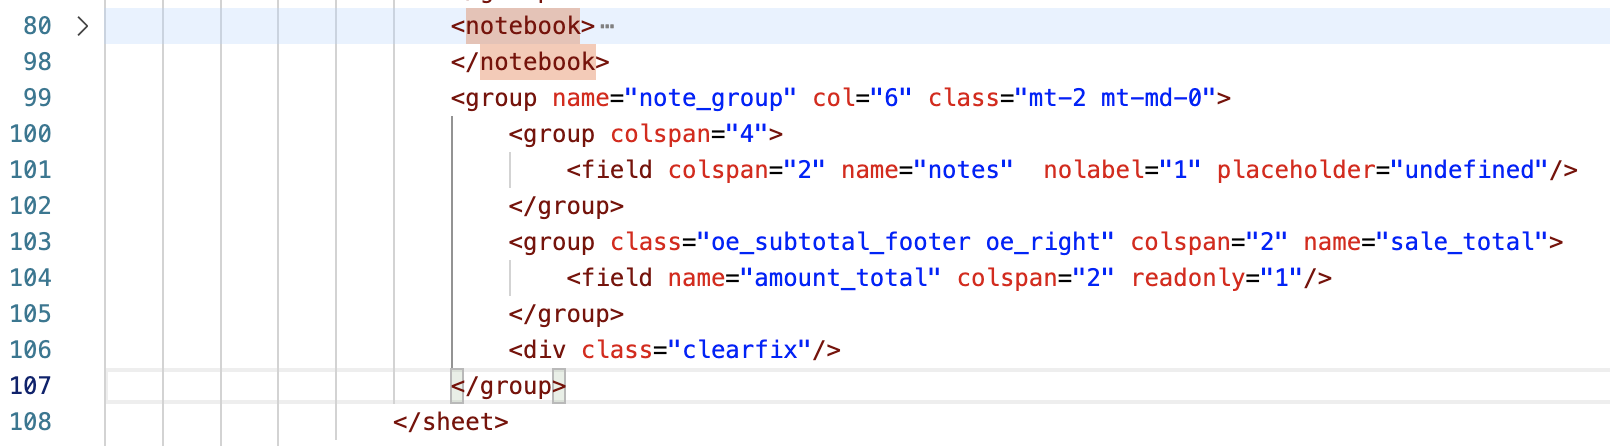
And will be generated as follows:
Relational Field
Create a UML association between two classes and set the multiplicity of each end to generate One2many, Many2one, or Many2many relation on Odoo Object.
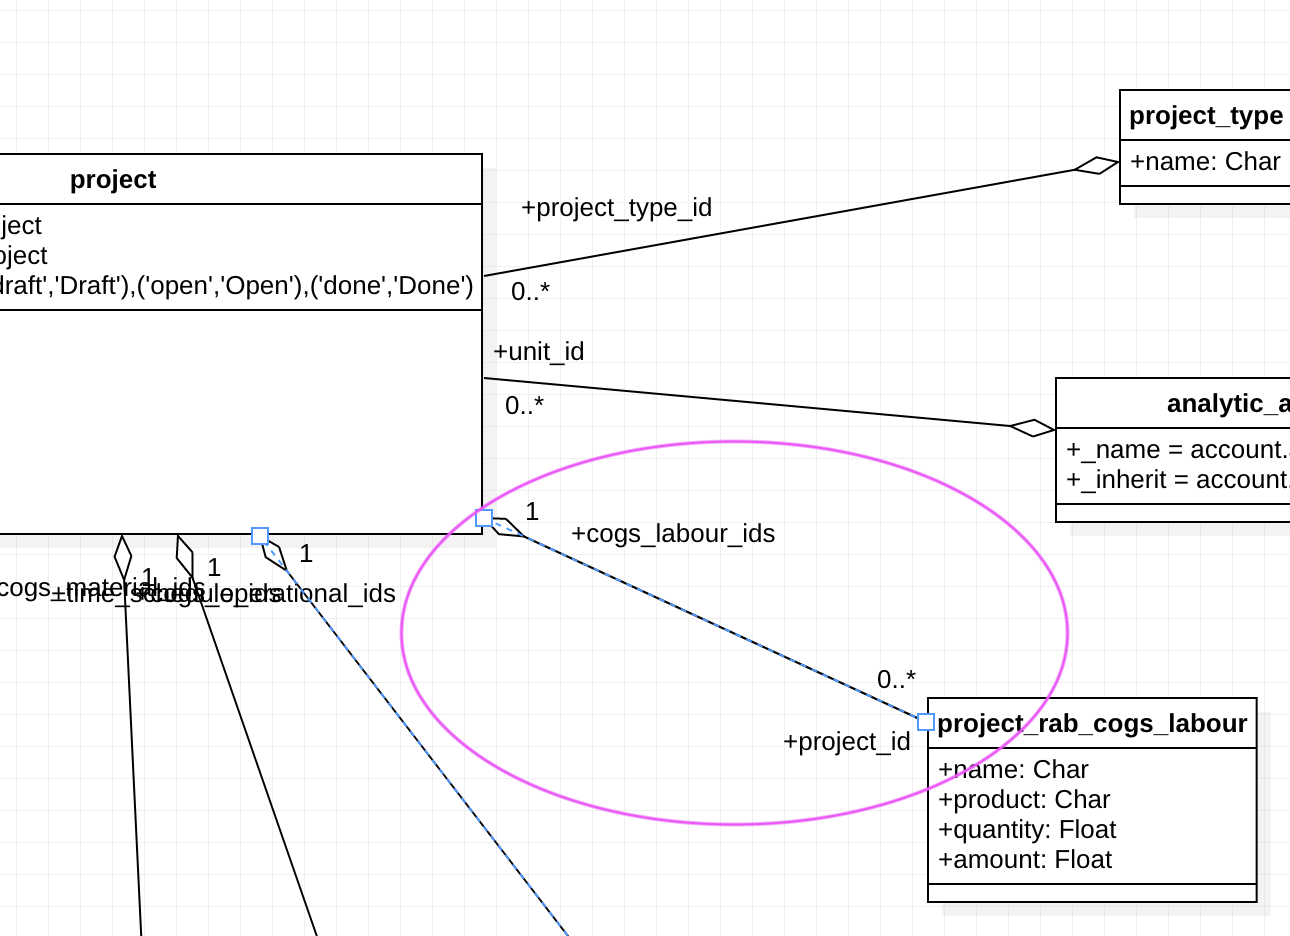
Those associations will be converted to field on each object with Odoo relation type: Many2one, One2many, or Many2many, depending on the ending notation (multiplicity).
If multiplicity is one of `0..*`, `1..*`, `*`, then the field will be initialized with:
- `0..*` or `1..*` : fields.Many2one()
- `1` : fields.One2many()
- `*` : fields.Many2many()
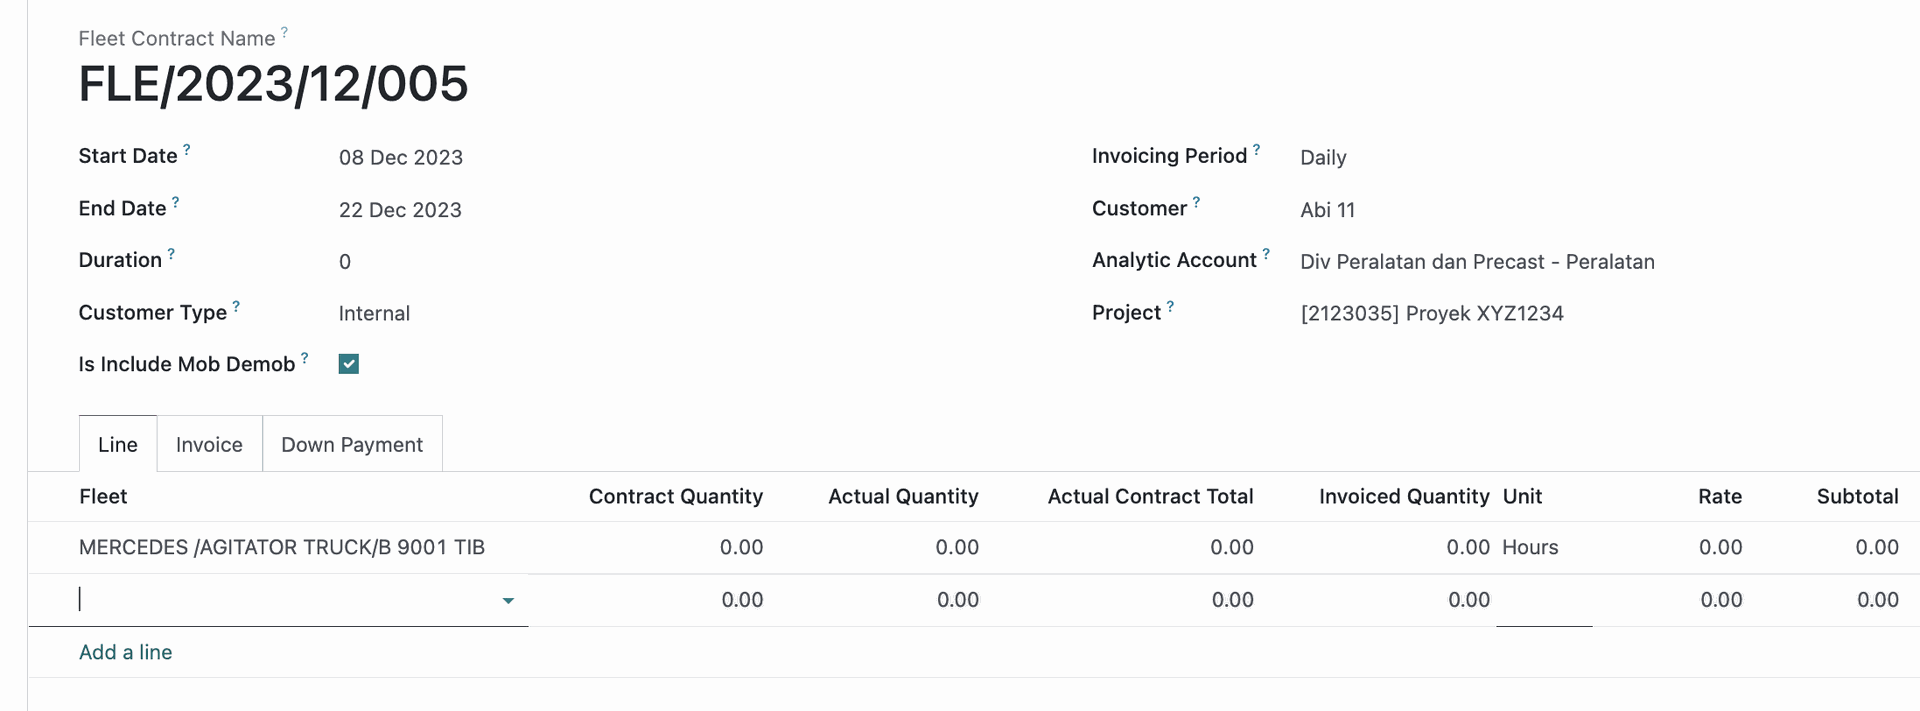
Tree Editable Bottom
If you have a One2Many fields in a class, it will be broken down to <tree> view on the class form view, where we can set the tree view editable attributes on:
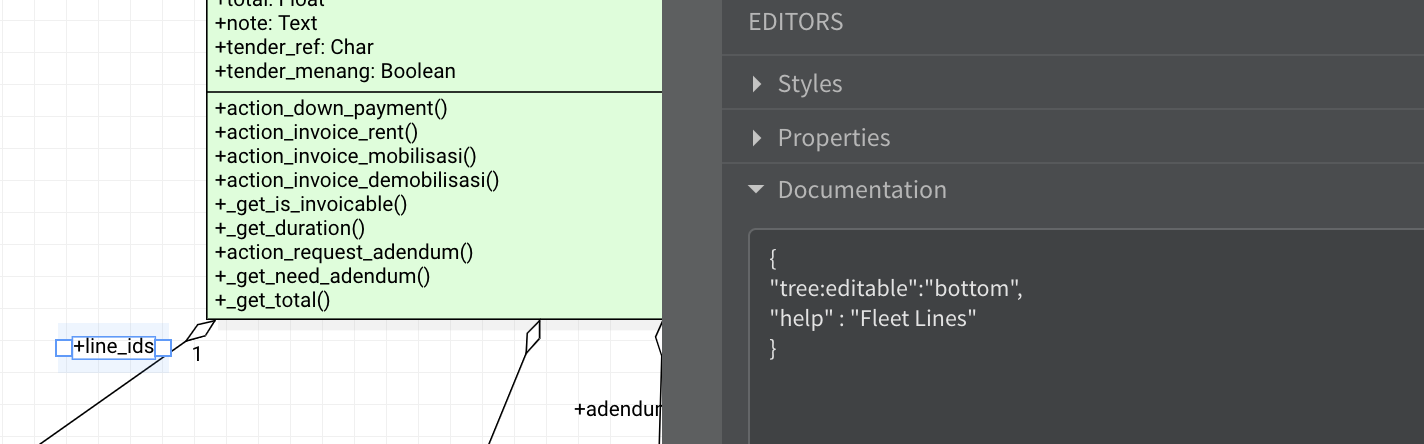
The Field Documentation box can contain JSON format information for specifying the One2many field attributes for example: tree:editable.
{
    "tree:editable": "bottom"
}
This will make the tree widget for the One2many field have additional attribute:
<tree editable="bottom">...</tree>
The Many2One field of the parent class is not shown anymore on the tree view.
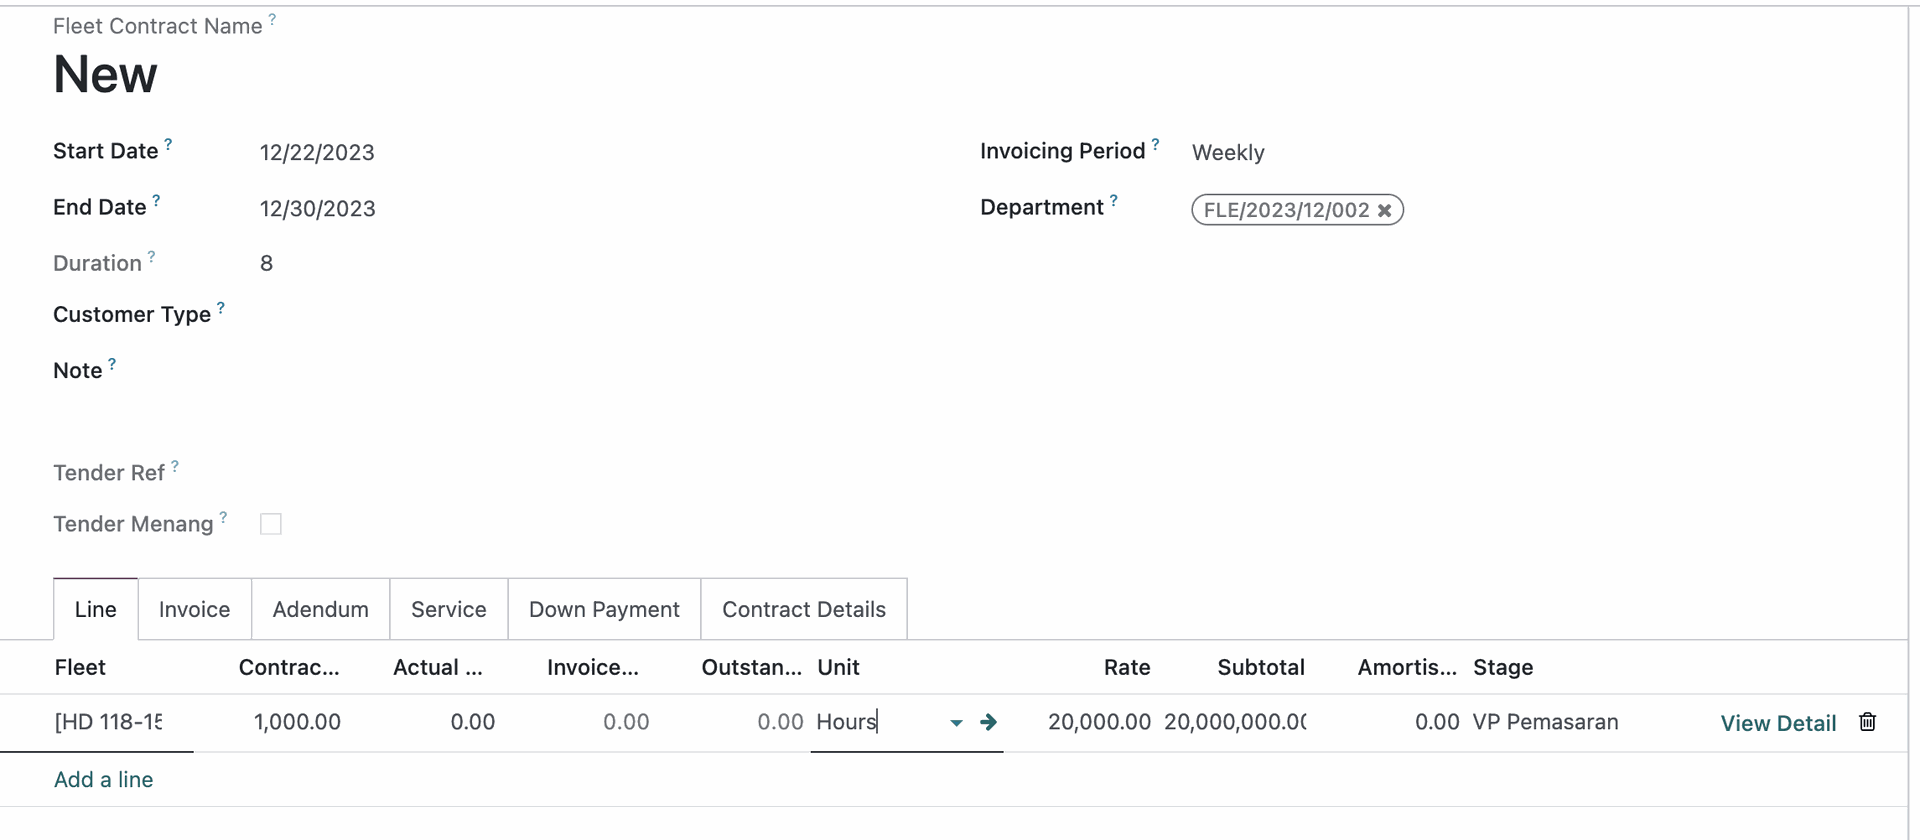
View Detail Button
When you set the tree:editable=bottom option, you may have another option whether to show a button link labelled "View Detail" to open the record detail pop up window, just like when you do not set the tree:editable key.
Put the tree:show_detail = true option to add the "View Detail" button at the last column of the tree view of a One2many field on the form.
For example:
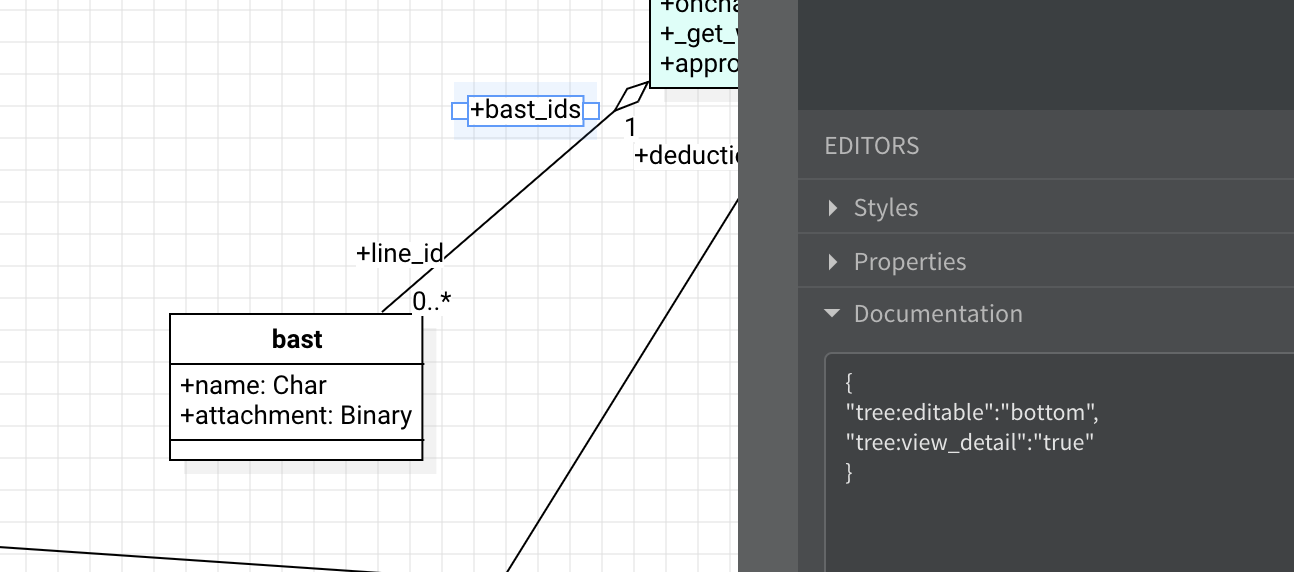
The JSON data on the Field Documentation box:
{"tree:editable" : "bottom",
"tree:view_detail" : "true"
}
This will generate the XML form with One2many tree like this:
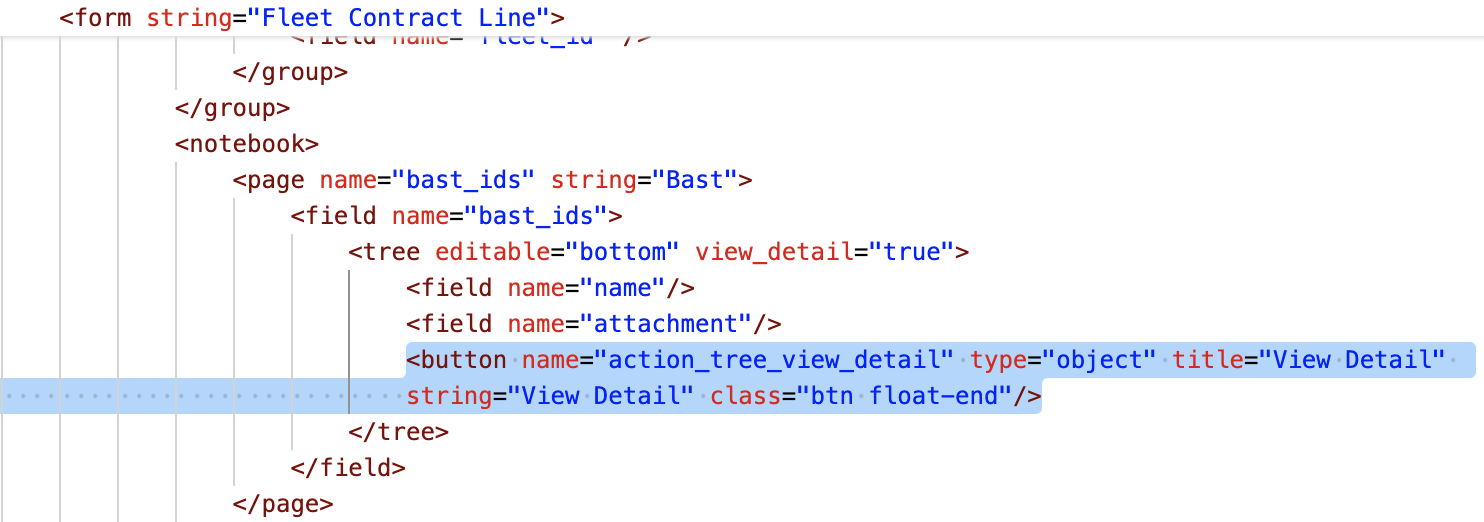
And also create the method "action_tree_view_detail" on the comodel relation class:
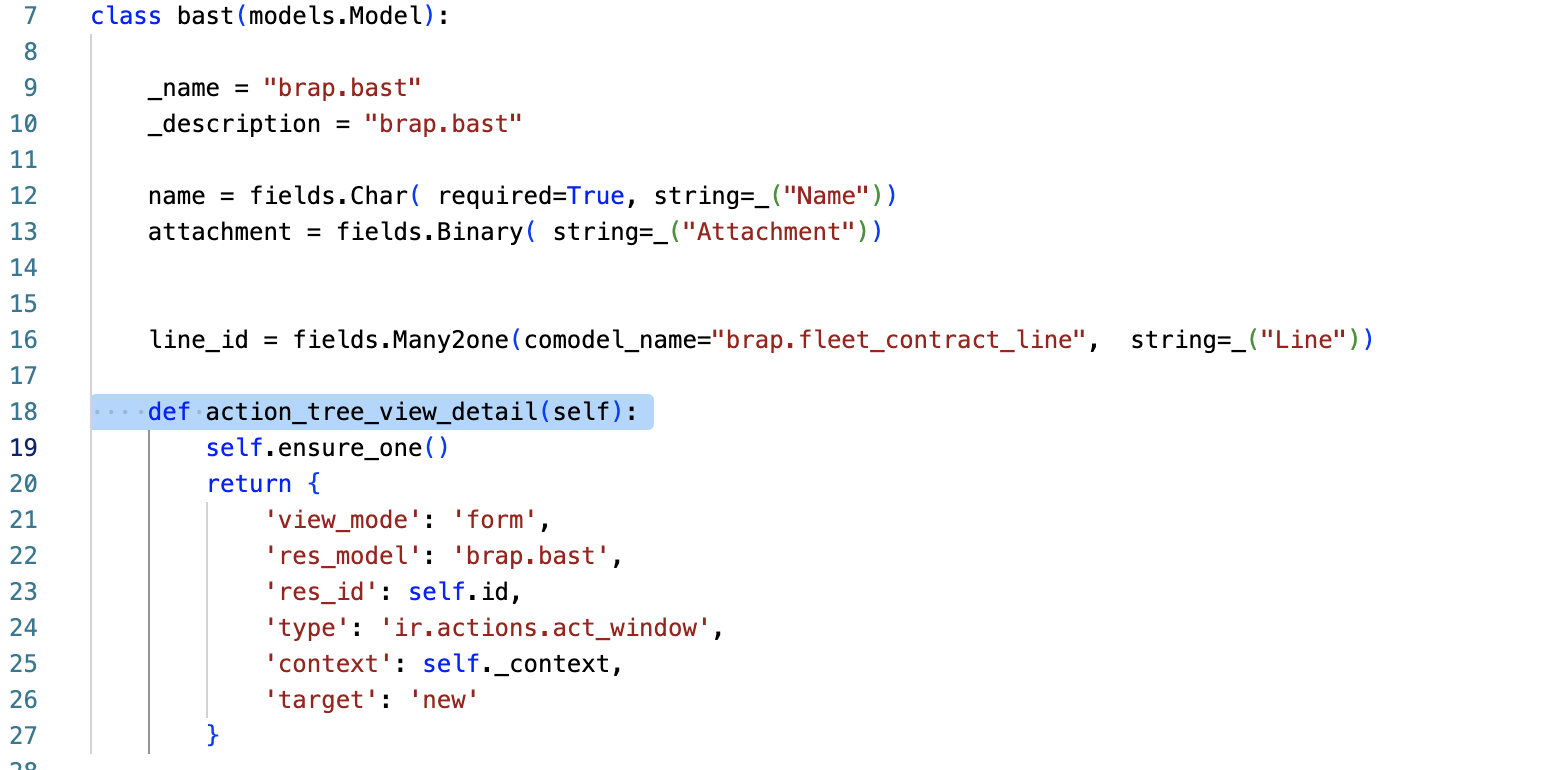
So the actual form will be like this:
Many2many_tags Widget
If you have a Many2many field and you want to display it on the form as many2many_widget, then simply add the xml:widget on the field documentation. For example:
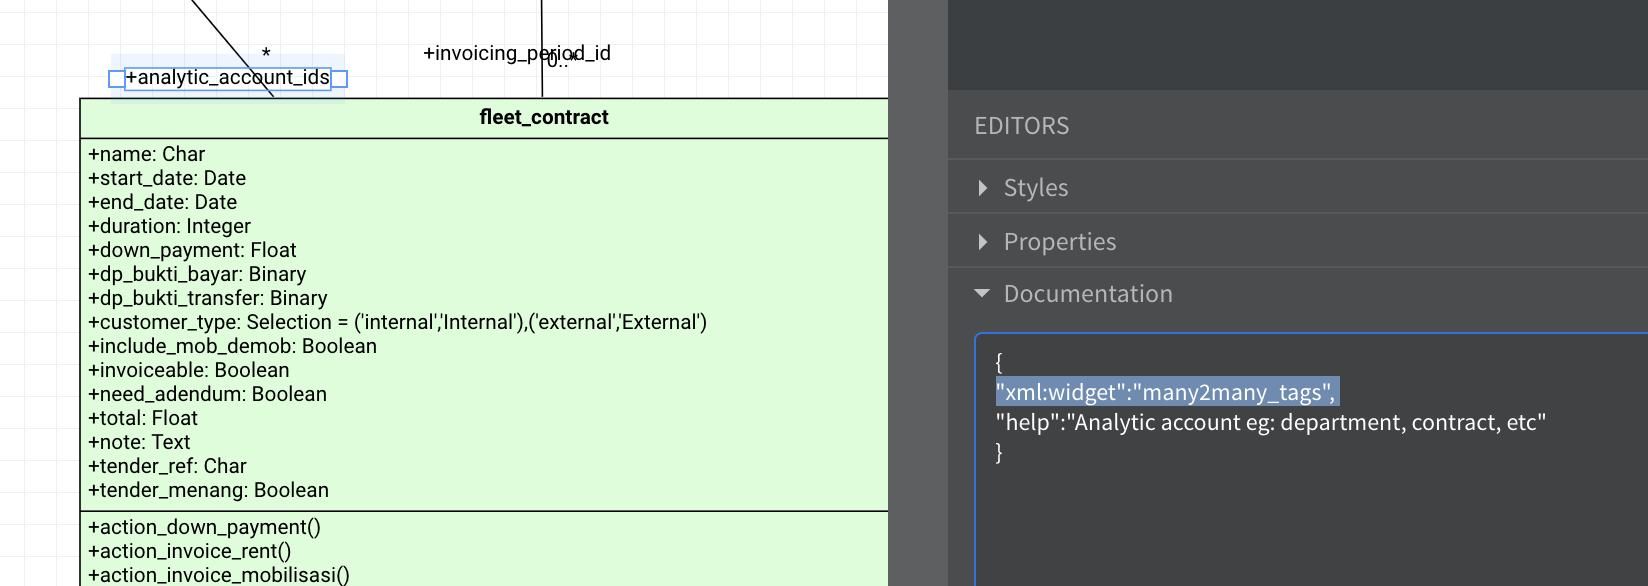
Tshi will create the XML code:
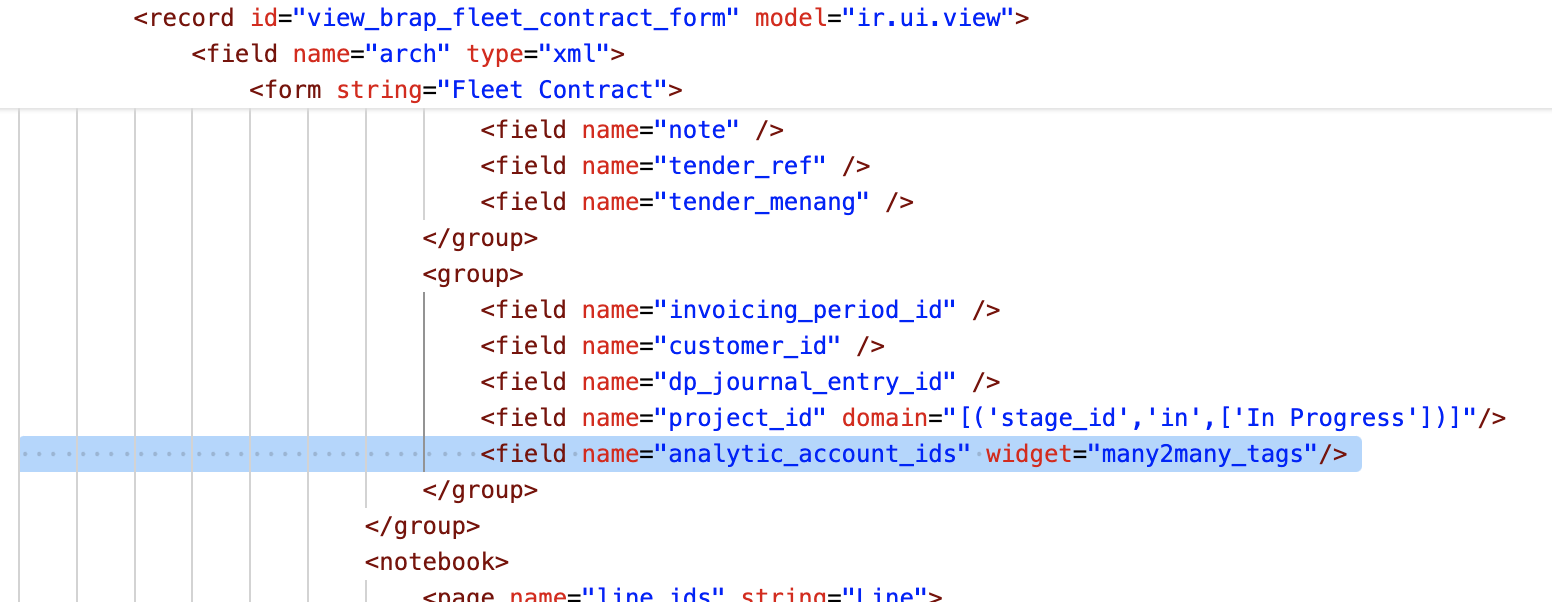
You may apply any other valid widget for the field using the xml:widget key on the field documentation.
One2Many Smart Button

A special data for One2Many field to specify whether or not the show a Smart Button to go to the detail list of the field's comodel.
Put a JSON data on the One2Many field documentation, with key "show:smart_button" and a JSON object value.
The JSON format example:
{
    "show:smart_button":{
       "label":"Show Lines",
       "icon":"fa-search"
    }
}
This will generate button on the XML file inside the smart button section on the form.
Also, it will generate the method to open the action view for the comodel class that belongs to the current parent record.
Selection Field
Just create a field attribute with type Selection and set the selection values on defaultValue field.
('internal','Internal'),('external','External')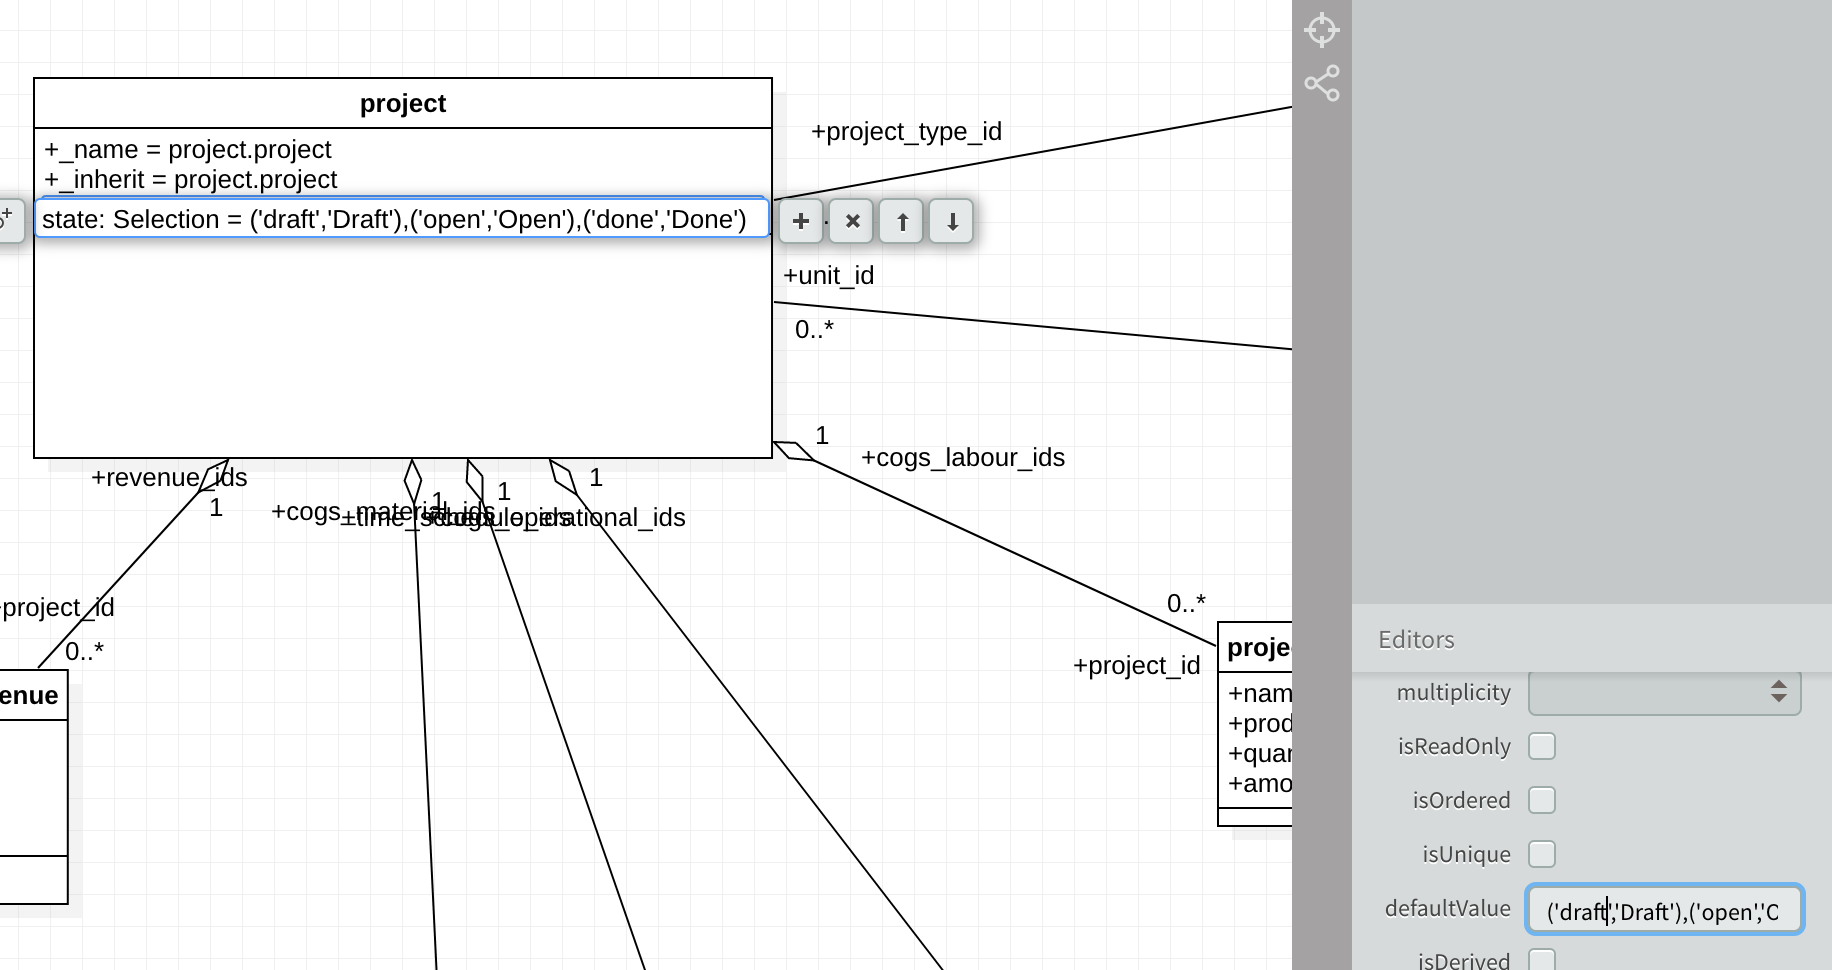
It will be converted to:
fields.Selection(selection=[ theDefaultValue ], string="field name")
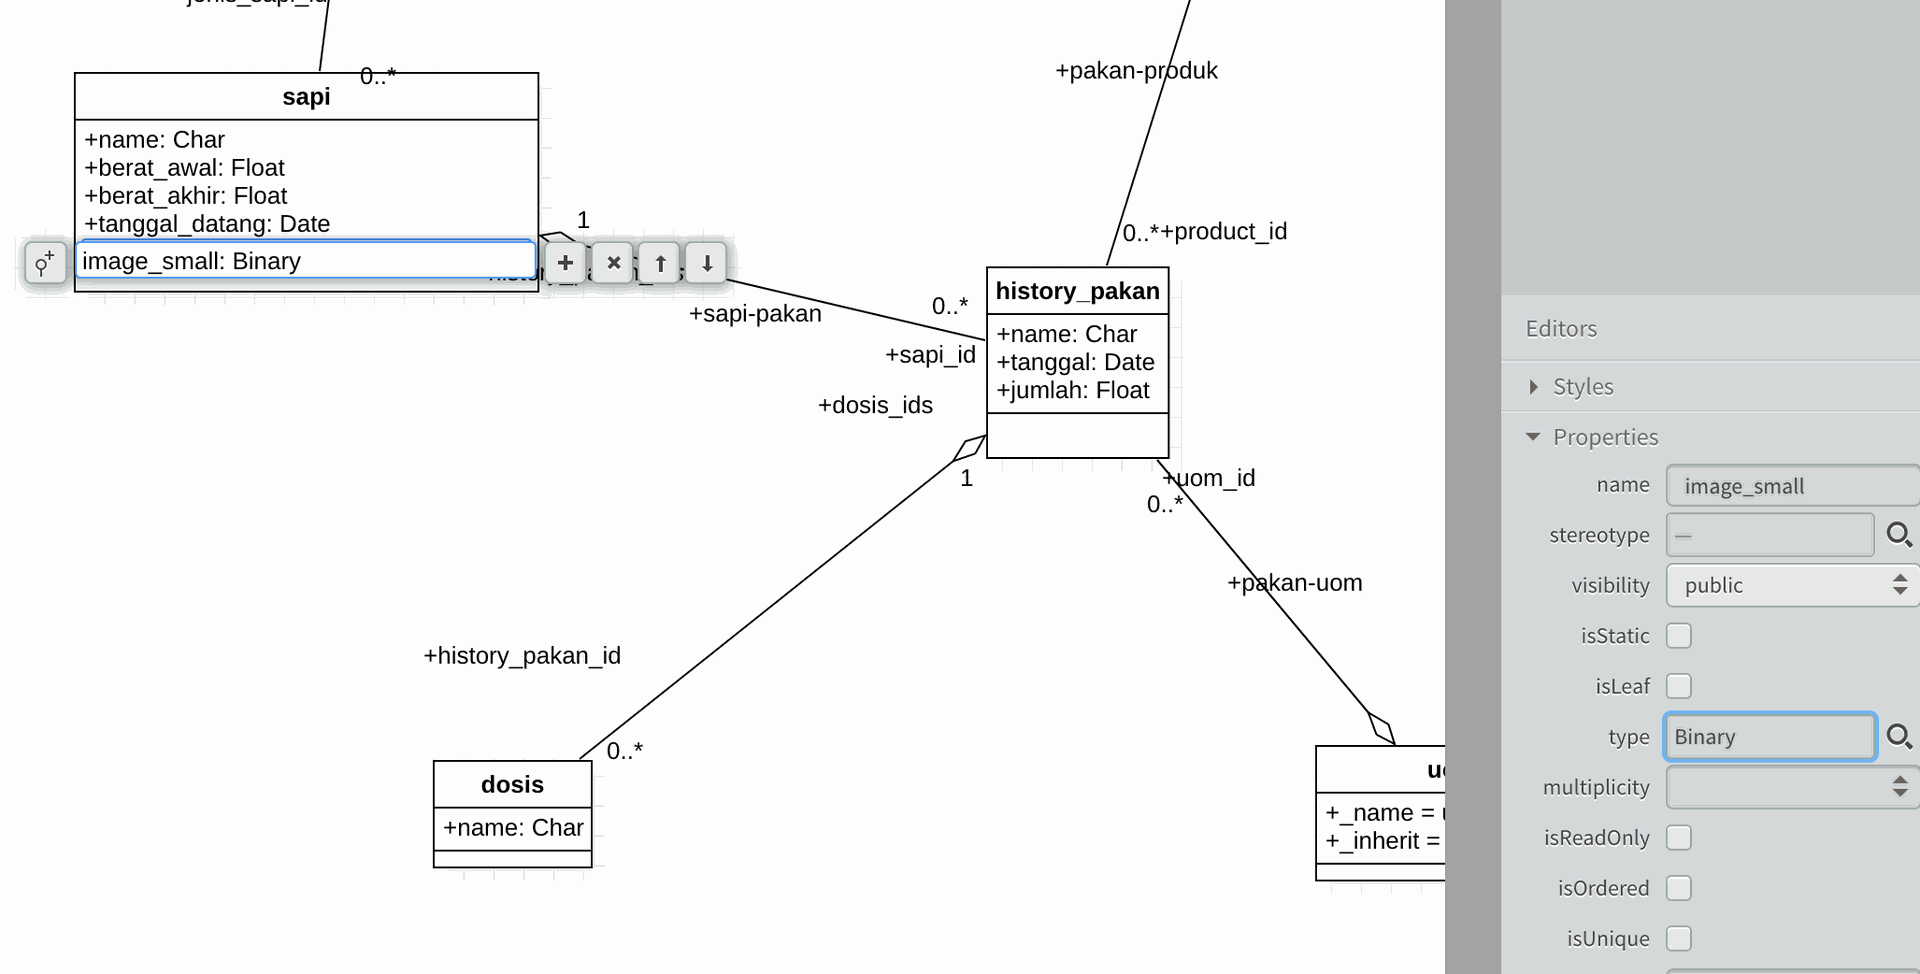
Kanban image
The generator generates Kanban template XML already. To display image on the kanban, just create an attribute with type Binary and set the name to image_small, then it will be displayed on the kanban.
Graph View
The generator generates Graph view XML already, as long as you have at least one Many2one field on the model, then it will create the Graph XML view for you.
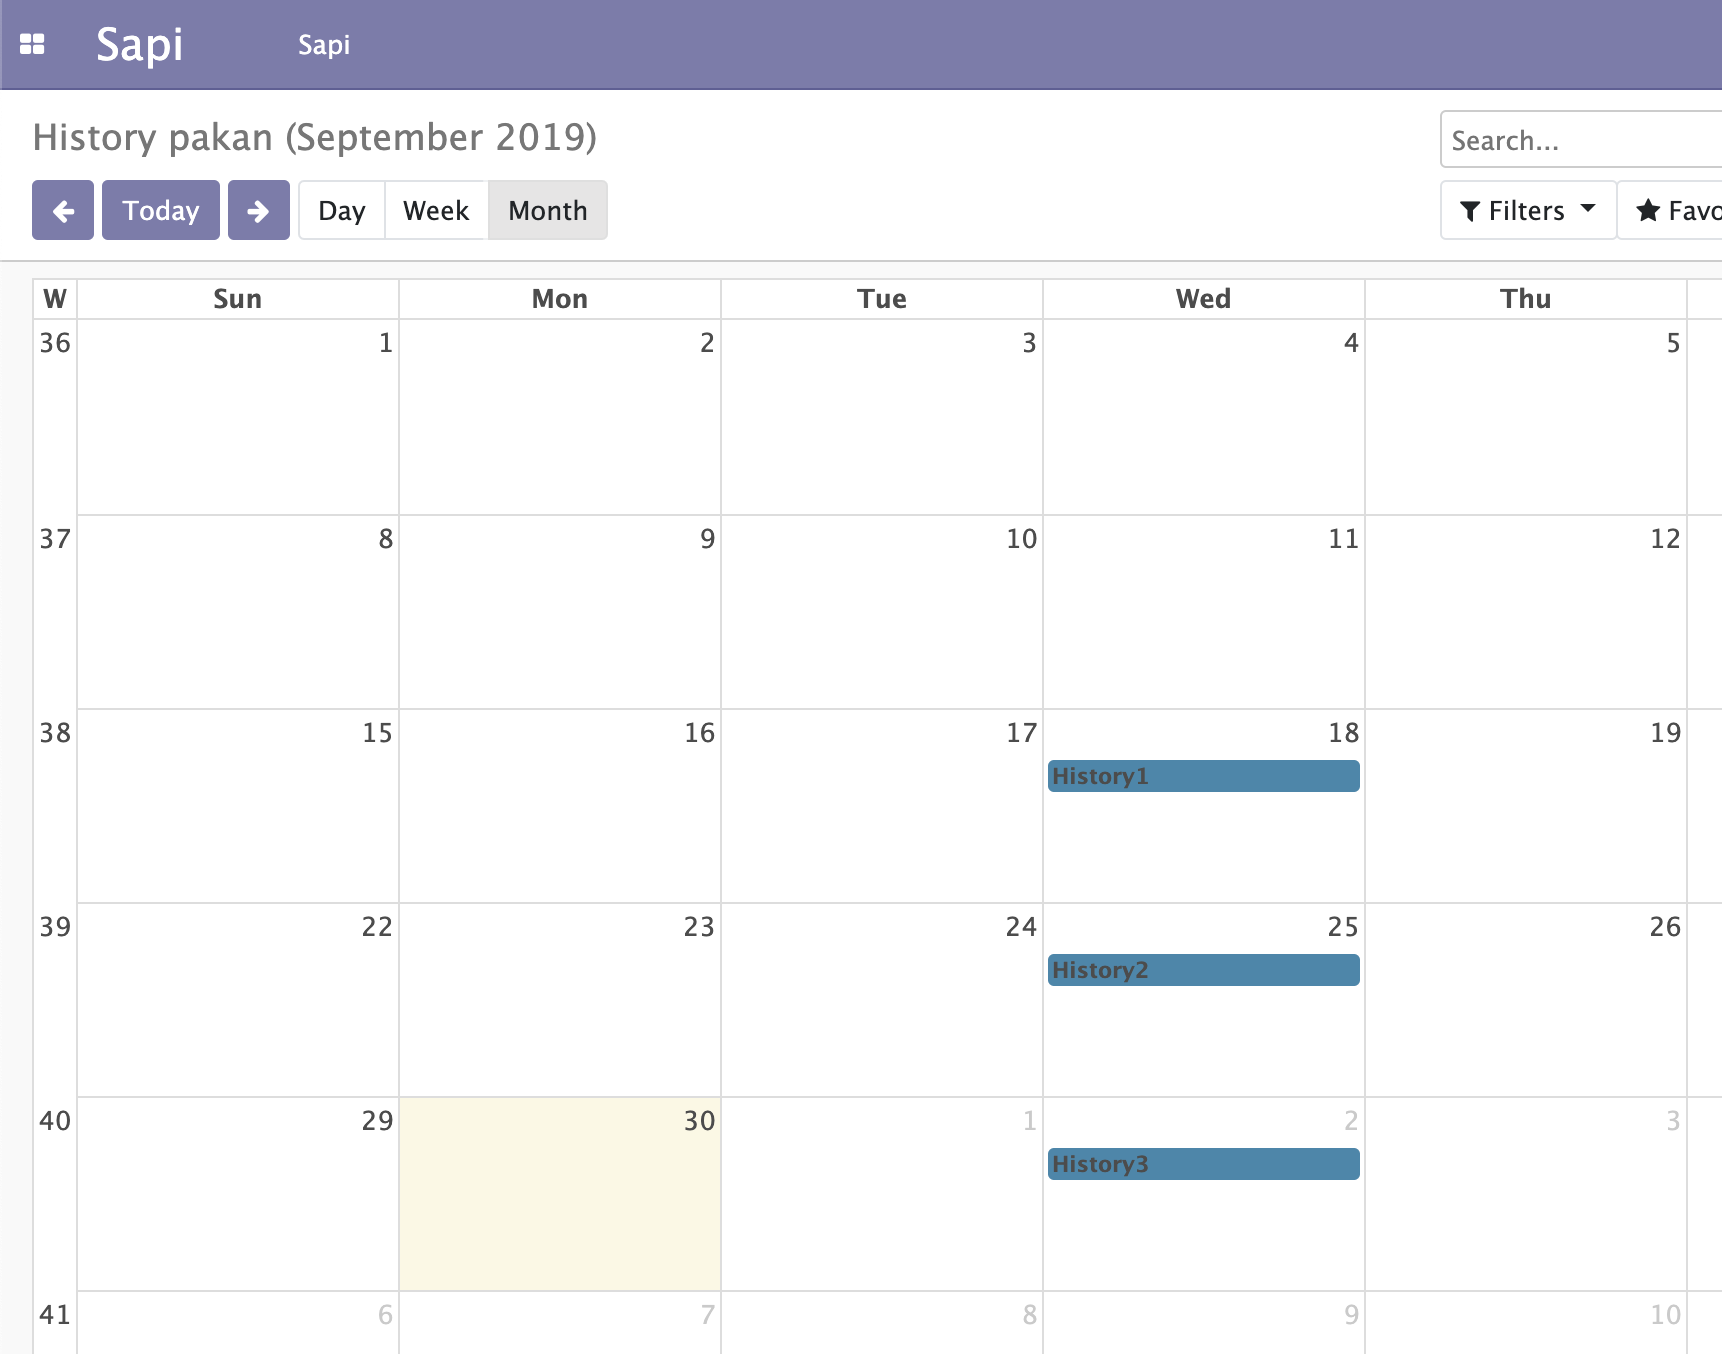
Calendar View
The generator generates Calendar view XML already, as long as you have at least one Date or Datetime field on the model, then it will create the Calendar XML view for you.
Methods
Just create the operation on the UML class diagram, it will be converted automatically to Odoo class methods where you are ready to define the logic or inherit them.
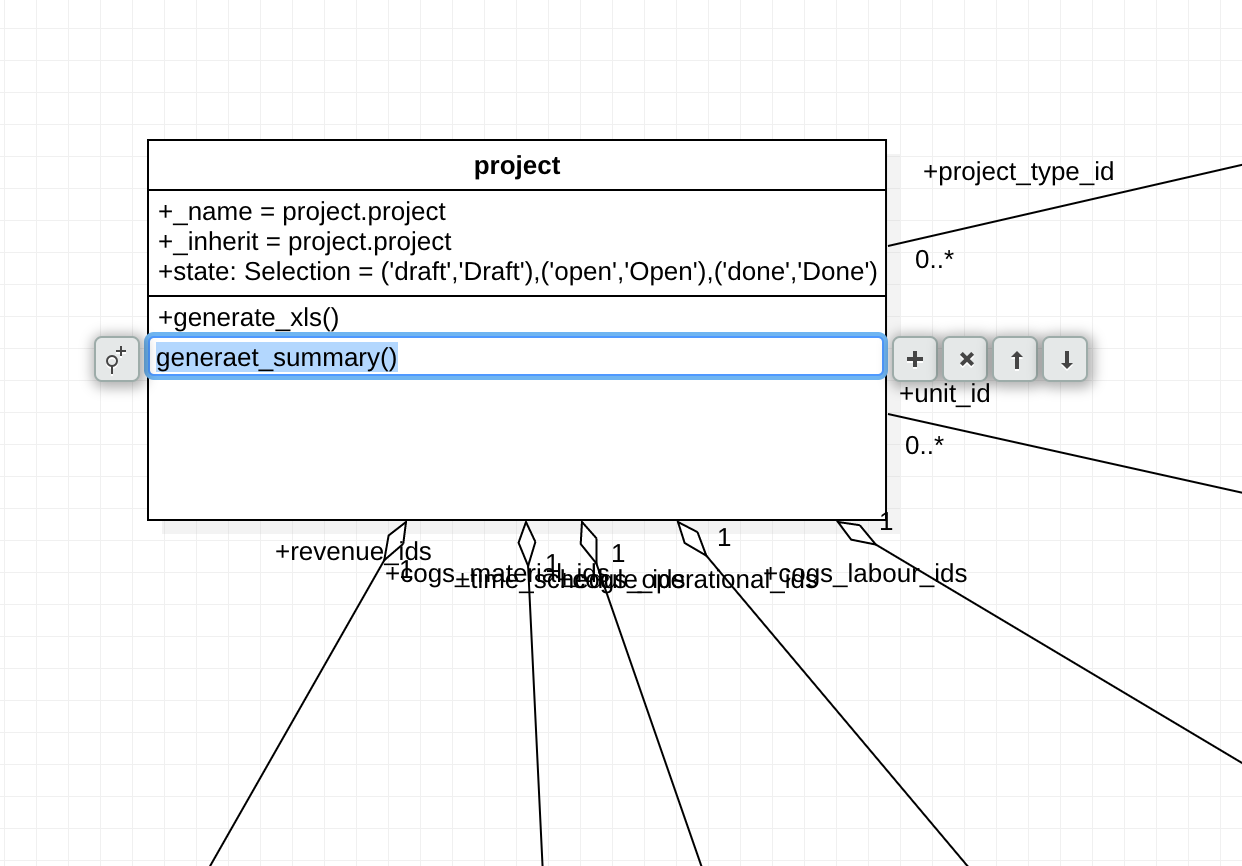
Simple method logics can be defined on the Specification box, like for on change method, simple compute methods, etc.
Method Attributes
Additional parameter can be defined also on the method Documentation box, like:
{
   "@api.depends"  : ["field1", "field2"],
   "@api.onchange" : "field1",
   "@api.model"    : ""
}
etc, to define the method decorators.
Also a special key of the JSON data for method name that starts with "action_".
{
"position" : "smart_button"
"icon" : "fa-iconname"
}to show the generated action button at the smart button section on the form, rather than on the header section.
For example:
{"@api.depends":["contract_quantity","invoiced_quantity"]
}
This will generate:
On Change Method
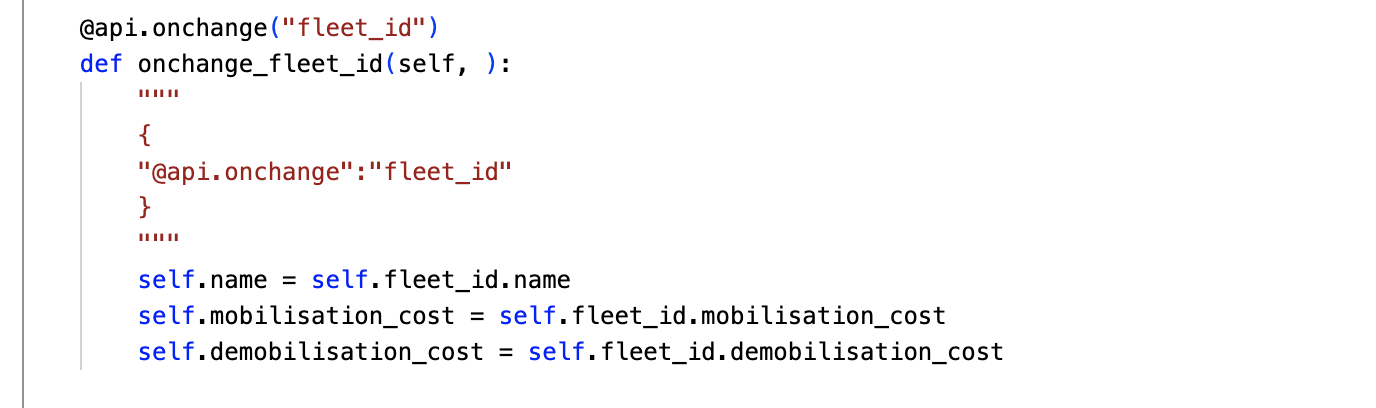
Put new method on the class as usual, eg: _onchange_field(), then define the "@api.onchange" key on the method documentation, it will generate @api.onchange('field') decorator.
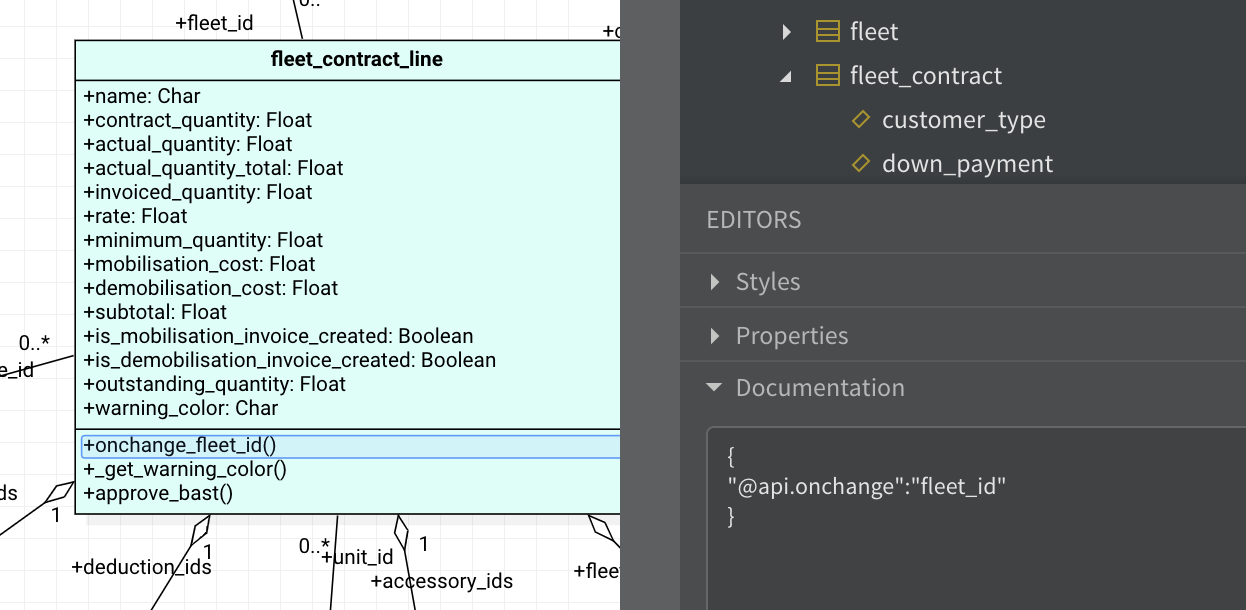
Optionally, you can put the code at the function specification field.
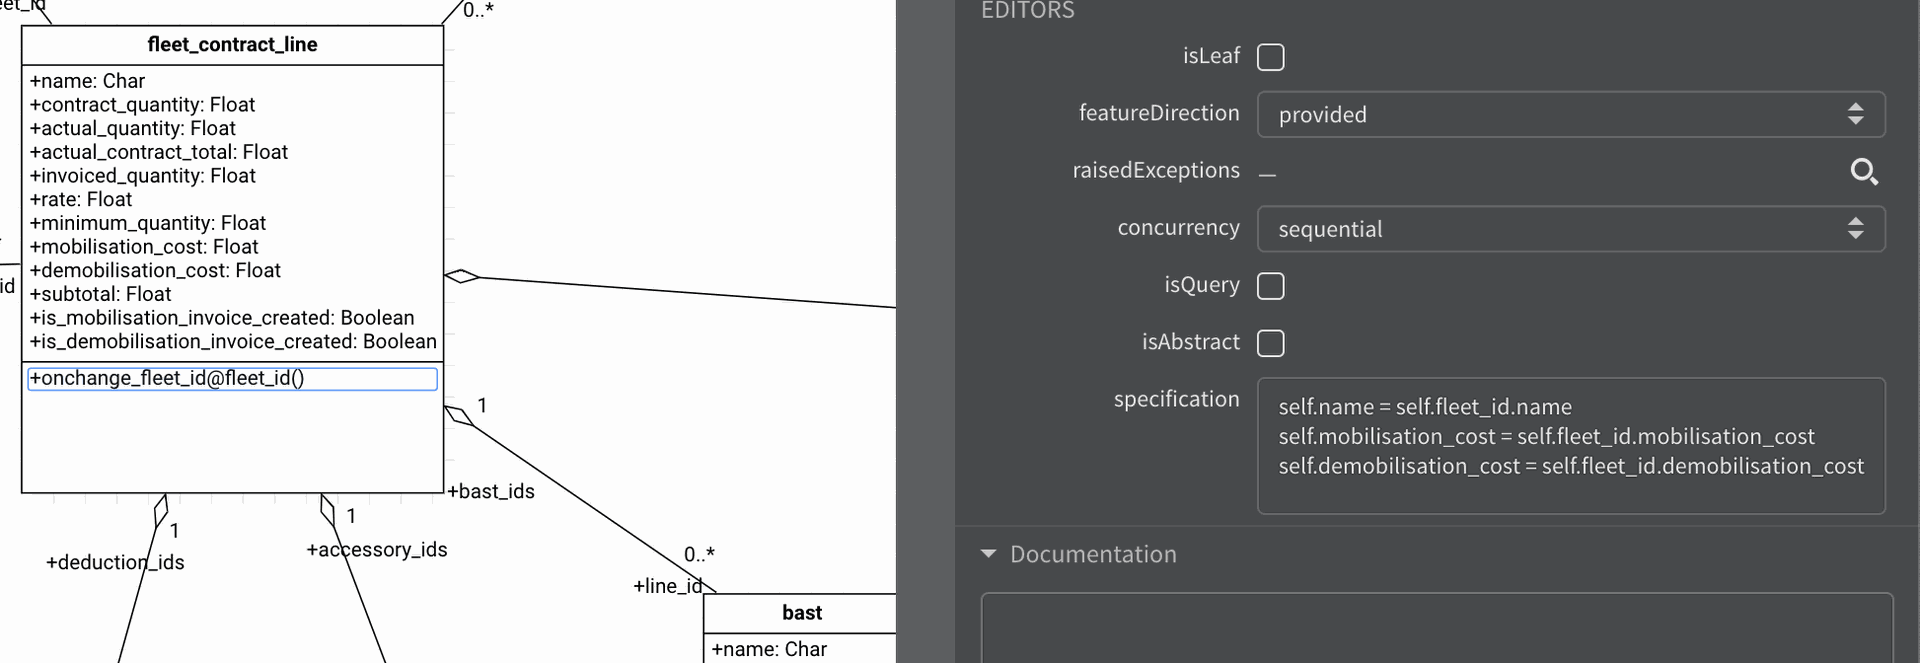
This will generate Python code:
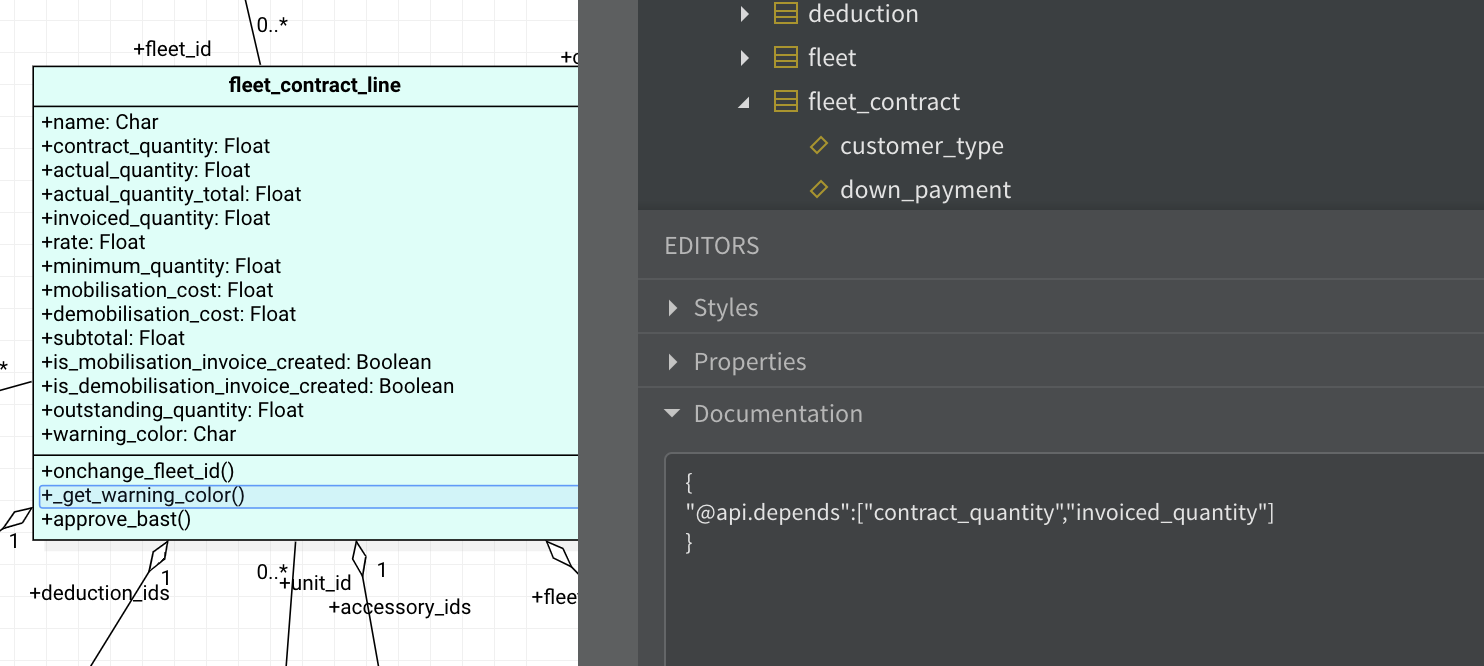
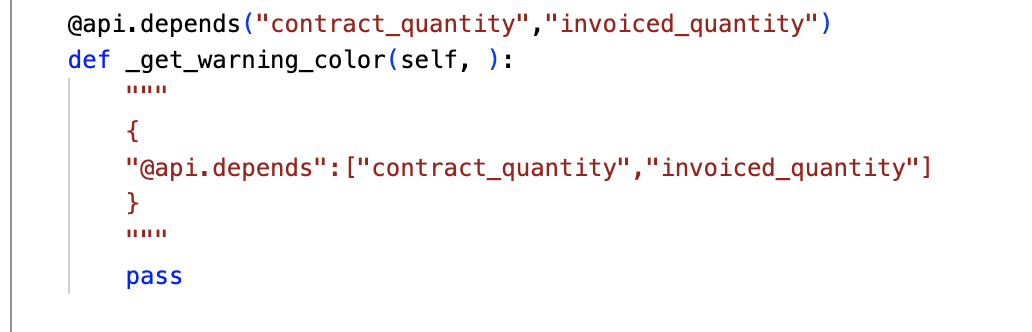
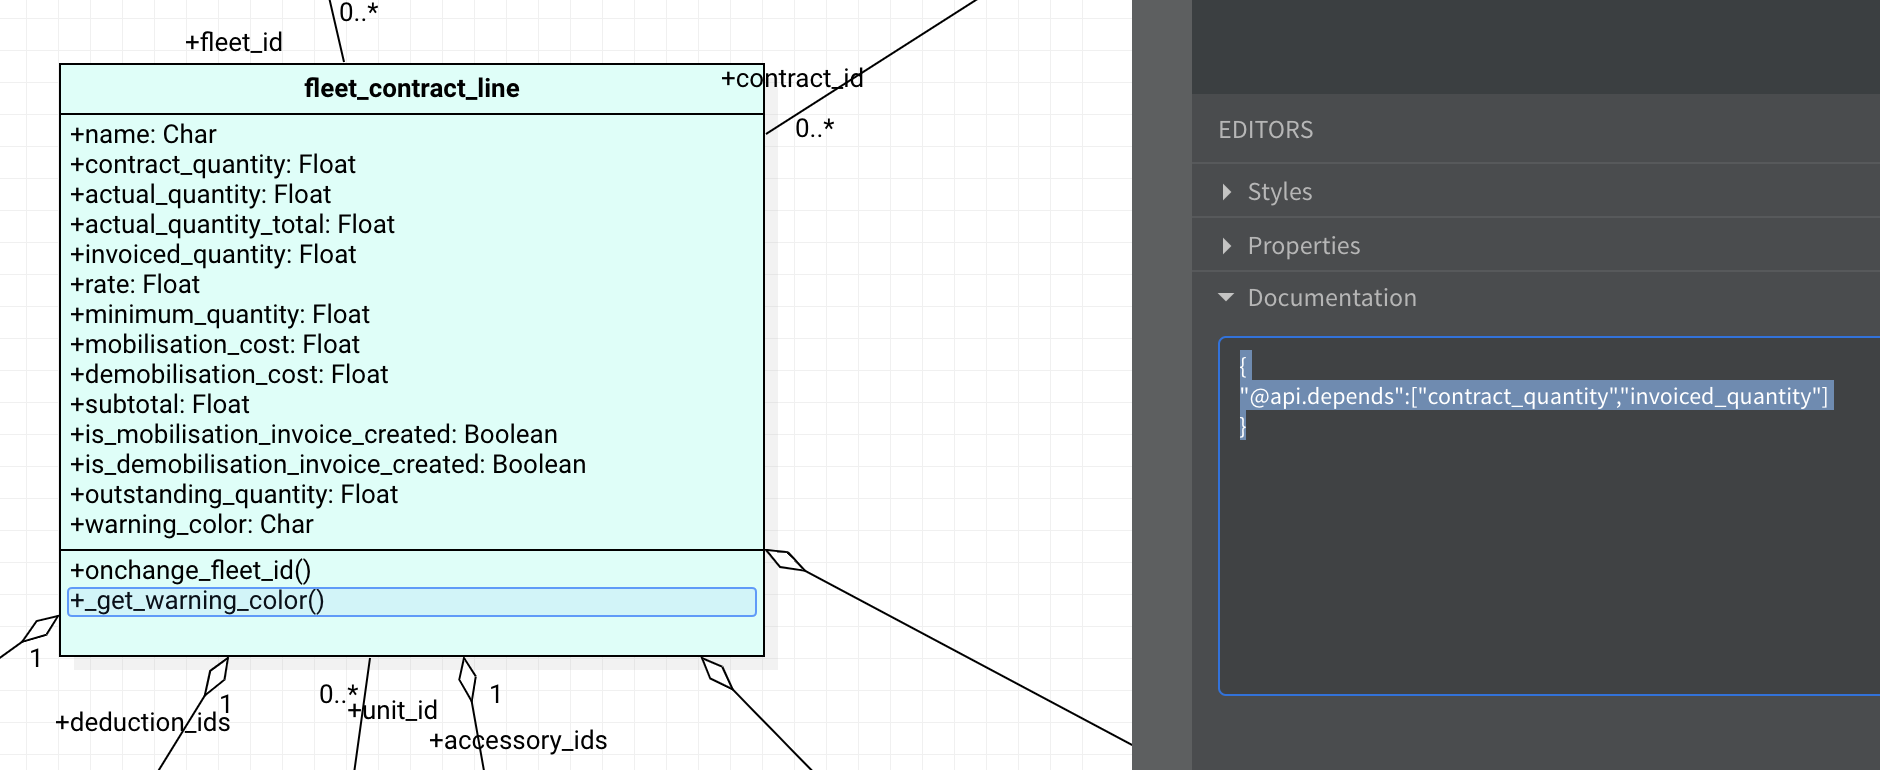
Compute Method
Define the compute method definition of a field (for example warning_color: Char) on the field documentation in JSON format as field attributes, eg:
{"compute":"_get_warning_color"
}
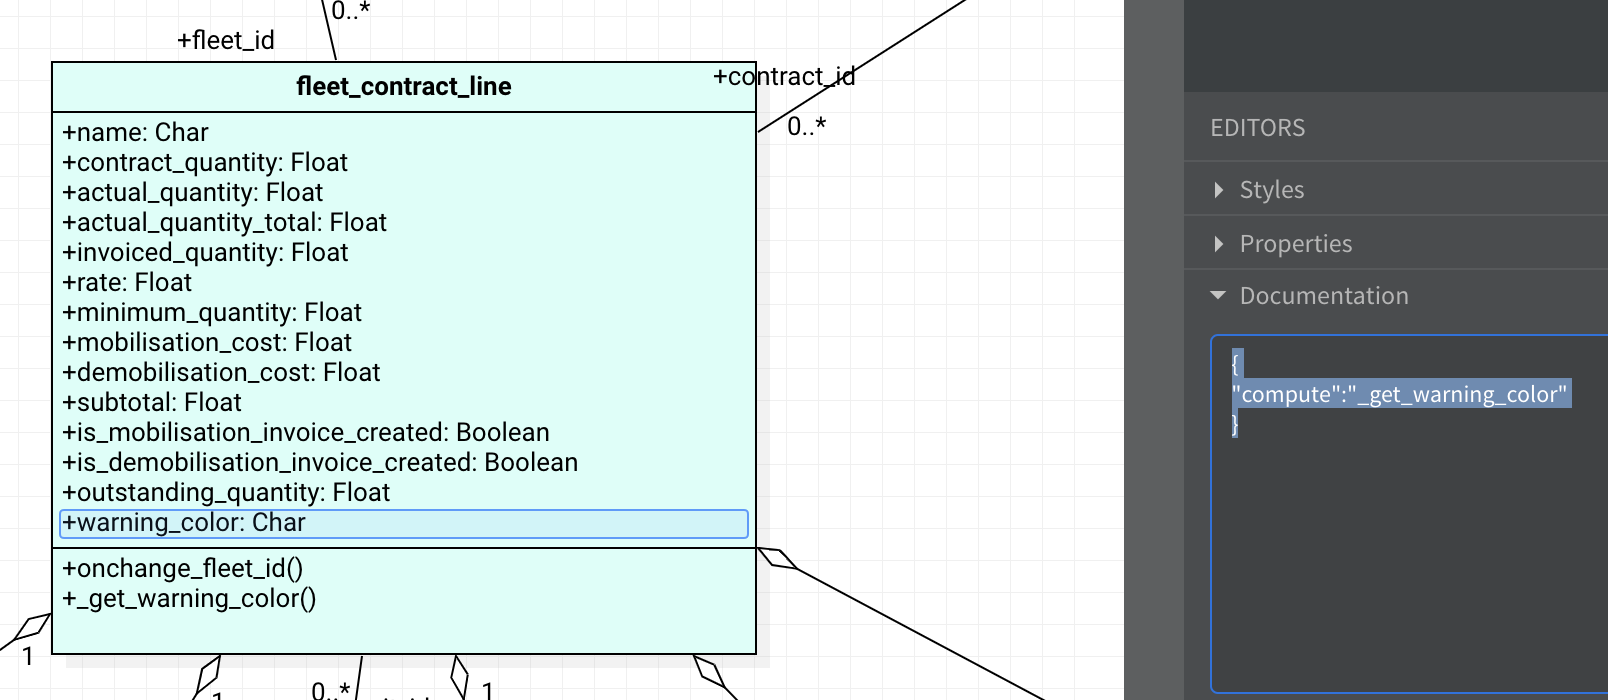
Then, define the required method as usual. You may add more properties for the method, for example, @api.depends:
{"@api.depends":["contract_quantity","invoiced_quantity"]
}
so that it will compute only on the changes of those dependant fields value.
Optionally, you can write down the function code on the Specification box, otherwise it will be an empty function:

This will generate Python code:

Action Buttons Methods
Create the operation on the UML class diagram prefixed with "action_", it will be converted automatically to Odoo class methods and the corresponding buttons on the XML form file.
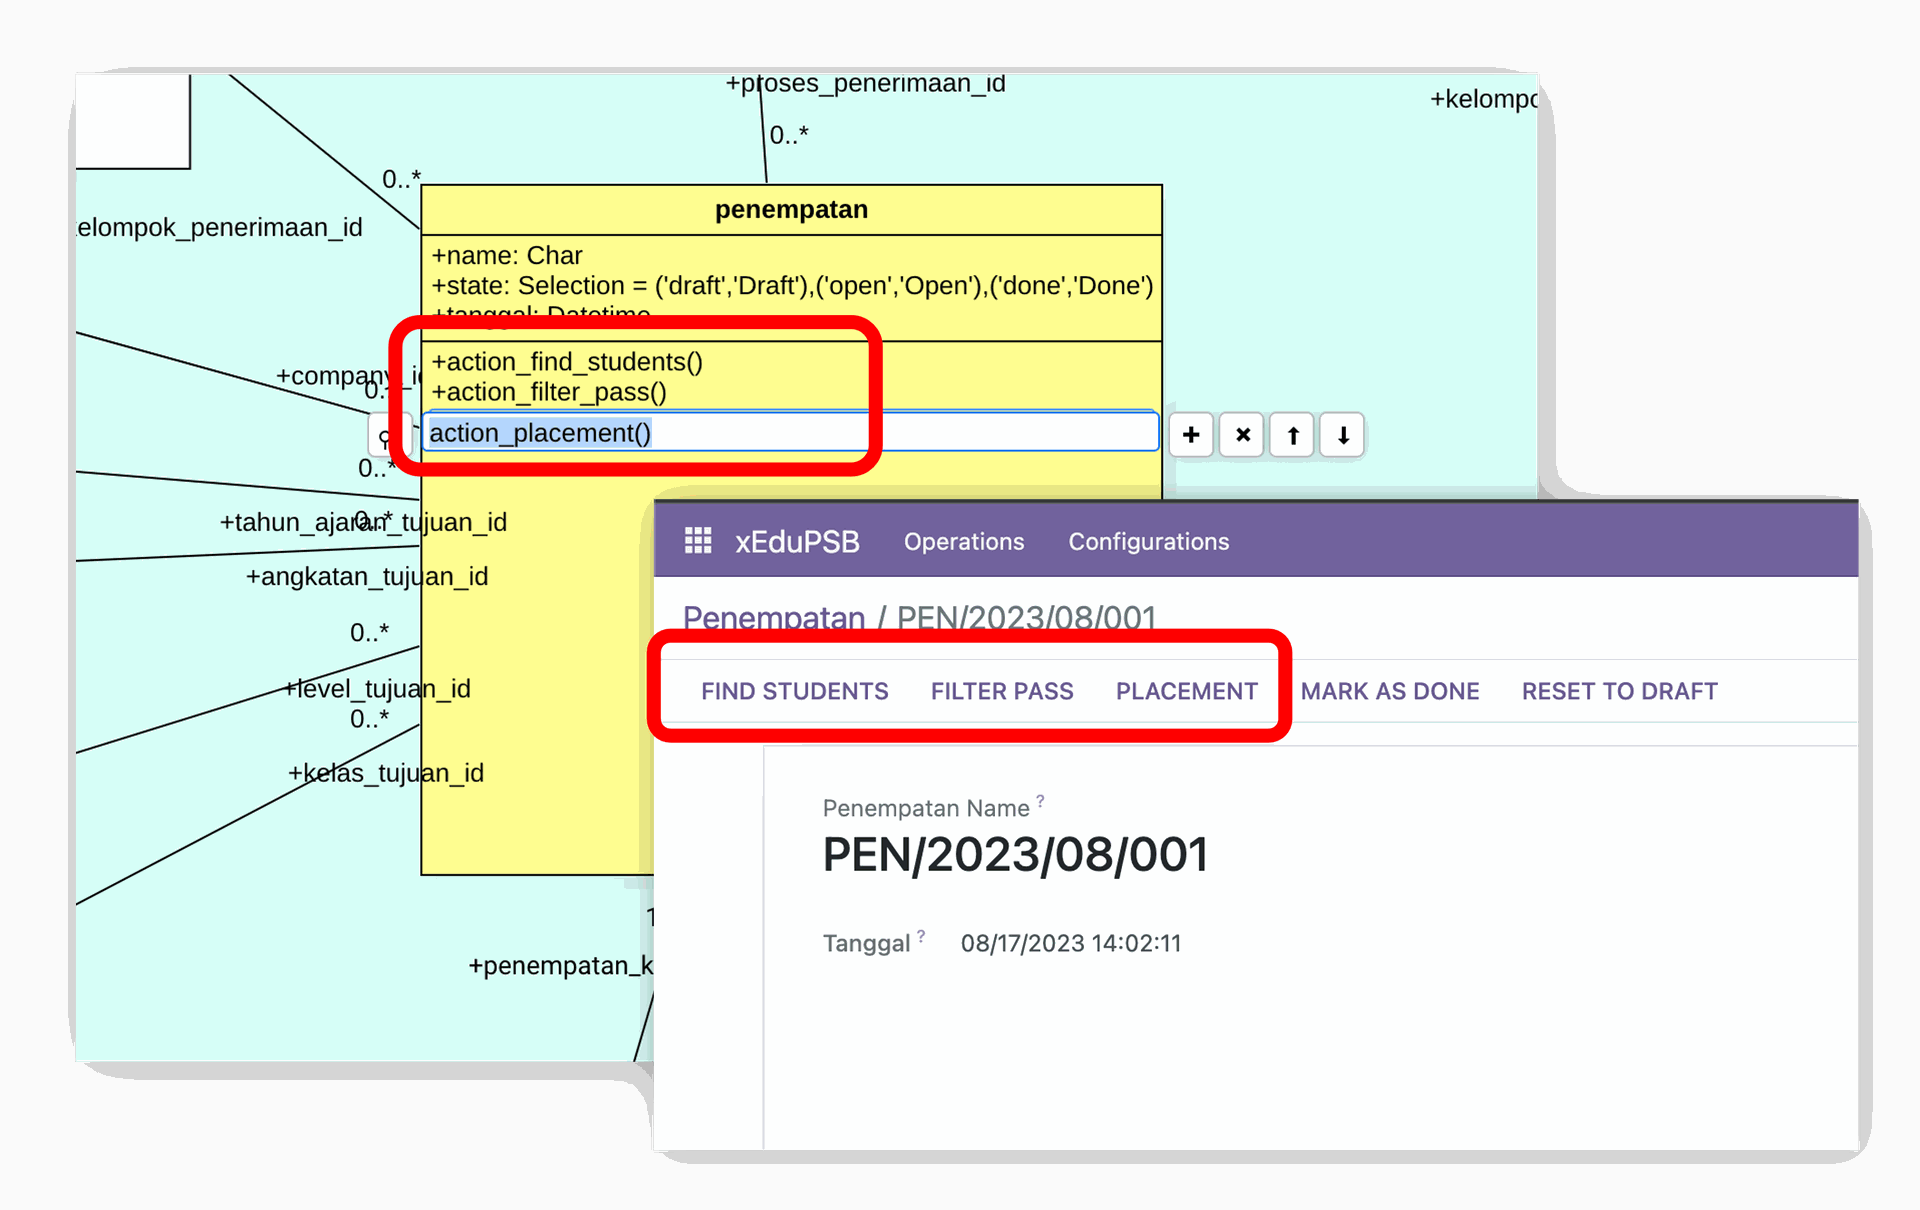
Optionally you can define the appearance of the buttons on the method documentation box, with position and icon key. See below.
Button Attributes
Optionally we can add more button attributes:
xml:attributes: to add XML attributes on <button> tag on the XML form.
For example to add confirmation box, on button click, put key on the method documentation:
{
    "xml:confirm":"Are you sure to delete this record?"
}
To add attrs invisible attributes, put xml:attrs="{'invisible':[condition]}", for example:
{
    "xml:attrs":"{'invisible':[condition]}"
}position: smart_button|header to set the button positon whether on the form header or the smart button section on the form.
icon: icon_name to set the button icon name using the font awesome icon list.
Action Smart Buttons
Action button can be placed inside the smart button section on the form. Just put the JSON data on the field documentation with key: position and value smart_button.

The JSON format example:
{
    "position":"smart_button",
    "icon":"fa-times"
}
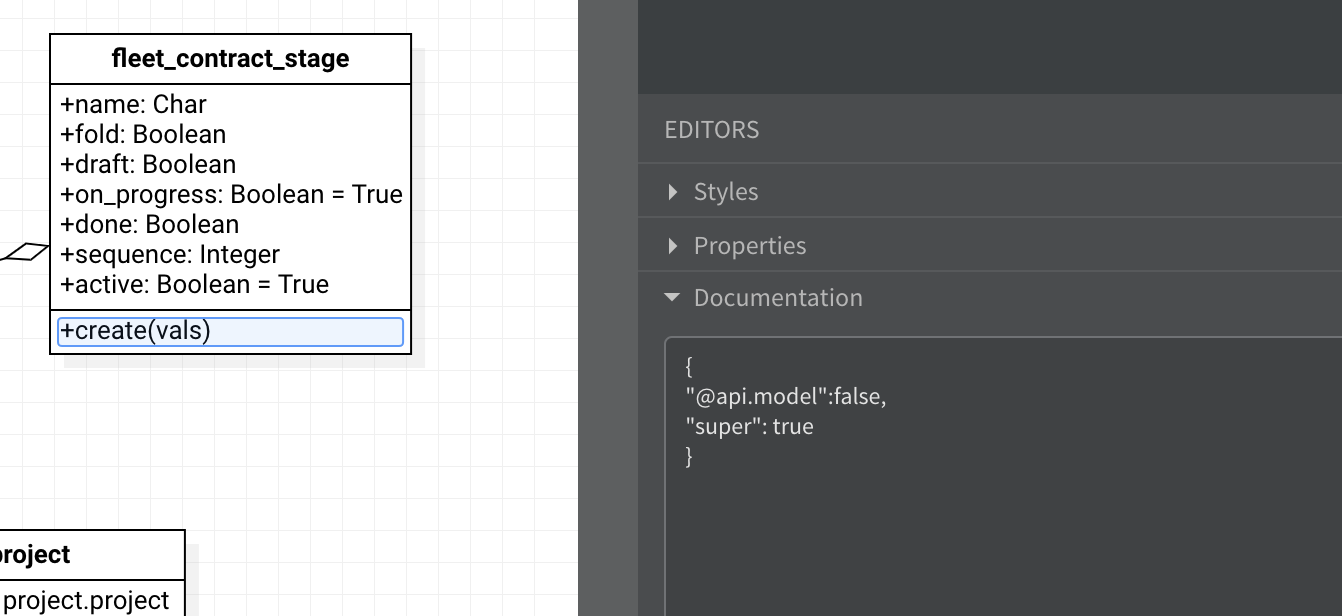
Inherit ORM Methods with Super
If you want to inherit ORM methods like create(), write(), etc that requires @api.model decoration and calling super() method, simply define the method name on the class, and put the @api.method and super key on the method documentation box:
{"@api.model":false,
"super": true
}
This way, the generator will generate create() method with @api.model decoration and execute the super() method.
Here is the generated python code:

The inherited methods are also created on the inherited addon, so you can easily do the detailed logics inside that method.
Qweb Report

Qweb reports are automatically generated along with all relational fields as well as normal fields! So just inherit or modify them to adjust your requirements!
State Fields and Sequence
When you have "state" field on your model, the generator will create action buttons on the form, put it under "Operation" menu of the application, and generate the sequence for document numbering.

You can easily modify the sequence numbering by editing the generated inherited module, for example:
Dynamic Stages
By adding a "stage" class, and link it to any other object as "stage_id" Many2One field, we can get dynamic stages to improve the flexibility of the approval workflow of the object.
Putting "is_a_stage" :true in this class will treat it as a stage class, the generator will automatically add:
draft: Boolean field
open: Boolean field
done: Boolean field
fold: Boolean field
allow_confirm: Boolean field
allow_cancel: Boolean field
execute_enter: Char field
confirmation: Char field
On the class that has "stage_id" field related to the stage class, the generator will automatically add:
stage_is_draft: Boolean field, related to the stage_id.draft, store = True
stage_is_open: Boolean field, related to the stage_id.open, store = True
stage_is_done: Boolean field, related to the stage_id.done, store = True
allow_confirm: Boolean field, related to the stage_id.allow_confirm, store = True
allow_cancel: Boolean field, related to the stage_id.allow_cancel, store = True
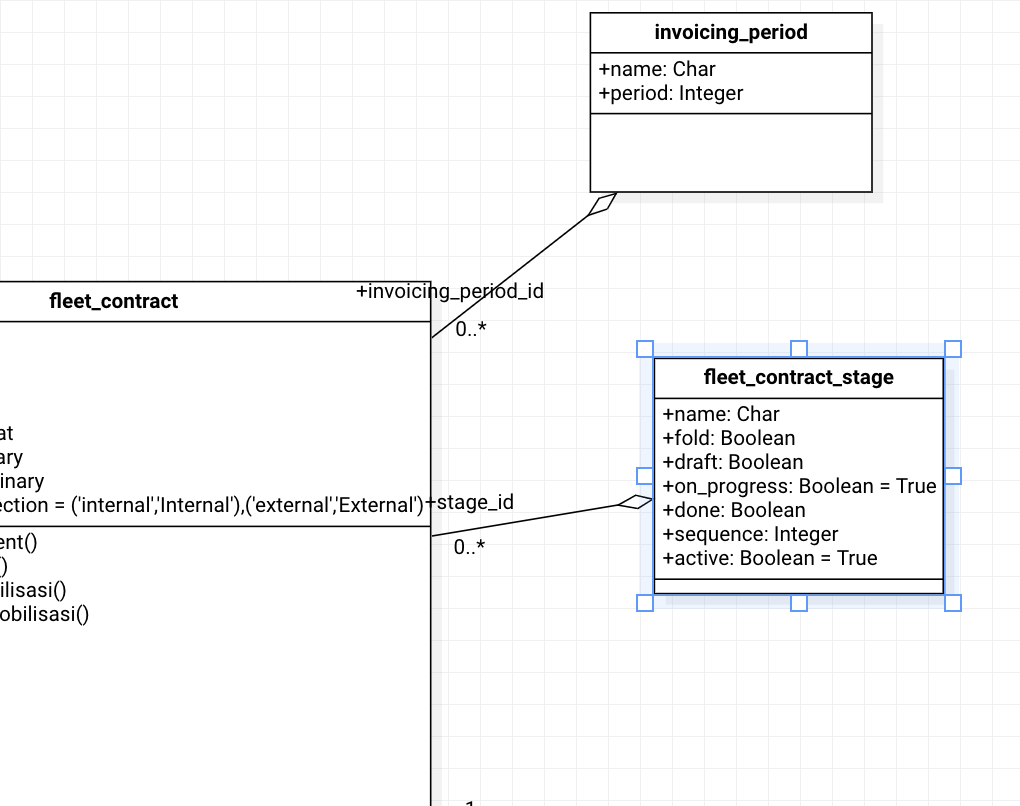
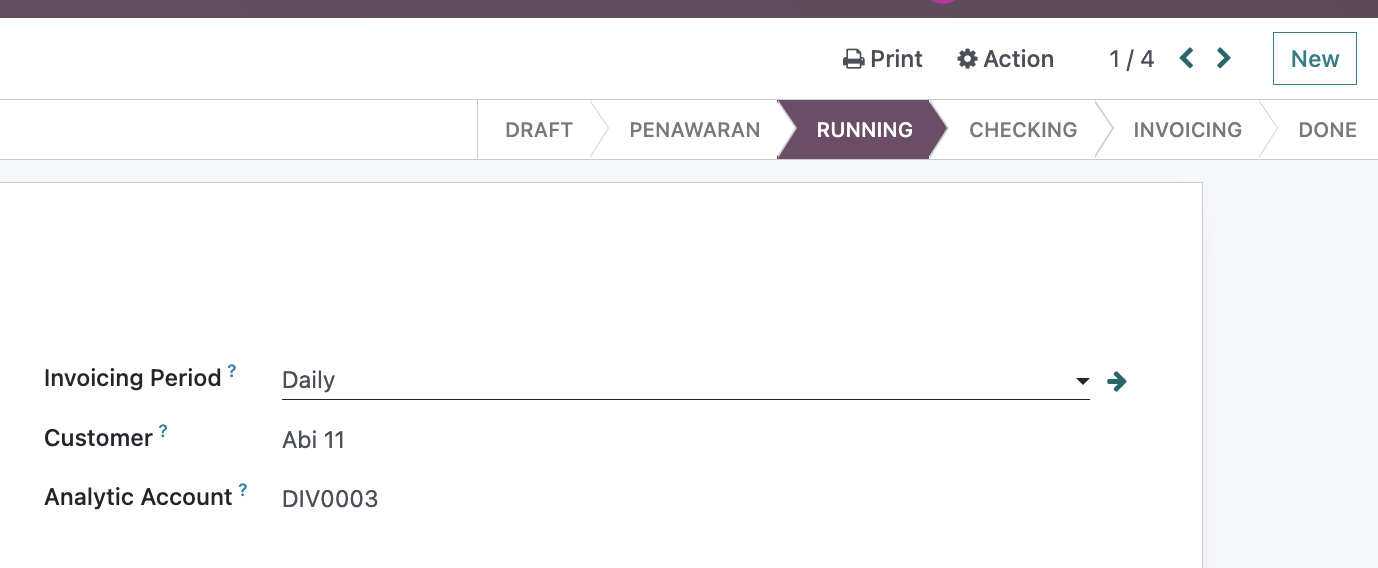
It will generate the status bar widget on the form, just like the static "state" selection field. But with this approach, we can have dynamic states by adding the records on the "stage" object.
It will also, create the Confirm and Cancel button to move the stage to the next sequence, or back to the previous sequence.
Furthermore, you can add dynamic conditions on each stage, like who or which groups are allowed to press buttons, which fields are read only or required, etc.
If you set the confirmation message on a stage, then a confirmation box will appear upon confirm button clicked on that stage. For example:
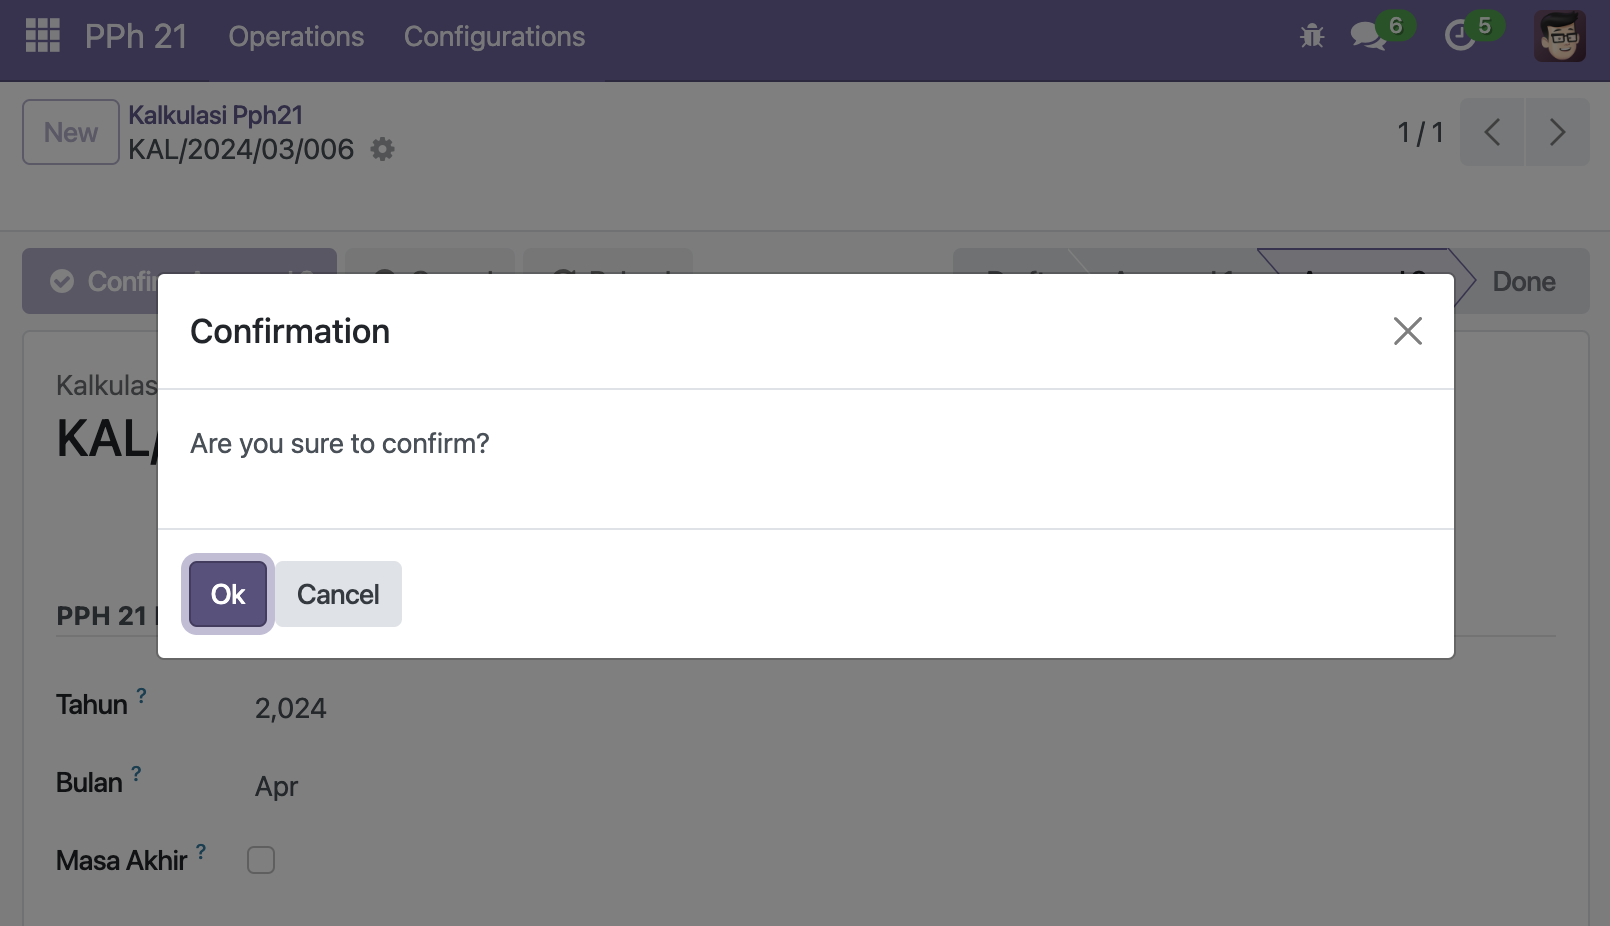
If you have "execute_enter" attribute on the stage class, then this method will be executed automatically when we press the Confirm button upon entering the stage
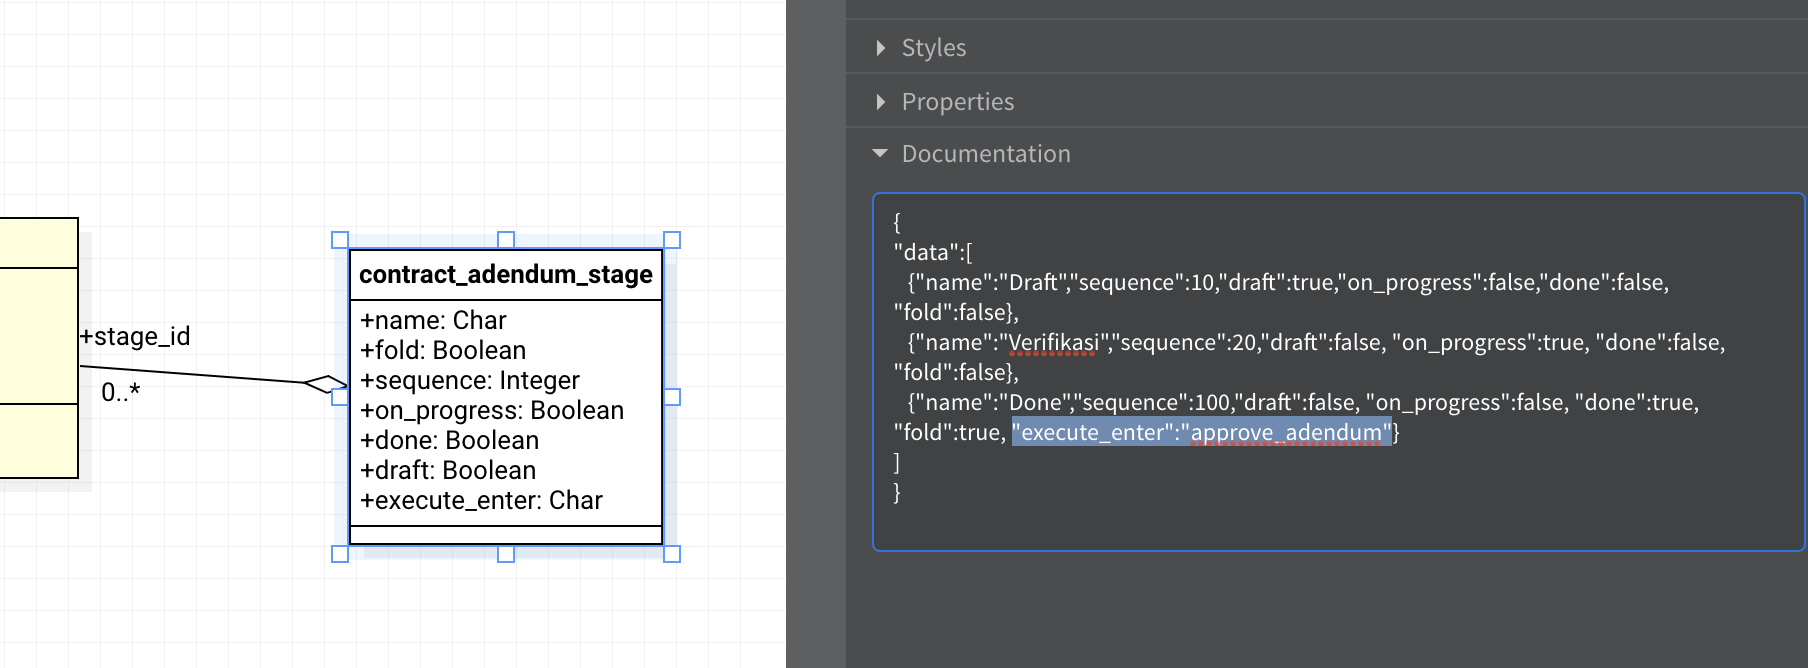
In the above example, when the Confirm button reach the Done stage, then the approve_adendum method will be executed automatically, subject to the existence of the method on the class.
The stage class must have "draft" Boolean field, to identify that the document linked to it is in the draft state, and all fields are editable.
A stage_is_draft Boolean field, which is a related=stage_id.draft field, is required for all models that has stage_id model to be used as a flag for read only or editable state of all fields on the model. When the stage is draft, the all fields will be editable on that object.
For example:

Example JSON for stage data:
[
  {
    "name": "Draft",
    "sequence": 10,
    "draft": true,
    "done": false,
    "open": false,
    "fold": false,
    "allow_confirm": true,
    "allow_cancel": false,
    "execute_enter": "",
    "confirmation": ""
  },
  {
    "name": "Prospecting",
    "sequence": 20,
    "draft": false,
    "done": false,
    "open": true,
    "fold": false,
    "allow_confirm": true,
    "allow_cancel": true,
    "execute_enter": "",
    "confirmation": ""
  },
  {
    "name": "Inquery",
    "sequence": 30,
    "draft": false,
    "done": false,
    "open": true,
    "fold": false,
    "allow_confirm": true,
    "allow_cancel": true,
    "execute_enter": "",
    "confirmation": ""
  },
  {
    "name": "Quotation",
    "sequence": 40,
    "draft": false,
    "done": false,
    "open": true,
    "fold": false,
    "allow_confirm": true,
    "allow_cancel": true,
    "execute_enter": "",
    "confirmation": ""
  },
  {
    "name": "Win",
    "sequence": 50,
    "draft": false,
    "done": true,
    "open": true,
    "fold": false,
    "allow_confirm": false,
    "allow_cancel": true,
    "execute_enter": "",
    "confirmation": ""
  },
  {
    "name": "Postponed",
    "sequence": 60,
    "draft": false,
    "done": false,
    "open": true,
    "fold": false,
    "allow_confirm": false,
    "allow_cancel": true,
    "execute_enter": "",
    "confirmation": ""
  },
  {
    "name": "Lost",
    "sequence": 70,
    "draft": false,
    "done": false,
    "open": true,
    "fold": true,
    "allow_confirm": false,
    "allow_cancel": false,
    "execute_enter": "",
    "confirmation": ""
  }
]
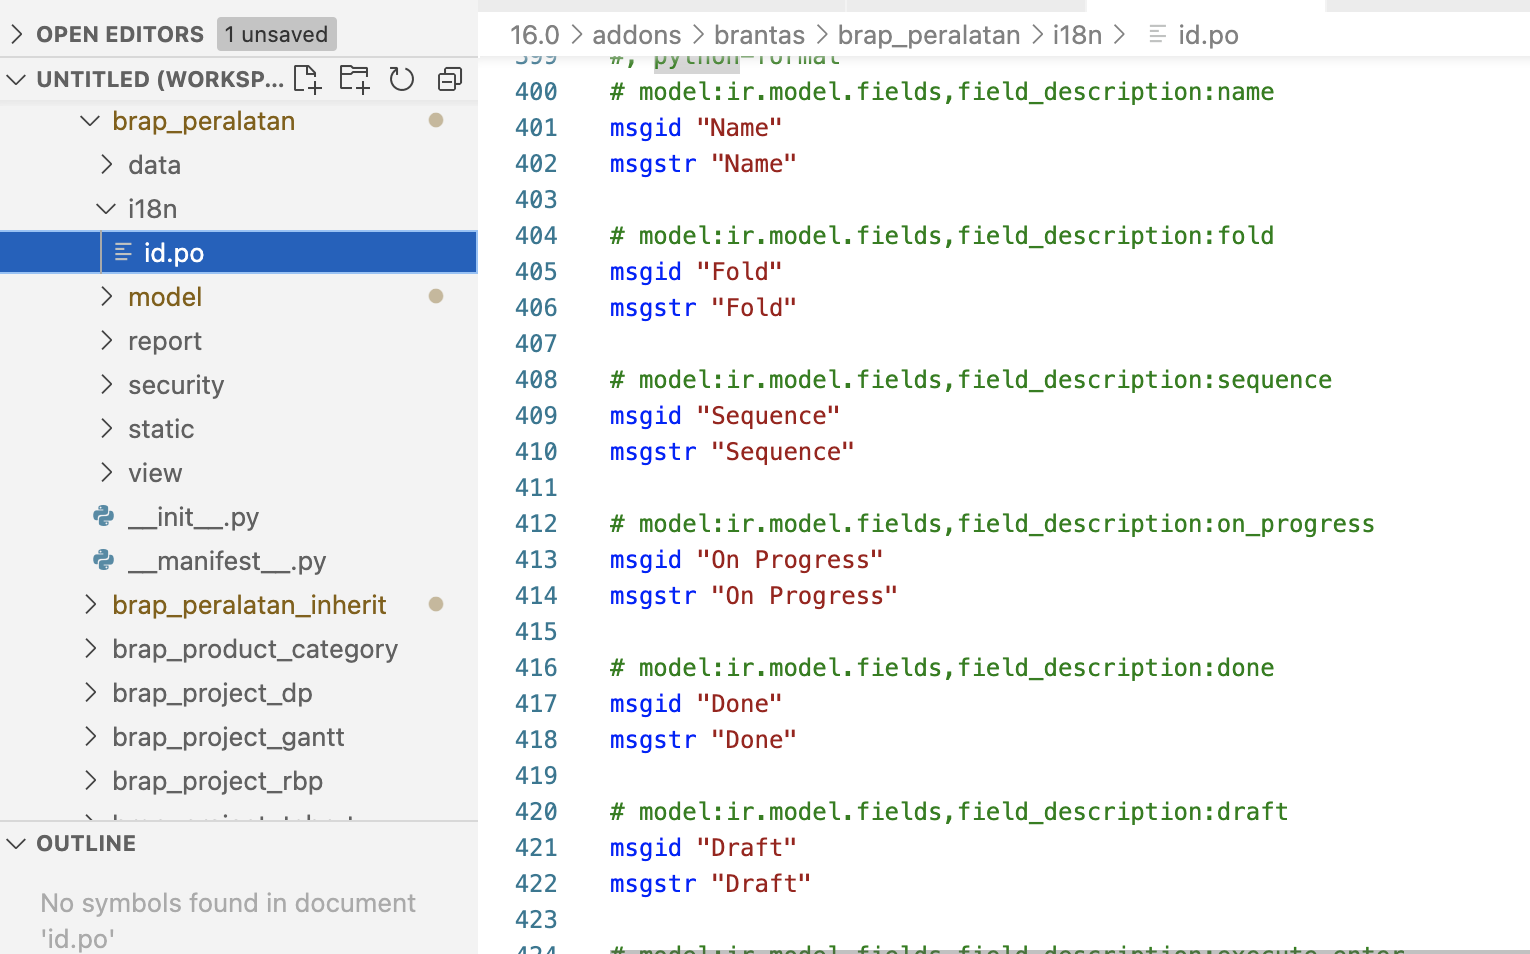
Internationalisation
The generator automatically generates the i18n folder under your addon folder containing id.po sample translation file in Bahasa Indonesia language.
It will loop through all field labels on all classes you have in the diagram and compose them into a dictionary like data.
Simply you can copy it into your inherited addon and do the actual translation.
When user select the language on their preference, then the translation will be activated for your addon.
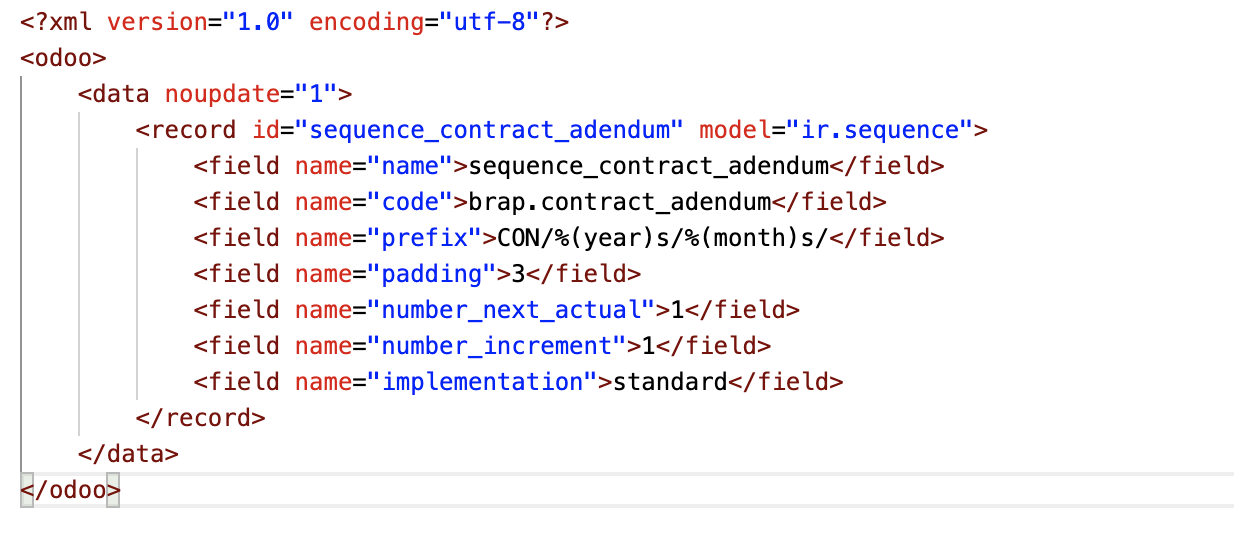
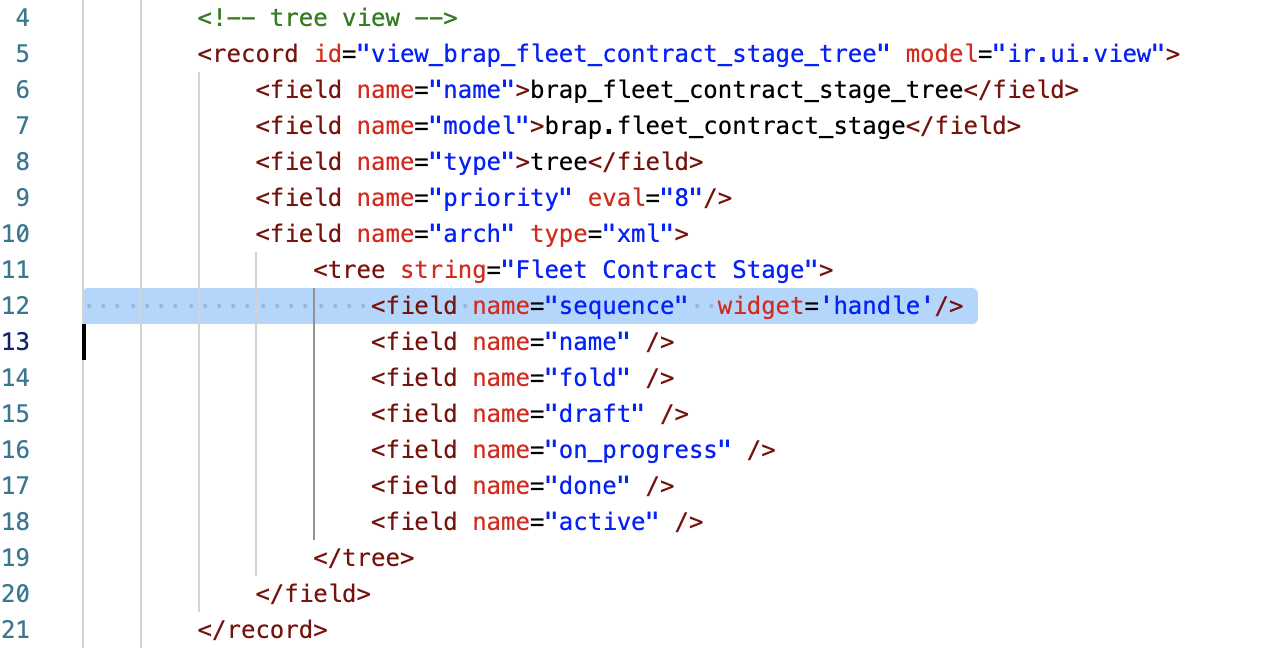
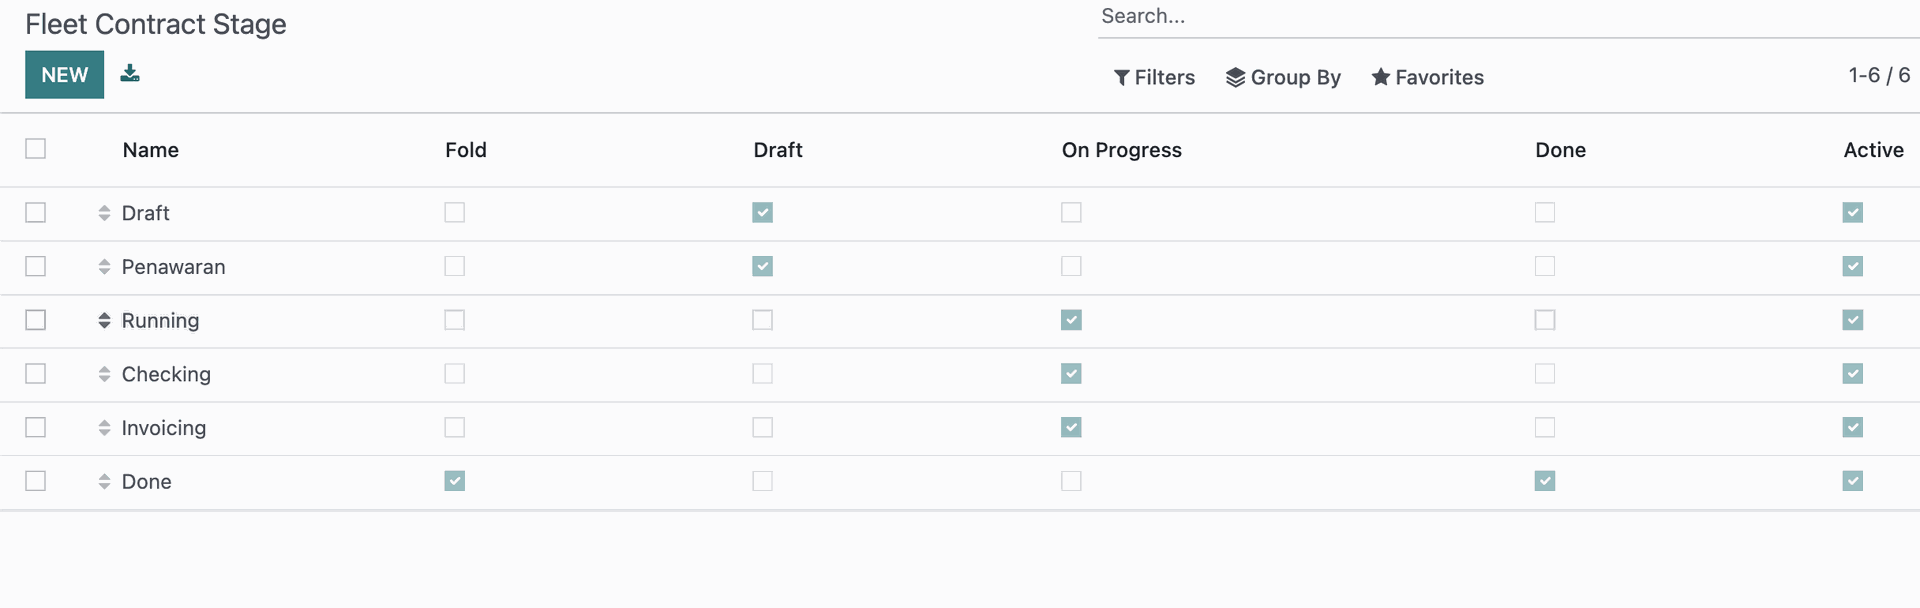
Sequence Handle
If you have sequence field with type integer in your class, then the generator will create the handle widget at the tree view, and the _order attribute on the class equal the the sequence field, so that the sequence can be saved on the mode.
This way, we can easily arrange the record sequence from the tree view.

Here is the generated tree view XML code:
And here is the view in browser:
Unit Tests
Unit test files is generated for each of you model on the diagram. This is the standard unit test cases as the template for you can inherit and define the logics that you want to test.
The generator generates the basic template of test scripts for each models under the tests folder inside the generated addon folder.
It provides common.py for common test scripts, ie, generating test data seeds, 4 dummy records for each class. This will be the base test class for subsequent test scripts for each model in the diagram.
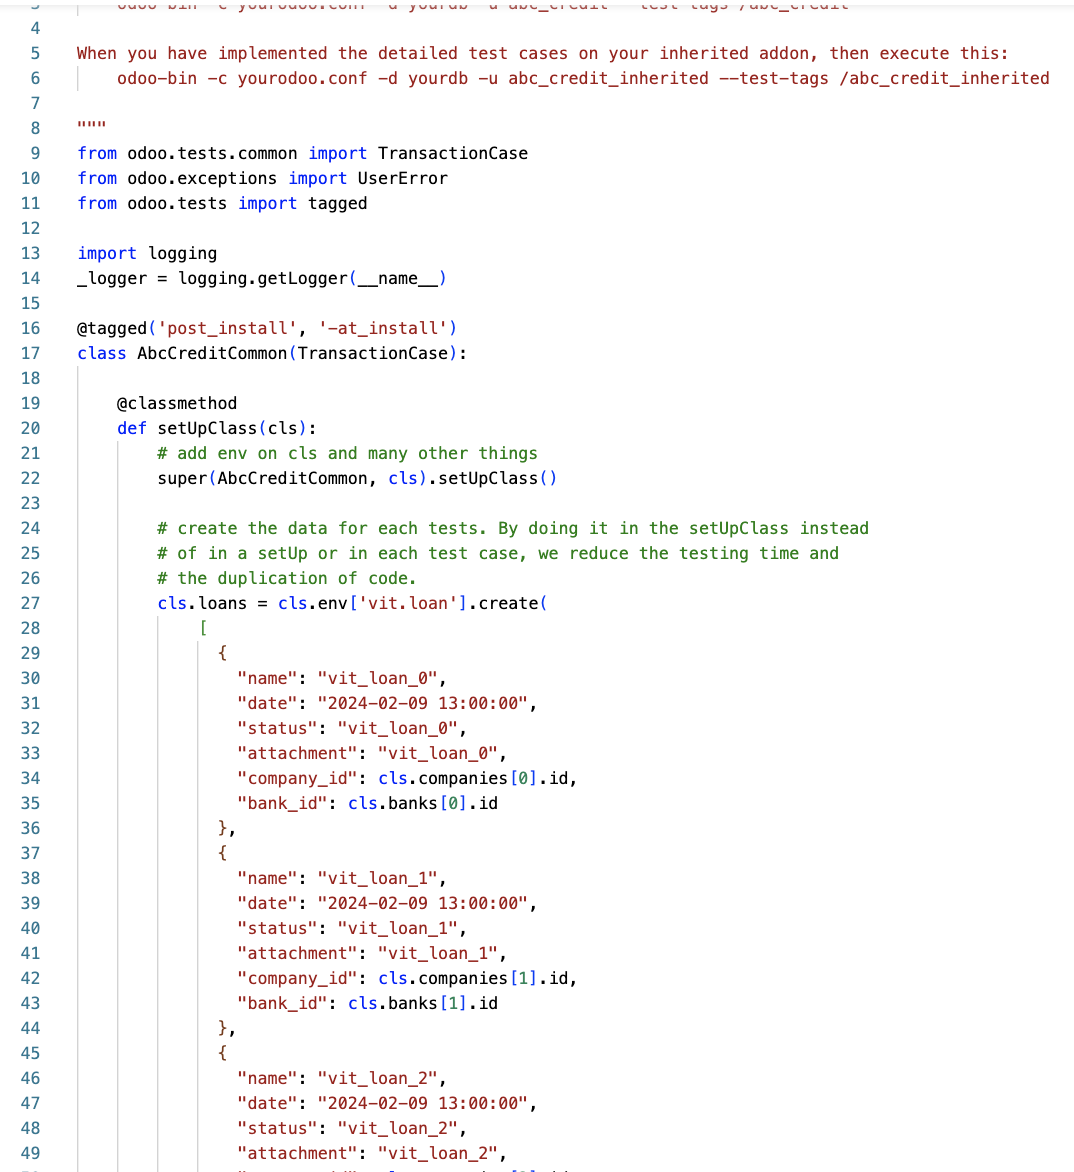
For the class to be included on the test sequence, and the test script is generated, we must add "test:seq":<integer> key on the class documentation, for example:
{
   "test:seq": 10
}
The generator will generate test script for each class in that test:seq order.
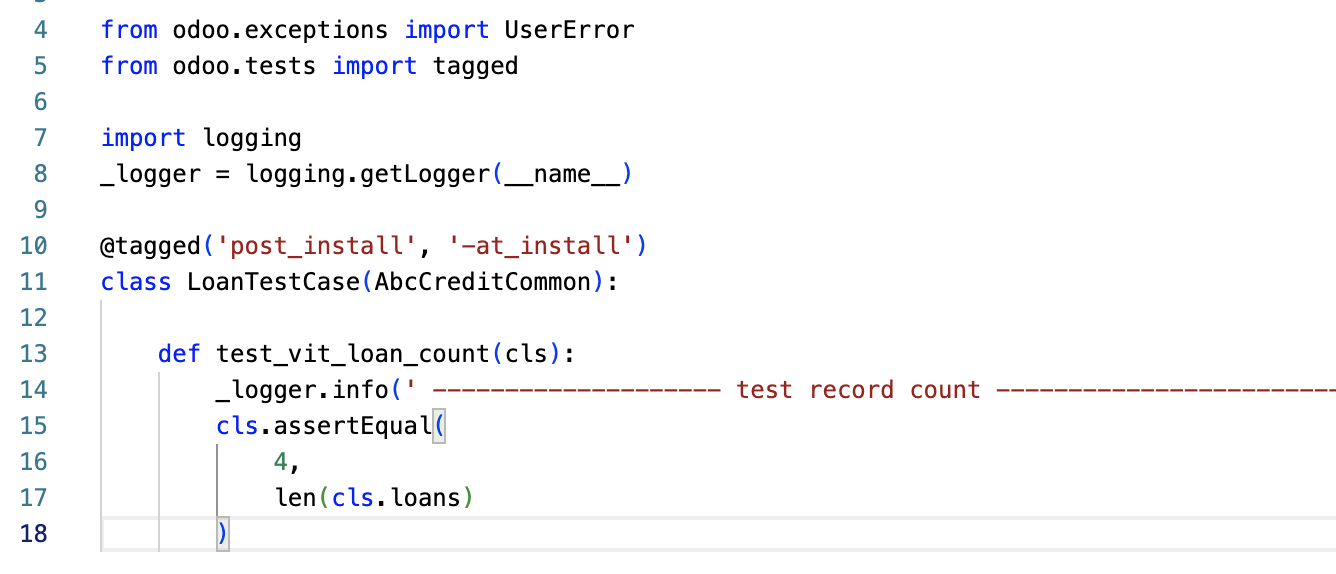
Generic test script provided for each classes:
- checking record count, which must be 4
To execute the test sequence, run odoo executable with test options as defined on the Odoo documentation manual:
odoo-bin --test-tag /your-addon
Usually, you will put the detailed test script under the inherited addons, so execute this:
odoo-bin --test-tag /your-addon-inherit
Wizards
When a class is specified as wizard (transient model), then a set of files under wizard folder is created, including, the wizard python class, XML form, wizard action ready to be invoked from other classes method.
To create a wizard class, create the class as usual, and add is_a_wizard key to true in the class documentation.
For example:
{
"is_a_wizard":true
}
This will generate necessary files for creating a wizard:
- wizard/class_name.py, a class python definition inherited from models.TransientModel with all attributes and methods as defined in the class.
- wizard/class_name.xml, an XML wizard form definition for the class, with buttons in the footer section of the form for all operations, and a special Cancel button.
And then it will import them from __init__.py and __manifest__.py file of the generated addon.
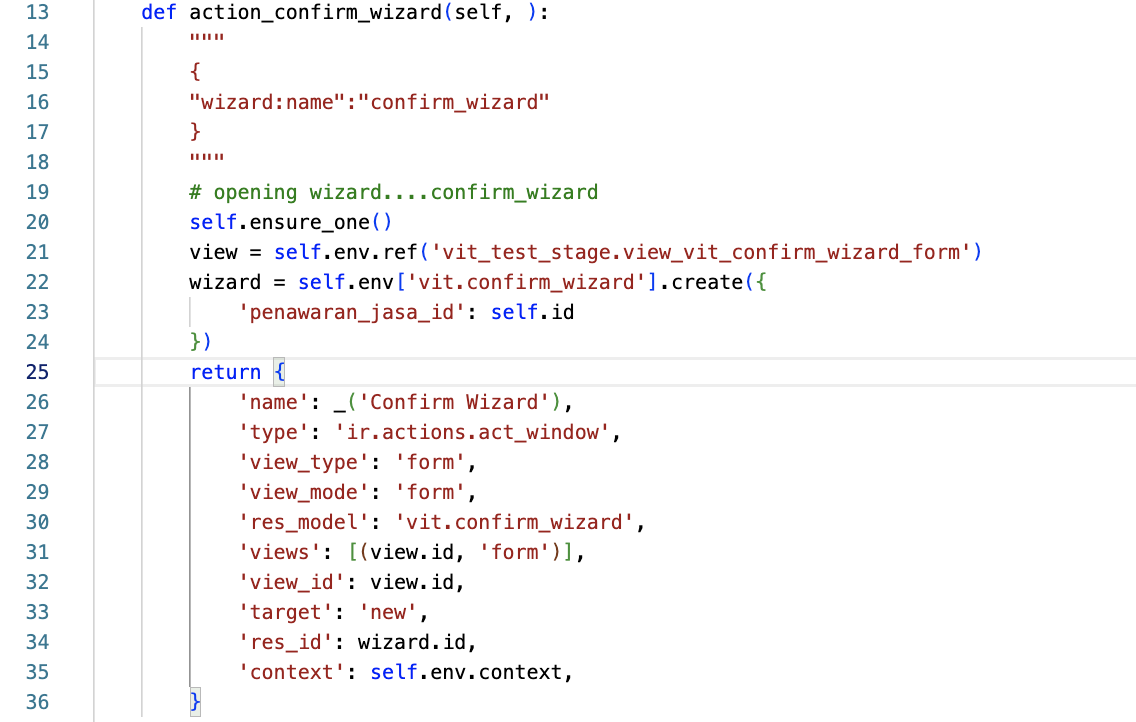
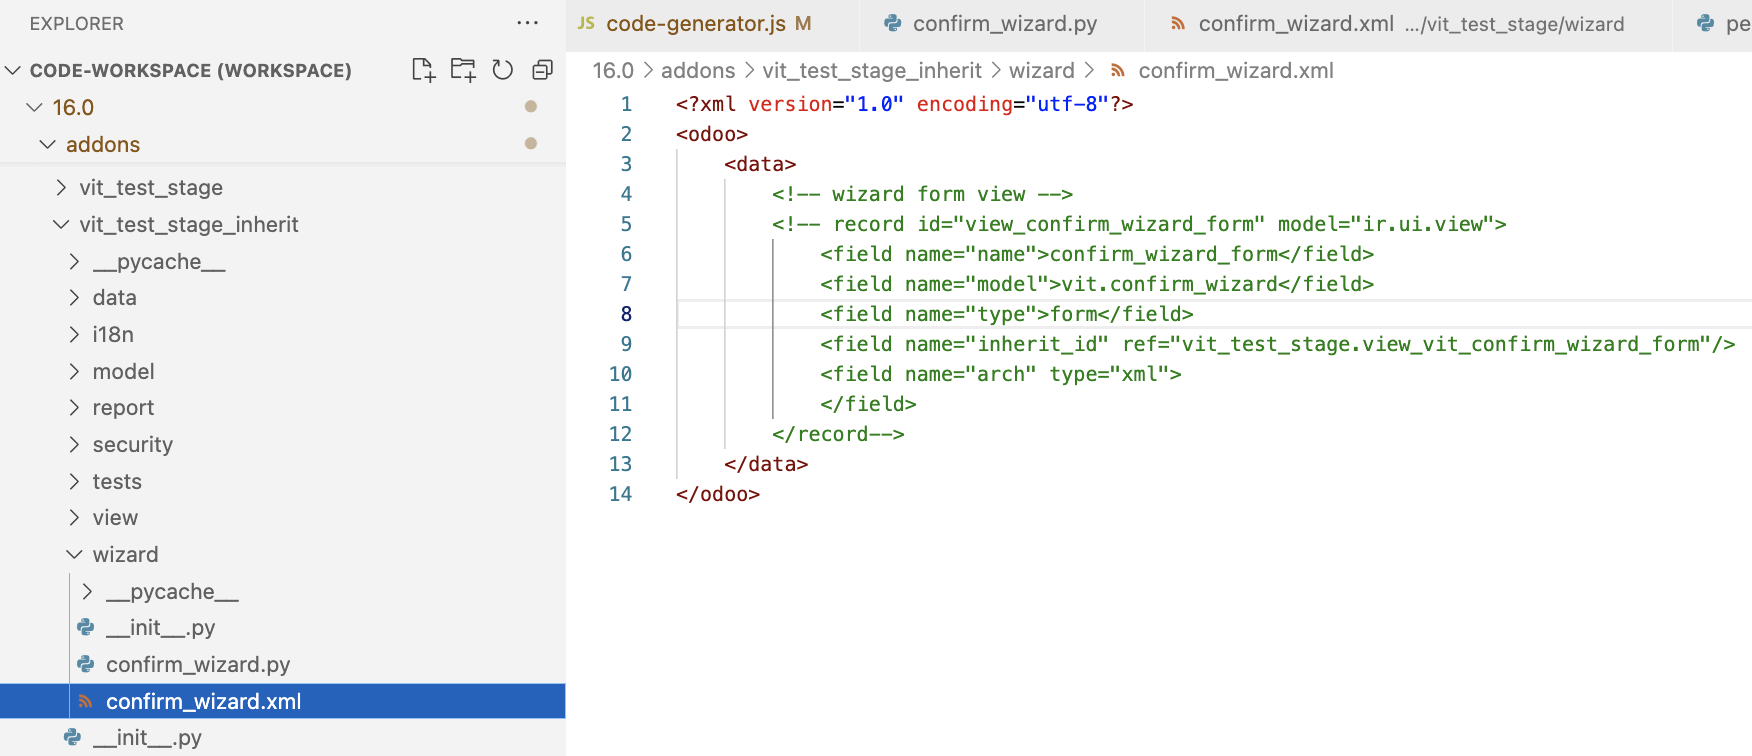
To use the wizard from an action in another class, put wizard:name = wizard class name on the caller method documentation. For example:
{"wizard:name":"confirm_wizard"
}
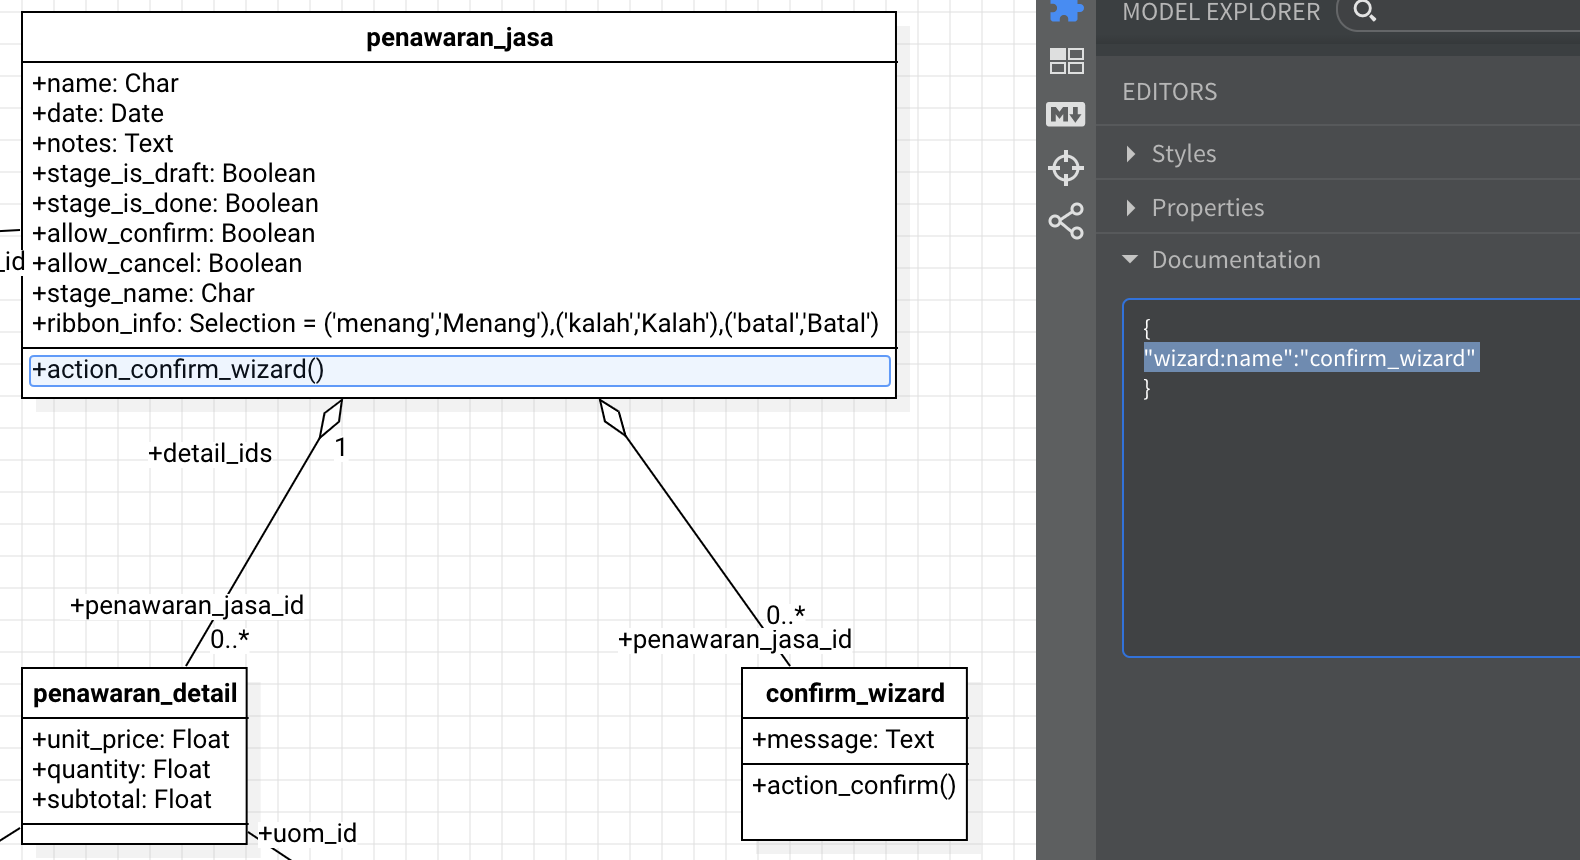
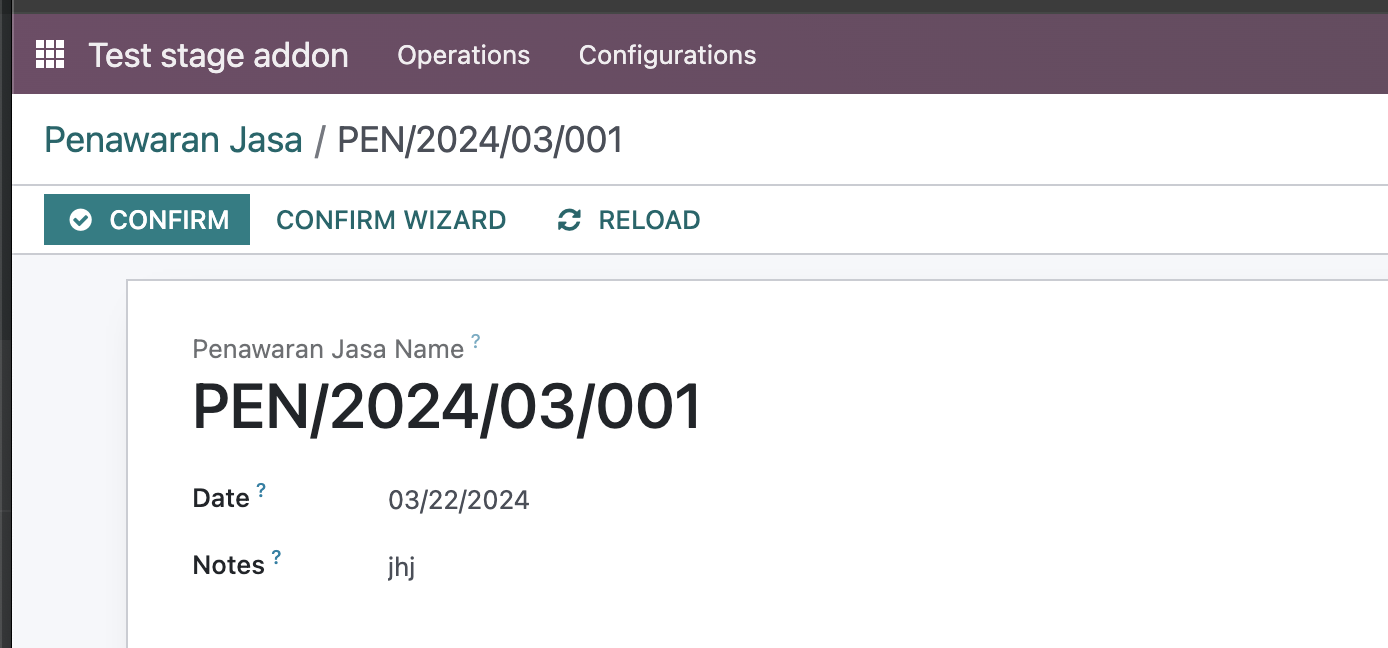
This will generate a button on the XML form (because it's name starts with action_) and a method containing special wizard invoking sequence codes on the method definition (because it has wizard:name option):
When installed, the invoking class will have the buttons on the form view, and when clicked, it will invoke the wizard popup subsequently.

Next, you can simply override and write the action method logics on the inherited addon, located in the inherited_addons/wizard folder. For example:
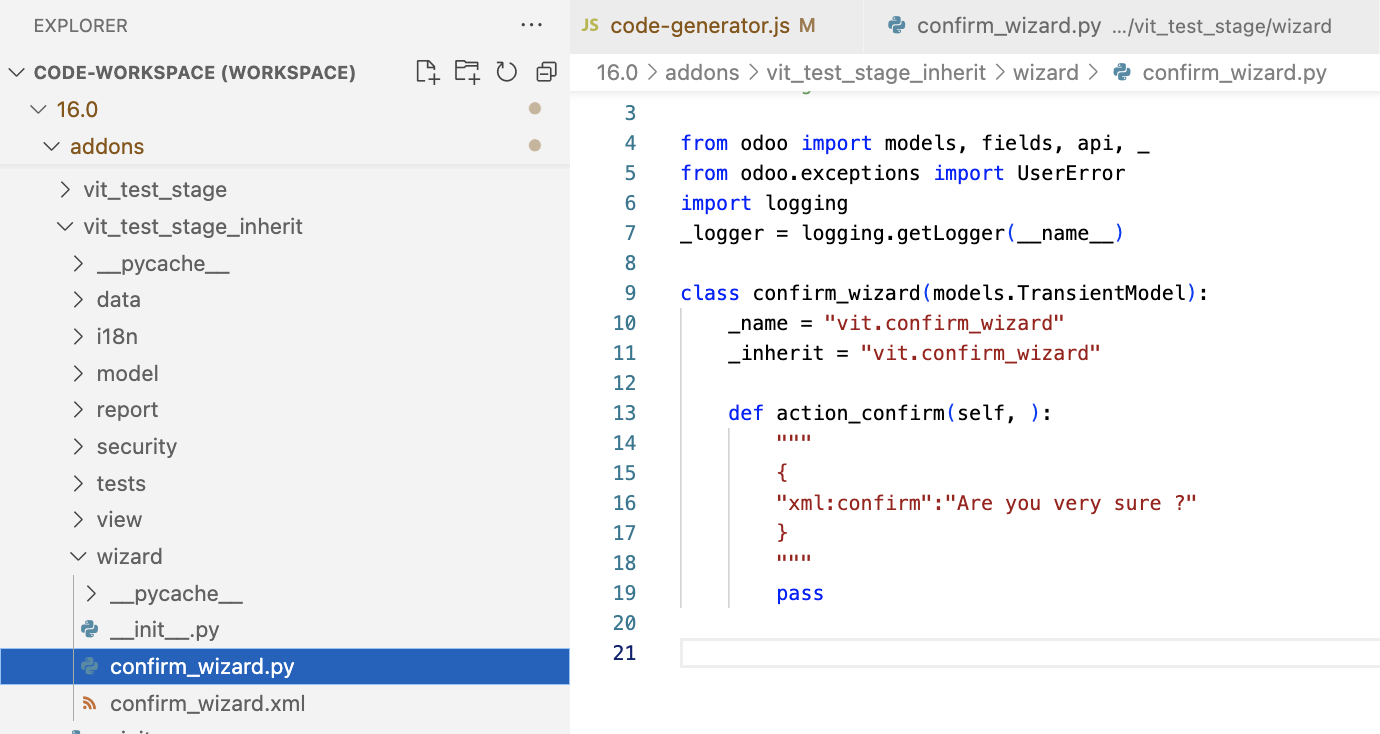
Optionally you may inherit the wizard XML form also on the inherited addon, located in the inherited_addons/wizard folder.
Don't forget to import the inherited XML definition from the inherited addon manifest file.
Ribbon
To add ribbon on a form, based on a selection field on the model, simple add form:ribbon key into the field documentation containing these keys:
- data. list of object containing these keys for the ribbon
- color: ribbon color
- title: ribbon title
- invisible-domain: additional ribbon invisible condition to add, beside the default ('field-name','=',False)
For example:
{
    "form:ribbon": {
        "data":[
           {"color":"bg-success", "title":"Tender Menang"},
           {"color":"bg-danger",  "title":"Tender Kalah"},
           {"color":"bg-warning", "title":"Tidak Ikut"}
       ]
 }
This will create two ribbon widget for the true and false condition of the field content.
Example form generated, when the field is true:
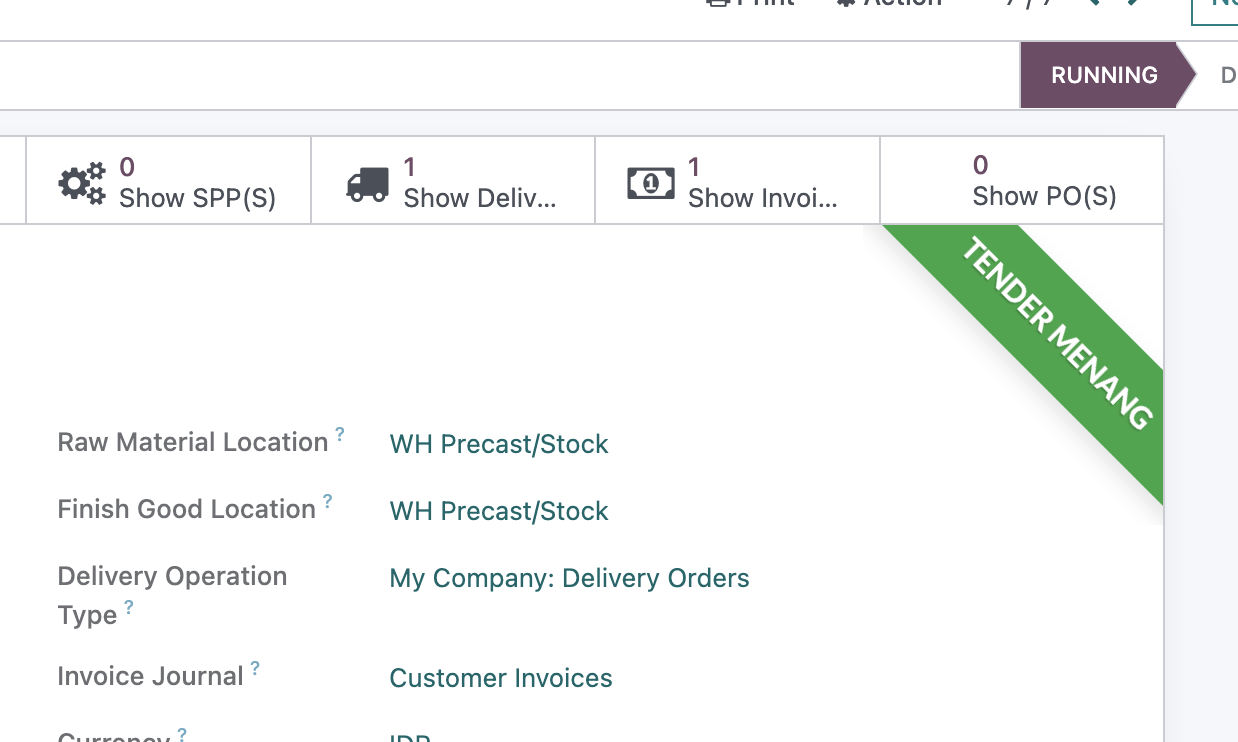
Example form generated, when the field is false:

Action Server Context Menu
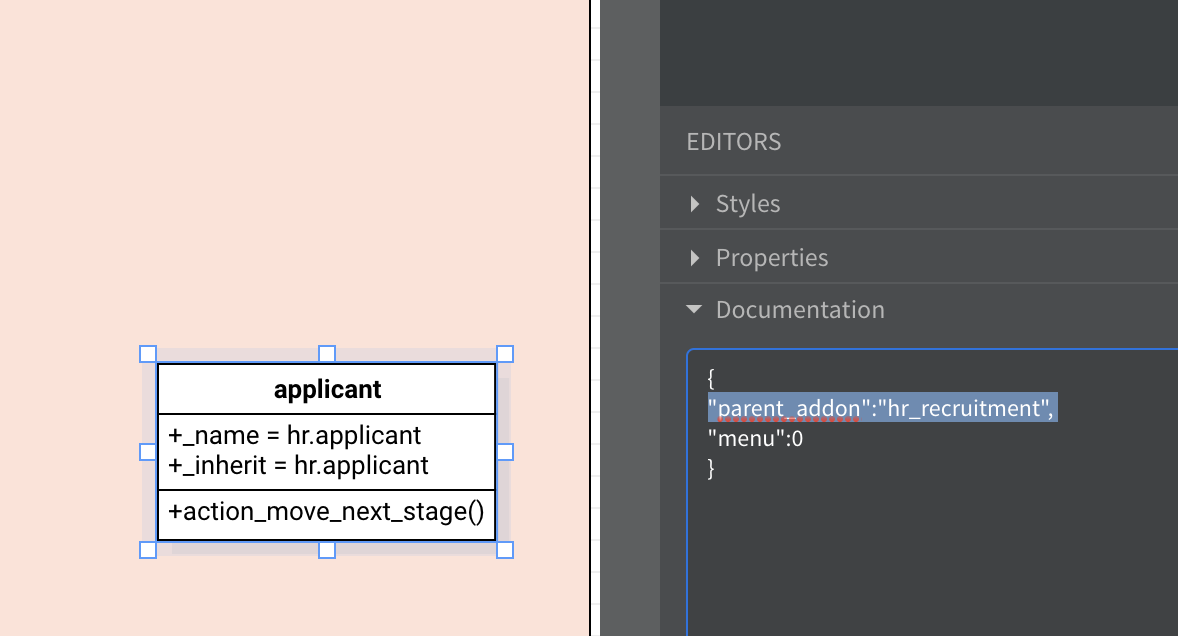
To create action server menu context: add "show:action_server":true on a method.
The class must have "parent_addon" at the class level, for example for class hr.applicant, the parent addon = hr_recruitment, since the model is originally located on that addon folder.
For example, on the method:
{"show:action_server":true
}
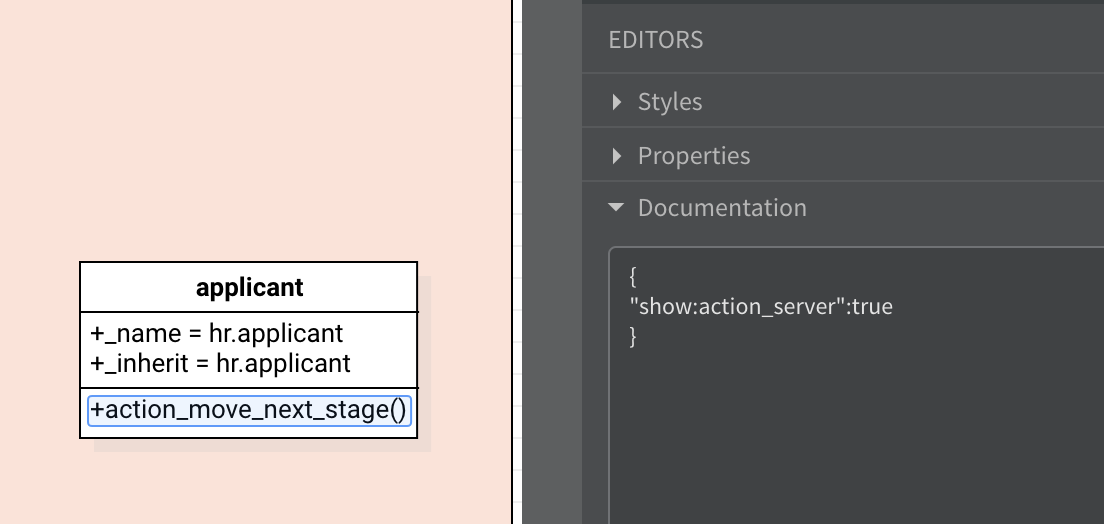
On the class:
{"parent_addon":"hr_recruitment",
"menu":0
}
This will create action server XML definition for the class, and add context menu on the tree and form.